Unitech PA962/PA963 Product Reference Guide www.unitech-adc.com Unitech America UTP Unitech Europe Unitech Greater China Unitech Japan unitech is a member of Oracle Embedded Software Licensing Program P/N 400424 REV.
Chapter 1. Introduction ............................................................................ 4 Unitech PA962 & Accessories ......................................................................................... 6 Tour of the Unitech PA962 ............................................................................................... 7 PA962 Front and Left Side .............................................................................................. 7 PA962 Back .............................
Checking Main and Backup Battery Status .................................................................... 20 How to Save Battery Power ........................................................................................... 21 Warm Boot / Cold Boot ................................................................................................. 22 Charging Considerations ............................................................................................... 23 Storage and Safety Precautions ..
Chapter 1. Introduction Thank you for purchasing PA962. PA962 is a rugged, compact and lightweight palm-size computer. It utilizes the Windows CE6 operating system, and incorporates an integral bar code scanning laser device, color LCD with touch screen, keypad, IrDA interface, and wireless communication capability. It provides the user with a standard Windows-based environment for customizing and operating the device. This PA962 product reference guide will guide you to access your PA962.
NOTICE This unit is equipped with a battery pack and backup battery. It is possible that the Unitech PA962 may not powered on due to battery discharge as a result of storage. In the above situation, plug the PA962 to the RS232 or USB cable with DC in port or put the unit into the Unitech PA960/PA962 Cradle (with 12V/2A AC-DC adapter), and recharge the unit for 16 hours in order to fully charge its backup battery.
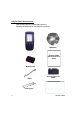
Unitech PA962 & Accessories After opening the box, please make sure the following accessories for the PA962 are present: PA962 CD PA962 Main Body Unitech PA962 Quick Reference Guide Battery pack Stylus Pulling-tags 6 CF slot drawer for PA962 RF Card Cushion Unitech PA962
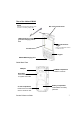
Tour of the Unitech PA962 Stylus This stylus is designed for tapping screen and also for accessing battery door Bar Code Laser Scanner LED Indicator for scanning good and charging indication Right Side Scanner Trigger Touch Screen Press it to enable laser scanner to read bar code. Keypad RS232/USB/Charging Port PA962 Back View IrDA port PCMCIA compartment Install PC card here. Reset Hole Push enclosed button for system warm-start CF slot compartment Please remove the battery door to access CF slot.
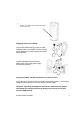
First Steps with the Unitech PA962 There are three ways to provide power to the PA962: Rechargeable Lithium-Ion battery pack RS232/Charging cable or USB/Charging cable Docking Station NOTE: Data you entered may not be properly stored until the built-in backup battery has been adequately charged. Please remember to turn on the backup battery before you charge the terminal. Installing the Battery Pack 1. Remove the battery compartment door (located on the lower back side of the unit). 2.
3. Position the battery pack and install the battery compartment door. Supplying Power to the PA962 Connect the RS232/Charging Cable or USB/ Charging Cable to the PA962, and then connect the AC adapter to the cable’s power jack and an electrical outlet. Or place the PA962 into the Docking Station (first connect the power supply to the Docking Station). Charging the Main and Backup Batteries for the First Time It may take up to 16 hours to fully charge the empty backup battery.
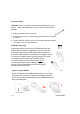
Using the Stylus CAUTION: Never use anything other than the PA962's stylus on the screen. Using object other than a stylus could cause permanent damage. 1. Hold the stylus as you hold a pencil. 2. To make a choice from a menu, lightly tap the tip of the stylus on that choice. 3. To write data into a field on a form, use the stylus to print the letters or numbers. Use very light pressure. PCMCIA Pulling Tags Pulling Tags simplify the removal of PCMCIA cards from the PA962.
Protective Screen Film The PA962 screen ships with a protective plastic film. You may remove this if desired by peeling from one corner. The screen will be more susceptible to scratching without the film, but will be more readable. First Operation of the Unitech PA962 Pressing the ON/OFF Key The Unitech PA962 welcome screen appears. The Windows CE® screen will appear shortly. Adjusting Screen Brightness Press [FUNC] key and Cursor key to decrease or increase screen brightness.
Setting the Time Zone first Follow the steps below to set up your time zone. 1. 2. 3. 4. Tap the location arrow to see a list of cities. Choose your location (or nearest listed one). Select the Daylight Savings Time check box, if necessary. Tap the APPLY button. Setting Year and Month Tap the Left or Right arrows to scroll the month. Tap here to directly change year setting Tap here to popup list of months Or directly tap location of year or month to change the year or month setting.
Flash Memory Flash Memory is a re-writable location for programs and data files. The benefit of this feature is that files and programs saved in Flash Memory are unaffected by the PA962's power status. To access the contents of Flash Memory, simply select :My Computer on the desktop and then select :Flash Storage.. The programs and data files currently stored in Flash Memory will be displayed. To save to Flash Storage, select File, Save To, and select Flash Storage .
Chapter 2. Using the Keypad and Scanner Keypad The PA962 series keypad contains 19 keys, including Cursor key, 0~9, Alpha key, ON/OFF, Function, Escape, Backspace, and Enter key. Please refer to the picture below. Cursor Backspace Power On/Off TAB Function Alpha ON/OFF When the unit is off, pressing the On/OFF key will turn the unit on. Alternatively, when the unit is on, this key must be pressed and held down for about two seconds in order to turn the unit off.
Alpha Key When the PA962 boots, the default condition is Numeric Mode on. When you toggle to Aphal Mode, the default condition is CAPS mode off. Alpha Mode Press alpha to alpha mode, the default condition is CAPS off. CAPS Press Apaha key twice to toggle CAPS Useful hotkeys The PA962 provides eight combination hot keys to activate specified screen setting functions or programs.
Software Keyboard (Windows CE Keyboard) Since the PA962’s keypad allows input of numeric characters only, the Windows CE Software provides a touch screen keyboard for input of other characters. The Windows based keyboard replicates the layout of a standard PC keyboard. Opening the Windows CE Keyboard: The Windows CE keyboard can be opened by tapping the “keyboard” icon on the task bar. (Refer to picture).
Using the Laser Scanner Note: Reading software must be enabled in order to operate the scanner. This can be a user-loaded application or a pre-loaded utility such as Scanner Setting. exe. Laser Scanner The PA962 has an integrated laser scanner, which reads all major bar code labels with excellent performance. Left side trigger Trigger keys are located on the left and right sides of the unit. Press either one to activate the laser scanner. The PA962 also has a built-in Scanner Setting.
Chapter 3. Power system Charging the Lithium-Ion Battery Pack The optional Docking Station is a convenient accessory for daily use of the PA962. The charging will be completed within 3 hours. Or, when using the included Charging/RS232 Cable or Charging / USB cable the charging time of the battery pack is about 3 hours. Charging the Main and Backup Battery for the First Time Note: Before using the PA962 for the first time, charge the unit for 16 hours to fully charge the empty backup battery.
Power Status Indication Four different icons are displayed on the status bar to indicate the on-board power status. “Plug” icon: When displayed, this icon indicates that the battery is charging. The PA962 is either plugged-in via the DC 12V/2A power adapter or in the docking station. “Battery Low” icon: When displayed, indicates the battery is low and needs to be charged. In other words, there is no external power supply, the battery charge is low or very low, and charging the PA962 is recommended.
Checking Main and Backup Battery Status Enter “Power Properties”: If the above mentioned “Plug” icon or “Battery” icon is displayed, double tap this icon to bring up the “Power Properties” screen. Or, select Settings/Control Panel from the Start menu and then double tap the “Power” icon to display “Power Properties”. Check Battery Status: The battery menu item will show the status of the main and backup batteries. There are 3 kinds of status indicators — “Good”, “Low” and “Very Low”.
How to Save Battery Power Automatic shut-down of the PA962 The PA962 will enter idle mode when there is no task, or all tasks are waiting for input. In default setting, the PA962 will automatically turn itself off if it remains idle for 3 minutes and when there is no external charging power applied. Pressing the power button will return the PA962 to the same point at the time of automatic shutdown. In Power Properties, select “Power Off”.
Automatically turn off the backlight when using battery power: Tap the check box to toggle this function. Available idle times are: 15 and 30 seconds, and 1, 2, and 5 minutes. Automatically turn off the backlight when using external power: Tap the check box to toggle this function. Available idle times are: 15 and 30 seconds, and 1, 2, 5, 10, 15, and 30 minutes. Automatically turn on the backlight when key This function is only activated by the PA962’s keypad rather than the Windows CE keyboard.
Charging Considerations It is important to consider the environment temperature whenever you are charging the Lithium-Ion battery pack. The process is most efficient at normal room temperature or slightly cooler. It is essential that you charge batteries within the stated range of -5°C to 50°C. Charging batteries outside of the specified range could damage the batteries and shorten their charging life cycle.
Chapter 4. Communication Introduction The Unitech PA962 allows users to link to a host computer via RS-232,USB, IrDA, or RF connection for data communication. This chapter provides an overview of the communication of the PA962. The following subchapters cover these topics: ”Microsoft ActiveSync” for details about serial communication via RS232/ USB port. “RF Communication” for details about wireless communication between mobile PA962 and host computers.
ActiveSync In order to exchange data between your desktop computer and the PA962, Microsoft ActiveSync must be installed on your desktop computer. With Microsoft ActiveSync you can: Transfer data. Back up and restore PA962 data. Add programs to and remove programs from the PA962. This chapter will introduce Microsoft ActiveSync version 4.2. ActiveSync provides a user-friendly interface and it can be downloaded free of charge from Microsoft’s Web site.
Download the ActiveSync software from the Microsoft web site at: http://www.microsoft.com/ windowsmobile/downloads/ activesync42.mspx The installation wizard begins. Click Next. You are prompt to read the End User Licensing Agreement(EULA). 26 Accept the license agreement terms and click Next.You are prompted for user information.
Type the user's name and organization and click "Next". You are prompted for destination folder. 6 Select a drive to install the program and click Next.The installation wizard has gathered the information it needs to install Activesync and prompts you to begin the installation. Click Install. The program begins the Installation.
After the program finished Different PA962 has cannot share the installing you will see ifthe following same Device Name more than screen. one terminal is to be connected to the same PC via a “Partnership”. The default Device Name assigned to the PA962 is “WinCE”. It is important to specify a different name for each terminal if more than one terminal is to be connected to the same PC. When ActiveSync displays the following screen, assign each terminal its own unique name. Click Finish.
5. Follow the onscreen instruction. Using the Mobile Devices Window 6. When the configuration process is complete, the Activesync window will Start Microsoft ActiveSync by clicking appears. the Microsoft ActiveSync shortcut on your desktop and then clicking the “Explore” icon. 7. Synchronization will be initialized and will take place if you have chosen to synchronize In the displayed window, you can: periodically or upon connection. Note: Your computer can create a partnership with multiple PA962s.
Synchronizing with your computer Changing Communications Settings Synchronization takes place thePA962 optionsduring you choose while setting If Microsoft ActiveSync failsaccording to detecttothe installation, set up commuupActivesync on your computer. If you accept the default (On Connect) synchronization nications manually instead.
Infrared Connection If you want to change the terminal’s default baud rate or use IrDA to port communicate the Host PC, follow the The infrared allows you with to synchronize steps below to an adjust it: enabled computer. Align information with infrared the infrared port of your device with the infrared port 1. Tapcomputer. Start, Settings, Control Panel, Communicaon the This method is ideal for quickly tions switching between multiple devices there are no cables 2. Tap since the PC Connection tab.
2. Perform the steps youraccording device: Synchronization willbelow take on place a. the you’ve IR port chosen. of your PA962 with the IR to Align options To initiate port on your computer so thatclick they Tools, are synchronization manually, and unblocked and within close range. then Synchronize Now. b. Initiate connection by tapping Start > Settings > Control Panel > PC Connection. c. Select Enable direct connections to the Synchronization may take a few minutes, desktop computer this checkneeds box.
Using ActiveSync to Exchange Files You can useSynchronization activesync to exchange information from your device to your computer Changing Options and vice versa. changes you made to the information on one location will not affect the information on options the othercan one. Synchronization beif you want to automatically update information on both your device and computer, synchronize the information instead.
Windows Explorer opens the Mobile Device window for your device. Application Manager detects the software that is available but not yet installed on the PA962. System software and programs added to the PA960 at the factory are stored in FlashROM. You cannot remove or modify this software, and you’ll never accidentally lose FlashROM contents. Software programs and data files added to your PA962 after factory installation can be stored in RAM or Flash Memory. InBox Following is an overview of InBox.
Note: If you’re setting up an Internet mail account with an ISP (Internet Service Provider), the ISP must use a POP3 mail server and an SMTP mail gateway. For dial-up connections, you’ll require an internal PCMCIA type modem card or external modem for the PA962. You’ll also need to set up the remote connection on the PA962 using the Connections program. For wireless connections, you’ll require a RF card for the PA962. You’ll also need to set up the remote connection on the PA962 via the Network setting.
You can also work offline. Once you’ve downloaded new message headers or partial messages, you can disconnect from the server and then decide which message to download completely. The next time you connect, InBox automatically downloads the complete messages you’ve marked for retrieval and sends the messages you’ve composed. Receiving Messages Messages received by synchronizing with your desktop computer and through remote connections appear together in your InBox. Double-tap a message to read it.
Sending Messages To compose a new message, tap the New Message button on the command bar. Enter an e-mail address in the To field or select a name from the Address Book. All e-mail addresses entered in the e-mail fields in Contacts appear in the Address Book. To send your message, tap File and Send.
Setting the RF Communication Installing the Wireless Local Area Network (WLAN) Card 1. Double tap Summit Client Utility. Power off the PA962. Remove the stylus, using the screw driver in the stylus to remove the screw, and then open the PCMCIA compartment. Attach the snap-on antenna to the RF card if required (only the Cisco card comes with a pre-installed antenna). Attach pulling-tag to antenna. Insert the RF card into the PCMCIA slot. PCMCIA card front side 2.
3. Warm Start terminal. Obtaining an IPthe Address viaOnce DHCP Server the terminal is warm started, the RF card is check detected. You MIS will see the Please with your department to determine whether a DHCP server is RF setting window up. Tap If available, tap the radio button Obtain an IP available in your LANpop environment. “Add New”. address via DHCP, and then tap the OK button.
Chapter 5. Useful Application Program Scan2Key The Scan2Key application can route input from a scanner port to keypad buffer, so that all input from scanner will be treated as they are just input from keypad. With this router, scanned data can be directly input into scanner port aware application, like MS Pocket Word.
Barcode Symbologies: Set customization symbologies for each symbology including: Enable Disable Send Check Digit Max.
Appendix A Technical Specifications CPU/Memory CPU Intel X-Scale 400MHz 32 CPU. Built-in real-time clock.
Laser Typical Depth of Field N ear Far 5 m il 2 . 0 in . ( 5 .1 c m ) 7 .5 m il 1 .7 i n . ( 4 .3 c m ) 8 . 0 i n . ( 2 0 .3 c m ) 1 0 m il 1 .8 i n . ( 4 .6 c m ) 1 0 in . ( 2 5 .4 c m ) 1 .9 i n . ( 4 .8 c m ) 1 3 in . ( 3 3 c m ) 100% U PC 5 . 2 i n . ( 1 3 .2 c m ) 2 0 m il * 2 0 in . ( 5 0 . 8 c m ) 4 0 m il * 2 5 in . ( 6 3 . 5 c m ) 5 5 m il * 3 0 in . ( 7 6 .
Power Power Options Lithium-Ion @7.4V, 1850mAH Main Battery Pack (Battery pack can be recharged 500 cycles or more) External AC/DC adapter @12VDC/2A with regulator Power Consumption Lithium-Ion battery: At 8V, room temperature. Standby mode: 45mA for sytem only without backlight. Suspend mode: 2mA for system only Battery Charge 3 hours with external AC/DC adapter 3 hours with docking station Backup Battery 1 rechargeable 3.
Mechanical and Environmental Dimensions Length: 7.28” (18.5cm) Width: 3.49” (8.76cm) Depth: 1.70” (4.33cm) Weight 15.59 oz. (442g) with battery pack IP Rating IP 54 Temperature Operation: -5°C to 50°C Storage: -20°C to 60°C Humidity 5% to 95% RH non-condensing Shock Multiple 4.0’ (1.
Appendix B Update and Upgrade OS Update OS via Compact Flash (ATA card) In order to upgrade or re-install the PA962 OS via Compact Flash, you will require the NK.bin file (available from Unitech Technical Support): Note: File name must be “NK.bin” – do not rename it. CAUTION: Users files will be erased! 1. Copy file “NK.bin” from the PC to the root directory of the Compact Flash card. Insert CompactFlash chip into PC Card Adapter 2. Insert the Compact Flash Card into the PA962. 3.
7. Press the ‘2’ key to select “OS Image Update”. FlashRom’s content will be erased and the new OS will be written to FlashRom. Then you will see the system will automaticlly run the following steps.: (1). Image goint to Flash (2). Erasing Flash (3). New programming Flash After the OS is successfully updated, the PA962 will automatically cold-start with the new OS.
Appendix C Troubleshooting Guide Problem Solution Battery needs recharging or replacement. Terminal does not power on. Ensure that battery is installed correctly. Adjust " Power Properties" Terminal shuts itself down. Battery needs recharging. Adjust " Power Properties" - especially if peripherals are used. Adjust backlight of LCD or Keypad. Battery life is short Replace battery pack if old(battery can be recharged approximately 500 cylces.) "Low Backup Battery" message Charge terminal for 16 hours.
FCC Statement This is a FCC Part 15 Class B product. In a domestic environment this product may cause radio interference, in which case the user may be required to take adequate measures. Canadian Compliance Statement This Class B Digital apparatus meets all requirements of the Canadian Interferance-Causing Equipment Regulations. Cet appareil numerique de la classe B respecte les exigences du Reglement sur le material broilleur du Canada. The device is certified to the requirements of RSS-139-1 for 2.
Federal Communication Commission Interference Statement This equipment has been tested and found to comply with the limits for a Class B digital device, pursuant to Part 15 of the FCC Rules. These limits are designed to provide reasonable protection against harmful interference in a residential installation. This equipment generates, uses and can radiate radio frequency energy and, if not installed and used in accordance with the instructions, may cause harmful interference to radio communications.