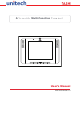
A Versatile Multi-Function Terminal F1 F2 F3 F4 F5 F6 User’s Manual 400701G Version 1.
Preface About This Manual This manual explains how to install, operate and maintain the MT680-AMWTAG Versatile Multi-Function Terminal. No part of this publication may be reproduced or used in any form, or by any electrical or mechanical means, without permission in writing from the manufacturer, which includes photocopying, recording, or information storage and retrieval systems. The material in this manual is subject to change without notice. © Copyright 2009 Unitech Electronics Co., Ltd.
Canadian Compliance Statement This Class A Digital apparatus meets all requirements of the Canadian Interference-Causing Equipment Regulations. Cet appareil numérique de la classe A respecte les exigences du Règlement sur le matériel broilleur du Canada. European Conformity Statement Declaration of Conformity with Regard to the R&TTE 1999/5/EC and EMC 89/336/ EEC directives.
About This Manual Battery Notices The MT680-AMWTAG is equipped with a Lithium-Ion battery. But, after extended storage periods, the MT680-AMWTAG may not start without an external power source due to battery discharge. In this case, connect the MT680-AMWTAG to the power cable and recharge the MT680-AMWTAG for about 12 hours to charge the battery to full capacity.
iv
Table of Contents Preface About This Manual .................................................................................... i Regulatory Compliance Statements .................................................................... i FCC Warning Statement ................................................................................. i Canadian Compliance Statement................................................................... ii European Conformity Statement .........................................
Serial Cable .................................................................................................. 14 Ethernet Cable ............................................................................................. 14 Using Mircosoft ActiveSync .............................................................................. 15 Additional Capabilities.............................................................................. 15 Requirements ..........................................................
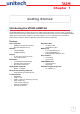
Chapter 1 Getting Started Introducing the MT680-AMWTAG The MT680-AMWTAG is a versatile fixed-mount TASHI (Time & Attendance, Access Control, Surveillance, Home Automation and Intercom) Controller. This multi-functional device offers a built-in 2.0-Megapixel CMOS digital camera, RFID reader, microphone and audio speaker. It runs on a Windows CE 5.0 operating system which provides a variety of applications that benefit numerous industries.
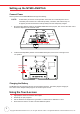
Setting up the MT680-AMWTAG Connect Power Connect power to the MT680-AMWTAG through the following: NOTE: 1. A UPS battery is used for normal operation when there is no external power source. The battery also functions as a data backup battery. Therefore, data entered may not be properly stored until the built-in backup battery has been adequately charged. Plug the Power Adapter Cable into the MT680-AMWTAG’s DC input jack, then connect the other end of the Power Adapter into an electrical outlet.
Chapter 1 Getting Started Using the MT680-AMWTAG for the First Time Once the MT680-AMWTAG has been charged for at least 12 hours, it is time to start up, calibrate the display, select the time zone, and enter the date and time. Powering On the MT680-AMWTAG The MT680-AMWTAG automatically powers on when the Power Adapter Cable plugs into an external power source. The MT680-AMWTAG welcome screen appears, followed by the Windows CE screen.
Chapter 2 Using the Hardware Using the Function Keys The MT680-AMWTAG contains six function keys. Function Keys F1 F2 F3 F4 F5 F6 Function Key Descriptions Key 4 Main Function F1 Function Key F2 Function Key F3 Function Key F4 Function Key F5 Function Key, or ESC performs the same function as tapping the touch screen. F6 Function Key, or ENTER moves the cursor to the next line or executes a command.
Chapter 2 Using the Hardware Using the Windows CE 5.0 Keyboard The Windows CE Software provides a touch-screen keyboard for alphanumeric input. The Windowsbased keyboard replicates the layout of a standard PC keyboard. Open the Windows CE keyboard by tapping → LargeKB. Keyboard Icon Entering Characters Entering alphabetic and numeric characters on the MT680 is the same as character input on a standard PC keyboard. Tap the onscreen button corresponding to the desired character.
Using the RFID Reader The MT680-AMWTAG features a standard RFID reader, which is compatible with 13.56MHz MiFare cards. Bring an RFID Card Near Here for Reading F1 F2 F3 F4 F5 F6 Testing RFID Card Verification The MT680-AMWTAG has built-in demo programs that allow RFID card verifications. 6 1. Double-tap the My Device icon on the Windows CE desktop. 2. Double-tap Windows. Copyright 2009 Unitech Electronics Co., Ltd. All rights reserved.
Chapter 2 Using the Hardware 3. Double-tap PDA_10 to open the demo program. 4. Set the COM Port: field at 2. Tap Connect. 5. Choose a card type to activate the demo test program. 6. Tap Auto and bring the RFID card close to the sensor. The code will display on the field below. 7. Tap Stop to end the reading.
Using the Camera The MT680-AMWTAG has a built-in 2.0-Megapixel camera that provides the following: • • • • Capture still images. Serve as video recorder. Function as an audio/video intercom. Incorporates facial recognition through third party software. Testing the Imager Test the camera’s efficiency with the MT680’s built-in CameraDemo program through the following: 8 1. Double-tap My Device on the Windows CE desktop. 2. Double-tap Windows. 3. Double-tap CameraDemo to open the demo program.
Chapter 2 Using the Hardware 4. Tap Preview → Start. A continuous image is displayed for capturing a(n) image/audio/video. 5. 6. Tap Capture, to photograph an image. To view the image, tap Preview → Stop. And, tap Playback → Show Image. Double-tap the image file name from the My Device folder. To exit the image, tap Playback → End Show Image. Exit the CameraDemo window by tapping X, or Preview → Exit. 7. 8.
Using the Audio Input/Output An audio demo program will test the audio input (recording) and output (playback). 1. Double tap My Device on the Windows CE desktop. 2. Double-tap Windows. 3. Double-tap wavtest to open the demo program. 4. Do one of the following: – Tap Rec to record the voice. – Tap Stop to finish recording. – Tap Play to listen to the recording. 10 Copyright 2009 Unitech Electronics Co., Ltd. All rights reserved. Unitech is a registered trademark of Unitech Electronics Co., Ltd.
Chapter 2 Using the Hardware Skipping the Calibration Routine The FlashConfigUtility program can bypass the screen, and date and time calibration routines when the MT680 cold starts. Skip the calibration process through the following: 1. Double tap My Device on the Windows CE desktop. 2. Double-tap Windows. 3. Double-tap FlashConfigUtility to open the FlashConfigUtility window.
4. To skip the screen calibration, tap Add Entry to create a new setting in the Flash Storage. 5. In the Name of Entry: field, input skipCalibration. In the Type: field, input bool. In the Set to Value: field, input 1. Tap OK. The message Success, Key Added appears, indicating a successful entry. NOTE: 12 The name is case-sensitive. 6. Tap View Key to view this setting. The read in screen appears with the message skipCalibration:bool:1. Tap OK. 7.
Chapter 2 Using the Hardware 8. In the Name of Entry: field, input skipClock. In the Type: field, input bool. In the Set to Value: field, input 1. Tap OK. The message Success, Key Added appears, indicating a successful entry. NOTE: 9. The name is case-sensitive. Tap View Key to view this setting. The read in screen appears with the message skipClock:bool:1. Tap OK. 10. Tap to exit the FlashConfigUtility. 11. Tap Start → Programs → Utilities → BootMode. The Boot window appears. 12.
Chapter 3 Data Communication The MT680-AMWTAG can link to a host computer for data communication via USB, RS232/485 or Ethernet cables. RS232/485 Switch USB Port (Client) USB Port (Host) Ethernet Port RS232/485 Port Establishing the USB Connection Connect a USB cable to the MT680-AMWTAG’s USB host port, and connect the other end to a USB peripheral, such as a: Keyboard, mouse, memory card or HID compliant device.
Chapter 3 Data Communication Using Mircosoft ActiveSync Using Microsoft ActiveSync to synchronize and transfer information between any desktop computer and the MT680-AMWTAG. Additional Capabilities Microsoft ActiveSync can: • • • • Backup and restore data. Copy files (rather than synchronize) between the MT680-AMWTAG and a desktop computer. Control synchronization. Select the type and amount of synchronized data.
4. Follow the onscreen instructions. The Microsoft ActiveSync window appears, when the configuration process is complete. Synchronization will initiate periodically, or upon connection. NOTE: 16 The computer can create a connection with multiple MT680-AMWTAG devices. In addition, an MT680-AMWTAG can create a connection with up to two computers. 5. To ensure the correction, on the MT680-AMWTAG, tap Start → Settings → Control Panel → double-tap PC Connection. 6.
Chapter 3 Data Communication Establishing a Wi-Fi Connection The MT680-AMWTAG supports wireless communication with a built-in Wi-Fi card for 802.11b/g WLAN. It is possible to use the Summit Client Utility to setup or modify the Wi-Fi settings through the following: NOTE: 1. Wi-Fi access requires a separate service contract through a wireless service provider. Contact a wireless service provider for more information. Double-tap the SUMMIT icon on the task bar, or tap Start → Programs → Summit → scu.
6. The scu window appears, asking to create a new profile. Tap Yes. 7. Enter the network key in the WEP Key Entry window. Tap OK. 8. Tap Commit to activate the setting. 9. In the Main tab, scroll down the Active Profile drop down menu to select UTE. The network automatically connects. The radio information containing the active profile, radio status, client attributes, AP attributes, connection channel number, data rate, transmitted power, signal strength and etc., will display in the Status tab. 10.
Chapter 3 Data Communication Set Up an IP Address The MT680-AMWTAG automatically detects WLAN module(FCC ID: TWG-SDCCF10G) during the first installation. Set the IP address through one of the following methods: • • Obtaining an IP Address via Dynamic Host Configuration Protocol (DHCP) Server. Specifying an IP Address. Obtaining an IP Address via DHCP Server Make sure a DHCP server is available in the LAN environment before trying to obtain the IP address through a DHCP server. 1.
Specifying an IP Address If no DHCP server is available, assign an IP address to each MT680-AMWTAG through the following: 1. Tap Start → Settings → Network and Dial-up Connections. NOTE: 2. Double-tap DM9ISA1. 3. Tap the radio button next to Specify an IP address. Input the proper IP address, Subnet Mask and Default Gateway. 4. In the Name Servers tab, input the proper Primary DNS:, Secondary DNS:, Primary WINS: and Secondary WINS:. Tap OK.
Chapter 4 Power System Charging the Battery for the First Time The MT680-AMWTAG is equipped with a Lithium-Ion battery. The MT680-AMWTAG may not power on after long storage periods without an external power adapter, due to battery discharge. In this case, connect the MT680-AMWTAG to the power adapter and recharge the device for about 12 hours.
Extending Battery Life Extend the MT680-AMWTAG’s battery life through the following: • • • Change the automatic power settings. Reduce the CPU speed. Minimize the backlight. Changing the Automatic Power Settings The MT680-AMWTAG enters an idle mode when there is no task, or all tasks are waiting for input. In the default setting, the MT680-AMWTAG enters User Idle mode when there is no data input for one minute. The MT680AMWTAG remains idle for three minutes when there is no external power source.
Chapter 4 Power System Adjusting the Backlight Conserve the MT680-AMWTAG’s battery power by adjusting the backlight screen settings through the following: NOTE: The MT680-AMWTAG screen contrast has been preset by Unitech for optimum performance. 1. Tap Start → Settings → Control Panel → double-tap Backlight to adjust the screen brightness. 2. The color display’s backlight can be customized for the Battery Power and External Power conditions.
Performing a Hardware Reset Perform a reset if the MT680-AMWTAG freezes (i.e., the device no longer responds to pressing buttons on/or the touch-screen). Performing a Warm Start A Warm Start is used to reset or reboot the device without losing data stored in RAM memory. Perform a Warm Start in any of the following situations: • • • The MT680-AMWTAG fails to respond. After installing software applications. After making changes to certain system settings (i.e. SD card).
Chapter 4 Power System Performing a Cold Start A Cold Start will erase all added data and programs, but it will restore the device to the default factory settings. However, data and application programs stored in the Flash Storage will not be deleted. Always perform a Warm Start before attempting to use a Cold Start to correct a problem. Data previously synchronized to the computer can be restored during a future Microsoft ActiveSync operation, or data can be restored from a backup storage card.
Appendix A System Specification Processing/Memory CPU Memory OS Keypad Display Microsoft Windows CE 5.0 6 Function Keys 8” VGA (640 x 480) Pixels Backlight Touch-screen, TFT-LCD One RJ45 with POE (DC12V/1A, IEEE802.3af Compliant) RS232 Support (Optional RJ45 to D-Sub 9pin cable) RS485 Support (Optional RS485+, RS485-) baud rate at 38400 bps or lower *RS232/RS485 (Single Port - use S2 switch to select connection type) USB v1.1 Host USB v1.
Appendix B Worldwide Support Unitech’s professional support team is available to quickly answer questions or technical-related issues. Should an equipment problem occur, please contact the nearest Unitech regional service representative. For complete contact information please visit the Web sites listed below: Region Web Site Global Operation Center www.unitech-adc.com Unitech Asia Pacific & Middle East www.unitech-utp.com.tw Greater China Division www.unitech-sbd.com Unitech Japan www.