
User's Manual


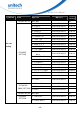

Table Of Contents
- About This Manual
- Regulatory Compliance Statements
- Laser Information
- LED Information
- Battery Notice
- Adapter Notice
- Hearing Damage Warning
- Worldwide Support
- North America
- Please scan QR Code to visit us :
- Warranty Policy
- 1.1 Package
- 1.2 Scanner Detail
- 1.3 Specifications
- 1.4 Getting Started
- 1.5 Battery Charging
- 1.6 LED Indicator / Beeper Sequence
- 1.7 Display Menu Tree
- 2.1 NFC Pairing with Mobile Devices
- 2.2 BT HID
- 2.3 BT SPP
- 2.4 BT SPP (Slave)
- 2.5 USB SPP
- 3.1 All symbologies
- 3.2 Message Length Description
- 3.3 1D
- 3.3.1 Codabar
- 3.3.2 Code 39
- 3.3.3 Interleaved 2 of 5
- 3.3.4 Code 93
- 3.3.5 Standard 2 of 5 Industrial (three-bar start/stop)
- 3.3.6 Standard 2 of 5 IATA (two-bar start/stop)
- 3.3.7 Matrix 2 of 5
- 3.3.8 Code 11
- 3.3.9 Code 128
- 3.3.10 UPC-A
- 3.3.11 UPC-E0
- 3.3.12 UPC-E1
- 3.3.13 EAN/JAN-13
- 3.3.14 EAN/JAN-8
- 3.3.15 MSI
- 3.3.16 GS1 DataBar Omnidirectional
- 3.3.17 GS1 DataBar Limited
- 3.3.18 GS1 DataBar Expanded
- 3.3.19 PDF 417
- 3.3.20 QR Code
- 3.3.21 Data Matrix
- 3.3.22 MaxiCode
- 3.3.23 Chinese Sensible (Han Xin) Code
- 3.4 2D
- 4.1 System setting
- 4.2 BT pairing
- 4.3 Output data transmit
- 4.4 BT Config
- 4.5 Beep & Vibration
- 4.6 Scan mode / Parameter Selection
- 4.7 Prefix/Suffix selections
- 4.8 Data formatting
- 4.9 Data Validation
- 4.10 Lookup Table Function
- 4.11 Manually set up

- 9 -
MS926 User’s Manual
1.7 Display Menu Tree
To enter main menu of MS926, press and hold Page Down button and then
press Page Up button. You will see the following screen on the MS926 display.
Now you can use Page Up/Down button to scroll through the menu and use
Scan button to make your selection.
The Display Menu Tree below is based on Auto Mode.
Top
Me nu
Sub Me nu
Level 1
Sub Me nu Level
2 / Opt ions/ Re su lt
Opt ions/ Re sult
Default
Set t ing
1.1 BT HI D
1.2 USB SPP
1.3 BT SPP
1. Scanner Type
1.4 BT SPP ( Slave)
n/ a
BT HID
2.1 Wedge Mode
2.2 Batch Mode
2. Operation
Mode
2.3 Aut o Mode
n/ a
Aut o Mode
3.1 View Dat e/ Tim e Show Dat e/ Tim e
3.2 Set Dat e/ Tim e Set Dat e/ Tim e
2014- 01- 01
08: 00: 00
3.3.1 Auto
3.3 Tim e Display
3.3.2 Always
Auto
3. Date/Time
3.4 Exit
n/ a
4.1 Power Saving
Disable/ 30/ 20/ 15
/ 10/ 5 Sec.
15 Sec.
4.2 Aut o Power Off
Disable/ 30/ 20/ 15
/ 10/ 5/ 3/ 1 Min.
General
Setting
4. Power
Manager
4.3 Exit n/ a
15 Min.