
User's Manual
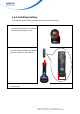
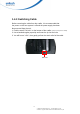
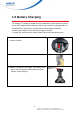
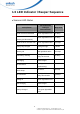
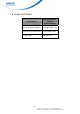
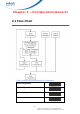
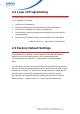
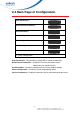
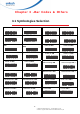
Table Of Contents
- About This Manual
- Regulatory Compliance Statements
- Laser Information
- LED Information
- Battery Notice
- Adapter Notice
- Hearing Damage Warning
- Worldwide Support
- North America
- Warranty Policy
- 1.1 Package
- 1.2 Scanner & Cradle Detail
- 1.3 Specifications
- 1.4 Getting Started
- 1.5 Battery Charging
- 1.6 LED Indicator / Beeper Sequence
- 2.1 Flow Chart
- 2.2 Loop of Programming
- 2.3 Factory Default Settings
- 2.4 Main Page of Configuration
- 3.1 SymboIogies Selection
- 3.2 UPC/EAN/JAN Parameters
- 3.3 Code 39 Parameters
- 3.4 Code 128 Parameters
- 3.5 Interleave 25 Parameters
- 3.6 Industrial 25 Parameters
- 3.7 Matrix 25 Parameters
- 3.8 CODABAR/NW7 Parameters
- 3.9 Code 93 Parameters
- 3.10 Code 11 Parameters
- 3.11 MSI/PLESSEY Code Parameters
- 3.12 Code 2 of 6 Parameters
- 3.13 LCD25 Parameters
- 3.14 Telepen Parameters
- 3.15 GS1 Databar
- 3.16 Bar Code ID
- 4.1 Interface & Reading Mode Selection
- 4.2 Communication Parameters
- 4.3 Language Selection
- 4.4 Reading Level
- 4.5 Accuracy
- 4.6 Buzzer Beep Tone
- 4.7 Sensitivity of Continuous Reading Mode
- 4.8 Reverse Output Characters
- 4.9 Setup Deletion
- 4.10 Setup Insertion
- 4.11 PAN Configuration

8
© 2016 unitech Electronics Co., Ltd. All rights reserved.
unitech is a registered trademark of unitech Electronics Co.,Ltd
1.4.2 Installing battery
To install the scanner battery, please follow the instructions below.
1. Use screwdriver to loosen the
screw on the bottom of the scanner
and remove the battery cover.
2. Slide and position the battery, make
sure the battery contacts are aligned
with the contacts in the scanner.
3. Replace the battery cover and use the screwdriver to tighten the screw on the bottom
of the scanner.
+
-