
User Manual


WASH SELECT II TO WASHPAY
Document Number: WS21046 5
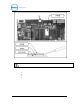
Figure 3. Locating an d Removing the E PROM
Caution:
Take care not to damage any pins when removing or inst alling chips.
2. Insert the new EPROM into the socket on the board. Chip pins may need to
be adjusted to fit into the socket. Use the following steps to adjust th e pins:
• Lay the chip on it s side with the pin s facing away fr om you.
• Gently rock the chip away from you to bend the pins.
• Lay chip on its other side and rock it away from you.
• Repeat the above steps, alternating sides of the chip, until pins are at
approximately a 90-degree angle and line u p in the socket.
3. The notched end of the chip goes up. There is a silk-screened image on the
CPU board you can use to line up the notch corre ctly. This image is labeled
EPROM.
4. Push the EPROM chip in gently. Do not for ce it, as you may ca use damage
to the chip or the CPU board.
5. Replace the protective p lastic cover ov er the CPU board.
Document Name: WSII to WashPayIntegration Field Retrofit Installation Guide