
User Manual


WASH SELECT II TO WASHPAY
Document Number: WS21046 2
Note:
Only qualified techni cians shoul d perform the foll owing install ation procedu res.
The following reports will be required to reprogram your system: Accounting report, Fleet
Account report, Configuration report, Pass code/Pass card report and, if the Paging
option is installed, a P ager number report.
3.2 Disconnect P ow er to the Wash Select II
Before you begin the installation, it is important to first disconnect power to the Wash
Select II at the main power sour ce. Once this has b een done, it is recommended that you
verify that the power is off using a voltage meter.
Warning:
Ensure po wer is disconnected from Wa sh Select II before proce eding with the
installation. Shut th e power off at the main panel b ox or breaker box and verify
by checking to see if the unit is still powered do wn.
3.3 Installation Preparation
Prior to beginning the in stallation, make sure you have done t he following:
1. Power off the WSII.
2. Remove the Coin Hopper.
3. Remove the protective plastic CPU cover from the inside, right-hand wall of
the case. This cover is held in place by two wing nuts and two 5/16” hex
nuts.
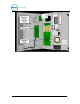
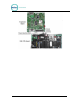
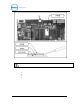
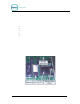
3.4 Installation Procedures
The following figure will help you locate the specif ic components in the WSII unit that you
will be installi ng in this section.
Document Name: WSII to WashPayIntegration Field Retrofit Installation Guide