Wash Select II to WashPay Integration Field Retrofit Installation Guide Wash Select II Software Version 6.00 and above POS4000 Software Version 8.25 Unitec www.StartwithUnitec.
W A S H S E L E C T I I T O W A S H P A Y WASH SELECT II TO WASHPAY INTEGRATION FIELD RETROFIT INSTALLATION GUIDE This guide provides complete instructions for installing the expansion board and programming the Wash Select II and WashPay Site Controller for integration. If further assistance is needed, please contact the distributor from which the product was purchased.
W A S H S E L E C T I I T O W A S H P A Y Table of Contents 1 Introduction.....................................................................................................................................1 2 Retrofit Installation Procedures ....................................................................................................1 2.1 3 Parts Checklist.......................................................................................................................
W A S H [ T H I S Document Number: Document Name: P A G E I N T E N T I O N A L L Y S E L E C T L E F T I I T O W A S H P A Y B L A N K ] WS21046 WSII to WashPayIntegration Field Retrofit Installation Guide iv
W A S H S E L E C T I I T O W A S H P A Y 1 Introduction This manual provides instructions for integrating the Wash Select II to the WashPay Site Management System. Perform the steps in this manual to all Wash Select II units, the POS4000, and the WashPay server.
W A S H Note: S E L E C T I I T O W A S H P A Y Only qualified technicians should perform the following installation procedures. The following reports will be required to reprogram your system: Accounting report, Fleet Account report, Configuration report, Pass code/Pass card report and, if the Paging option is installed, a Pager number report. 3.
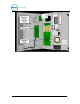
W A S H S E L E C T I I T O W A S H P A Y Figure 1. WSII Component Locations 3.4.
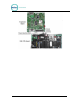
W A S H S E L E C T I I T O W A S H P A Y Figure 2. Expansion and CPU Board Layout 1. Ensure the main power to the WS2 is turned off. 2. Locate the Expansion Board mounting studs on the inside right wall. 3. Attach the included 4-40 male/female standoffs. 4. Attach the Expansion Board to the standoffs using the included white nylon plastic 4-40 nuts and washers. 5. Connect the ribbon cable from socket J5 on the Expansion Board to socket J2 on the CPU Board. 6.
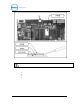
W A S H S E L E C T I I T O W A S H P A Y Figure 3. Locating and Removing the EPROM Caution: Take care not to damage any pins when removing or installing chips. 2. Insert the new EPROM into the socket on the board. Chip pins may need to be adjusted to fit into the socket. Use the following steps to adjust the pins: • Lay the chip on its side with the pins facing away from you. • Gently rock the chip away from you to bend the pins. • Lay chip on its other side and rock it away from you.
W A S H S E L E C T I I T O W A S H P A Y 3.6 Upgrade POS4000 EPROM Depending upon the version of software that is currently in the POS4000 console, this procedure may delete ALL configuration information, including all codes, fleet accounts, and accounting information. All setup configurations will be reset to factory defaults. To properly facilitate reprogramming this information, you should print the following reports BEFORE proceeding.
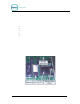
W A S H S E L E C T I I T O W A S H P A Y 5. Carefully remove the EPROM chip from the socket. Use a small flat head screw driver or an IC remover. Be careful to pry the chip from the socket and not the socket from the board. Figure 5. EPROM and Socket 6. Carefully install the new EPROM into the socket. Make sure that the Dimple on the chip is facing the same direction as it was before (refer to previous drawing). Also, make sure that pins can be properly inserted into the sockets without bending.
W A S H S E L E C T I I T O W A S H P A Y 5 System Configuration 5.1 Wash Select II The WSII software is designed for easy configuration. Perform the following procedure. 1. Power up the WSII. Figure 6. WSII CPU Reset Button 2. On the WSII, press the reset button on the CPU board. This will clear the memory. 3. Press (1) for Yes then press the (*) key to enter. 4. Set the Credit Mode to 6. This will automatically set the network parameters. 5. Scroll to Network Parameters. Press “*” to select. 6.
W A S H S E L E C T I I T O W A S H P A Y 7. The network status will be displayed: host connected: communication to the server is established network online: server connected, but no communication network down [x]: where x equals one of the following error codes: 1 No DHCP returned 2 Cannot create TCP server 3 Cannot set up UDP socket 4 Cannot find controller 5 Did not connect to TCP server 6 Did not get a device ID no response: No response from the interface (If "no response", set up will exit.
W A S H S E L E C T I I T O W A S H P A Y to implement the changes. The device profile configuration file includes a series of set-up pages, which are described in the following sections.
W A S H S E L E C T I I T O W A S H P A Y 5.3 Download Devices Once the self serve and receipt printer profiles have been configured, the device profile must be downloaded. You may choose to download each device individually or download all devices at once. The devices will reboot and come up in operational mode. 5.4 User Management Unique User IDs and passwords should be set up for employees, service personnel or others that may need access to the WashPay system.
W A S H S E L E C T I I T O W A S H P A Y 5.5 Wash Select II Notifications to the Site Controller In the event there is an error generated by the Wash Select II, the Wash Select II will send an error message to the WashPay Site Controller as well as a notification to the site owner.