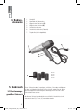
0 923 D t F I 230 V Schlagschrauber „PREMIUM” 230 V „PREMIUM” impact driver Déboulonneuse 230 V „PREMIUM“ Avvitatore a percussione „PREMIUM” da 230 V Wkrętarka udarowa 230 V„PREMIUM“ Originalbetriebsanleitung Hergestellt für: Manufactured for: Fabriqué pour: Prodotto per: Wyprodukowany dla: INTER-UNION Technohandel GmbH Klaus-von-Klitzing-Str. 2 76829 Landau · Germany www.inter-union.de & 10923_Schlagschrauber_BA_141205.indd 1 C.
D Originalbetriebsanleitung Inhalts verzeichnis 1. Sicherheitshinweise...................................................3 1.1. Allgemeine Sicherheitshinweise für Elektrowerkzeuge.................................................3 1.2. Sicherheitshinweise für Schlagschrauber............5 2. Lieferumfang.................................................................7 3. Erklärung verwendeter Symbole..............................7 4. Bedienelemente.........................................
WARNUNG Lesen Sie alle Sicherheitshinweise und Anweisungen! Versäumnisse bei der Einhaltung der Sicherheitshinweise und Anweisungen können elektrischen Schlag, Brand und/oder schwere Verletzungen verursachen! Bewahren Sie alle Sicherheitshinweise und Anweisungen für die Zukunft auf und geben Sie sie ggf. an andere Benutzer oder nachfolgende Besitzer weiter. 1. Sicherheits hinweise 1.
e) f) Sicherheit von Personen a) b) c) d) e) f) g) Wenn Sie mit einem Elektrowerkzeug im Freien arbeiten, verwenden Sie nur Verlängerungskabel, die auch für den Außenbereich geeignet sind. Die Anwendung eines für den Außenbereich geeigneten Verlängerungskabels verringert das Risiko eines elektrischen Schlages. Wenn der Betrieb des Elektrowerkzeuges in feuchter Umgebung nicht vermeidbar ist, verwenden Sie einen Fehlerstromschutz schalter.
a) b) c) d) e) f) g) h) Überlasten Sie das Gerät nicht. Verwenden Sie für Ihre Arbeit das dafür bestimmte Elektrowerkzeug. Mit dem passenden Elektrowerkzeug arbeiten Sie besser und sicherer im angegebenen Leistungsbereich. Benutzen Sie kein Elektrowerkzeug, dessen Schalter defekt ist. Ein Elektrowerkzeug, das sich nicht mehr ein- oder ausschalten lässt, ist gefährlich und muss repariert werden.
• Beim Wechsel der Fahrzeugreifen zusätzliche Hebevorrichtungen und Sicherheitsstützvorrichtungen verwenden. • Beim Gebrauch den Antrieb des Schlagschraubers nicht mit den Händen berühren. Restrisiken Auch wenn Sie dieses Elektrowerkzeug vorschriftsmäßig bedienen, bleiben immer Restrisiken bestehen. Folgende Gefahren können im Zusammenhang mit der Bauweise und Ausführung dieses Elektrowerkzeugs auftreten: 1. Lungenschäden, falls keine geeignete Staubschutzmaske getragen wird. 2.
2. Lieferumfang 1 Schlagschrauber mit Netzkabel 4 Steckschlüsseleinsätze (17 mm, 19 mm, 21 mm, 22 mm) 1 Tragekoffer Diese Symbole werden auf den folgenden Seiten verwendet: Warnung Anmerkung Schutzkleidung Staubmaske Gehörschutz Sichtschutz Schutzklasse II Umweltschutz 3. Erklärung verwendeter Symbole 7 10923_Schlagschrauber_BA_141205.indd 7 05.12.
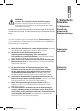
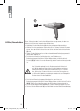
4. Bedienelemente 1. 2. 3. 4. 5. 6. 7. Handgriff Netzkabel mit Netzstecker Wippschalter Rechtslauf (F) Wippschalter Linkslauf (R) Steckschlüsselhalter Steckschlüsseleinsätze (Zubehör) Tragekoffer (nicht abgebildet) 22 mm 21 mm 19 mm 17 mm 5. Gebrauch 5.1 Bestimmungsgemäßer Gebrauch Dieser Schlagschrauber ist geeignet, um Bolzen, Schrauben und Muttern ein- bzw. auszudrehen. Benutzen Sie ihn nicht für andere Zwecke.
Alle Anwendungen mit dem Gerät die nicht im Kapitel "Bestimmungsgemäße Verwendung" genannt sind, gelten als eine nicht bestimmungsgemäße Verwendung. Das Gerät darf nicht zu folgenden Zwecken eingesetzt werden: • Zum Mischen von Farben oder Baustoffen, • Polieren, Schleifen, Schärfen, Gravieren mit entsprechenden Vorsätzen, • Antrieb für weitere Geräte. 5.2 Nicht bestimmungs gemäßer Gebrauch Es besteht Verletzungsgefahr.
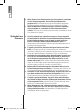
1 6.2 Ein-/Ausschalten Dieser Schlagschrauber ist mit einem Wippschalter ausgestattet, mit dem von Rechtslauf auf Linkslauf umgeschaltet werden kann. • Verbinden Sie den Netzstecker (2) mit einer geeigneten Netzsteckdose. • Wählen Sie einen geeigneten Steckschlüssel aus. Achten Sie beim Einsetzen darauf, dass der Steckschlüssel fest und sicher auf dem Steckschlüsselhalter (5) sitzt. • Setzen Sie das Werkzeug fest auf das zu bearbeitende Befestigungsmaterial (Bolzen bzw. Mutter) an.
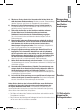
2 Linkslauf (R) Rechtslauf (F) Arbeitshinweise: • Das Lösen/Festdrehen von Bolzen, Schrauben oder Muttern kann mehrere Schläge benötigen. • Je länger Sie einen Bolzen, eine Schraube oder eine Mutter eindrehen, desto fester wird sie sitzen. Vermeiden Sie verlängertes Eindrehen, um Beschädigungen des Befestigungsmaterials oder des Mauerwerks zu verhindern. • Beachten Sie insbesondere, dass kleineres Befestigungsmaterial häufig geringere Festigkeit benötigt.
• Heben Sie das KFZ mit dem Original-Zubehör und -Werkzeug des KFZHerstellers an. Halten Sie sich strikt an die Bedienungsanleitung des Herstellers. • Wählen Sie einen geeigneten Steckschlüssel aus. Achten Sie beim Einsetzen darauf, dass der Steckschlüssel fest und sicher auf dem Steckschlüsselhalter (5) sitzt. • Setzen Sie das Werkzeug fest auf das zu bearbeitende Befestigungsmaterial des Reifens an. • Zum Eindrehen (im Uhrzeigersinn) drücken Sie den Wippschalter auf die Rechtslauf-Position (F) (3).
Warnung! Trennen Sie das Werkzeug vor Reinigung oder Pflege stets von der Netzversorgung, um das Risiko von Verletzungen zu vermindern. Versuchen Sie niemals, das Werkzeug selber zu reparieren. 7. Reinigung und Pflege Ziehen Sie den Netzstecker (2) aus der Netzsteckdose. Entfernen Sie den Steckschlüssel (6) aus dem Steckschlüsselhalter (5). Reinigen Sie die Entlüftungsschlitze von Staub und Schmutz.
8. Umwelt schutz 9. Problem behebung Alt-Elektrogeräte sind Wertstoffe, sie gehören daher nicht in den Hausmüll! Wir möchten Sie daher bitten, uns mit Ihrem aktiven Beitrag bei der Ressourcenschonung und beim Umweltschutz zu unterstützen und dieses Gerät bei den – falls vorhanden – eingerichteten Rücknahmestellen abzugeben. Problem Ursache Lösung Das Werkzeug arbeitet nicht. Der Netzstecker (2) ist nicht korrekt mit einer Netzsteckdose verbunden.
Artikelnummer: 10923 Nennspannung: 230 V~, 50 Hz Nennaufnahmeleistung: 710 W Steckschlüsseleinsatz – Vierkant-Größe: 12,7 mm, ½" Maximales Drehmoment: 300 Nm Linkslauf (lösen) 100 Nm Rechtslauf (eindrehen) Schutzklasse: Klasse II IP-Schutzklasse: IPXO Leerlaufdrehzahl n0: Steckschlüsselgrößen: Gewicht (Netto): 10.
10.3 Hinweis zur Lärmbelästigung Eine gewisse Lärmbelästigung durch dieses Werkzeug ist nicht vermeidbar. Verlegen Sie lärmintensive Arbeiten auf zugelassene und dafür bestimmte Zeiten. Halten Sie sich ggf. an Ruhezeiten und beschränken Sie die Arbeitsdauer auf das Notwendigste. Zu Ihrem persönlichen Schutz und zum Schutz von in der Nähe befindlicher Personen ist ein geeigneter Gehörschutz zu tragen. 11.
12. EGKonformitätserklärung 17 10923_Schlagschrauber_BA_141205.indd 17 05.12.
Original operating instructions Index 1. Safety instructions.....................................................19 1.1. General safety instructions for power tools.......19 1.2. Safety instructions for impact wrenches...........21 2. Supplied with the product .......................................23 3. Explanation of the symbols used............................23 4. Operating elements...................................................24 5. Use................................................
WARNING Read all the safety instructions and directions! Failure to observe the safety instructions and directions may cause electric shocks, fires and/or serious injury! Retain all safety instructions and directions for future use and pass them on to any other users or subsequent owners. 1. Safety instructions 1.
Safety of people a) b) c) d) e) f) g) Pay attention, watch what you are doing and approach work with power tools with patience. Do not use power tools if you are tired or under the influence of drugs, alcohol or medicine. One moment’s inattention when using a power tool may lead to serious injury. Wear personal protection equipment and always wear safety glasses.
a) b) c) d) e) f) g) h) Do not overload the device. Use the correct power tool for the job. With the appropriate power tool you will work better and more safely within the stated performance range. Do not use a power tool if its switch is defective. A power tool that can no longer be turned on and off is dangerous and must be repaired. Pull the plug out of the socket and/or remove the battery before adjusting the device’s settings, changing accessories or putting away the power tool.
Residual risks Even if you use this power tool according to the instructions, there are still residual risks. The following risks may occur in connection with the construction and design of this power tool: 1. Lung damage if a suitable dust mask is not worn. 2. Hearing damage if suitable hearing protection is not worn. 3. Damage to health resulting from hand and arm vibrations if the device is used for a lengthy period or is not controlled or maintained correctly.
1 Impact wrench with mains cable 2. Supplied with the product 4 socket spanner attachments (17 mm, 19 mm, 21 mm, 22 mm) 1 carry case These symbols are used on the following pages: Warning Note Protective clothing Dust mask Hearing protection Eye protection Protection class II Environmental protection 3. Explanation of the symbols used 23 10923_Schlagschrauber_BA_141205.indd 23 05.12.
4. Operating elements 1. 2. 3. 4. 5. 6. 7. Handle Mains cable with mains plug Rocker switch, rotation to the right (F) Rocker switch, rotation to the left (R) Socket spanner holder Socket spanner attachments (accessories) Carry case (not shown) 22 mm 21 mm 19 mm 17 mm 5. Use 5.1 Correct use This impact wrench is suitable for tightening or loosening bolts, screws and nuts. Do not use it for any other purposes. Incorrect use of the tool may cause personal injury or damage to property.
All applications with this device that are not mentioned in the “Correct use” section are deemed to be incorrect use. 5.2 Incorrect use The device must not be used for the following purposes: • For mixing paints or building materials • For polishing, grinding, sharpening, engraving with appropriate attachments, • As a drive for other devices. There is a risk of injury. The user is liable for all resulting damage to property and/or personal injury arising from incorrect use.
1 6.2 Switching on/off This impact wrench is equipped with a rocker switch with which you can switch from rotation to the right to rotation to the left. • Put the mains plug (2) into a suitable mains socket. • Select a suitable socket spanner. When attaching it, make sure that the socket spanner sits firmly and securely on the socket spanner holder (5). • Place the tool firmly on the fixing element to be worked on (bolt or nut).
2 Rotation to the left (R) Rotation to the right (F) Instructions on working: • Loosening/tightening bolts, screws or nuts may require several impacts. • The longer you tighten a bolt, screw or nut, the more firmly it will be seated. Avoid extended tightening to prevent damage to the fixing element or to masonry/brickwork. • In particular you should note that smaller fixing elements often require less tightening.
• Select a suitable socket spanner. When attaching it make sure that the socket spanner is firmly and securely seated on the socket spanner holder (5). • Place the tool firmly on the tyre’s fixing element to be worked on. • To tighten (clockwise) push the rocker switch to the rotation to the right position (F) (3). Before use, check that the direction of rotation is correct. For safety reasons the torque is restricted to 100 Nm in rotation to the right.
Warning! Always disconnect the tool from the mains supply before cleaning or care so as to reduce the risk of injury. Never try to repair the tool yourself. 7. Cleaning and care Pull the mains plug (2) out of the mains socket. Remove the socket spanner (6) from the socket spanner holder (5). Clean dirt and dust off the ventilation slits. Use a mild soap and a damp cloth to clean the impact wrench’s housing and handle (1). Always keep the handle free of oil and lubricating grease.
8. Environmental protection 9. Troubleshooting Old electrical devices are made of valuable materials so they do not belong in the household refuse! We would therefore ask you to support us with your active contribution to saving resources and with environmental protection and to take this device to a return point set up for this purpose if there is one available. Problem Cause Solution The tool is not working.. The mains plug (2) is not correctly connected to a mains socket.
Article number: 10923 Nominal voltage: 230 V~, 50 Hz Nominal power consumption: 710 W Socket spanner attachment – square, size: 12,7 mm, ½" Maximum torque: 300 Nm rotation to the left (loosening) 100 Nm rotation to the right (tightening) Protection class: Class II IP protection class: IPXO Idling rotation speed n0: Socket spanner sizes: Weight (net): 2200 rpm SW17, SW19, SW21 and SW22 3.23 kg Acoustic pressure level LPA: Noise output level LWA: 96.34 dB(A); KPA: 3.0 dB(A) 107.
10.3 Instructions on noise pollution A certain amount of noise pollution from this tool is unavoidable. Postpone noisy jobs to authorised and permitted times. Observe any quiet times and restrict the time of working to what is essential. Suitable hearing protection is to be worn for your personal protection and for the protection of people in the vicinity. 11.
12. EC conformity declaration 33 10923_Schlagschrauber_BA_141205.indd 33 05.12.
F Mode d'emploi original Sommaire 1. Consignes de sécurité..............................................35 1.1. Consignes de sécurité générales – outils électriques..........................................................35 1.2. Consignes de sécurité – clés à chocs................37 2. Etendue de la livraison.............................................39 3. Explication des symboles utilisés..........................39 4. Eléments de commande............................................40 5.
AVERTISSEMENT Lisez toutes les consignes de sécurité et instructions ! Les manquements dans le respect des consignes de sécurité et des instructions peuvent causer une décharge électrique, un incendie et/ou de graves blessures ! Conservez l’ensemble des instructions de sécurité et des instructions pour le futur et remettez-les éventuellement aux autres utilisateurs ou futurs propriétaires. 1. Consignes de sécurité 1.
e) f) Sécurité des personnes a) b) c) d) e) f) g) Si vous travaillez avec un outil électrique au dehors, utilisez uniquement des rallonges appropriées au travail à l’extérieur. L’utilisation d’une rallonge appropriée à l’extérieur réduit le risque de décharge électrique. Si l’utilisation de l’outil électrique dans un environnement humide ne peut être évité, utilisez un disjoncteur-protecteur à courant de défaut.
a) b) c) d) e) f) g) h) Ne surchargez pas l’outil. Utilisez l’outil électrique pour le travail auquel il est destiné. Avec l’outil électrique approprié, vous travaillez mieux et avec plus de sécurité dans le domaine de performance indiqué. N’utilisez aucun outil électrique dont l’interrupteur est défectueux. Un outil électrique qui ne se laisse pas mettre en marche ou arrêter est dangereux et doit être réparé.
• Utiliser des dispositifs de levage et d’appui de sécurité supplémentaires pour changer les pneus du véhicule. • Lors de l’utilisation de la clé à chocs, ne pas toucher la commande avec les mains. Risques résiduels Des risques résiduels existent toujours, même si vous vous servez de cet outil électrique de manière conforme. Les dangers suivants peuvent survenir en liaison avec le type de construction et la confection de cet outil électrique : 1.
2. Etendue de la livraison 1 clé à chocs avec câble d’alimentation 4 douilles (17 mm, 19 mm, 21 mm, 22 mm) 1 mallette Ces symboles sont utilisés dans les pages suivantes : Avertissement Remarque Vêtements de protection Masque anti-poussière Protection auditive Protection visuelle Classe de protection II Protection de l’environnement 3. Explication des symboles utilisés 39 10923_Schlagschrauber_BA_141205.indd 39 05.12.
4. Eléments de commande 1. 2. 3. 4. 5. 6. 7. ) Poignée Câble d’alimentation avec fiche secteur Interrupteur à bascule marche à droite (F) Interrupteur à bascule marche à gauche (R) Support de douille Douilles (accessoires) Malette (non illustrée) 22 mm 21 mm 19 mm 17 mm 5. Usage 5.1 Usage conforme Cette clé à chocs est appropriée à serrer et à desserrer les boulons, les vis et les écrous. Ne l’utilisez pas à d’autres fins.
Toutes les applications de l’outil qui ne sont pas nommées au chapitre « Usage conforme » sont considérées comme d’usage non conforme. 5.2 Usage non conforme L’outil ne doit pas être utilisé pour les travaux suivants : • pour mélanger les peintures ou les matériaux, • pour polir, poncer, ébarber, graver avec des adaptateurs correspondants, • pour entraîner d’autres outils. Il existe un risque de blessure.
1 6.2 Mise en marche / Arrêt Cette clé à chocs est équipée d’un interrupteur à bascule pouvant être commuté sur de marche à droite à marche à gauche. • Branchez la fiche (2) sur une prise appropriée. • Sélectionnez la clé à douille qui convient. Veillez à ce que la clé à douille soit fixée solidement et de manière sûre sur le support de clé (5). • Placez solidement l’outil sur le matériau de fixation à traiter (boulon ou écrou).
2 Marche à gauche (R) Marche à droite (F) Consignes de travail : • De serrage/desserrage des boulons, vis ou écrous peut nécessiter plusieurs coups. • Plus vous serrez longtemps un boulon, une vis, ou un écrou, puis il sera solidement fixé. Evitez de prolonger le serrage pour empêcher l’endommagement du matériau de fixation ou de la maçonnerie. • Notez particulièrement que le petit matériau de fixation nécessite fréquemment une moindre solidité.
• Levez le véhicule avec l’accessoire et l’outil d’origine du constructeur du véhicule. Observez strictement la notice d’instruction du fabricant. • Sélectionnez une clé à douille qui convient. Veillez à ce que la clé à douille soit fixée solidement et de manière sûre sur le support de clé (5). • Placez solidement l’outil sur le matériau de fixation à traiter du pneu. • Pour serrer (dans le sens horaire), mettez l’interrupteur à bascule sur la position marche à droite (F) (3).
Avertissement ! Débranchez toujours l’outil de l’alimentation secteur avant de le nettoyer ou de l’entretenir pour réduire le risque de blessure. N’essayez jamais de réparer vous-même l’outil. 7. Nettoyage et entretien Débranchez la fiche (2) de la prise. Retirez la clé à douille (6) du support de clé (5). Nettoyez la fente d’aération de la poussière et de la saleté. Utilisez un savon doux et un chiffon humidifié pour nettoyer la boîte et la poignée (1) de la clé à chocs.
8. Protection de l'environnement 9. Elimination des problèmes Les appareils électriques usagés sont des appareils de valeur qui ne doivent pas être jetés aux déchets ménagers ! Nous vous demandons donc, par votre contribution active, de nous soutenir dans le ménagement des ressources et la protection de l’environnement et de remettre cet outil aux points de reprises aménagés à cet effet s’il en existe. Problème Cause L’outil ne fonctionne pas.
Numéro d’article : 10923 Tension nominale : 230 V~, 50 Hz Puissance nominale absorbée : 710 W Dimension insert clé à douille hexagonale : 12,7 mm, ½" Couple de rotation maximal : 300 Nm marche à gauche (desserrer) 100 Nm marche à droite (serrer) Classe de protection : Classe II Classe de protection IP : IPXO 10.
10.3 Remarque sur les nuisances sonores 11. Déclaration de garantie Une certaine nuisance sonore due à cet outil ne peut pas être évitée. Effectuez les travaux générant un bruit élevé à des heures autorisées et appropriées. Respectez éventuellement les temps de repos et limitez la durée de travail au strict nécessaire. Portez une protection auditive pour votre protection personnelle et celle des personnes se trouvant près de vous.
12. Déclaration de conformité CE 49 10923_Schlagschrauber_BA_141205.indd 49 05.12.
I Istruzioni d'uso originali Indice 1. Avvertenze di sicurezza............................................51 1.1. Avvertenze di sicurezza generali per elettroutensili.....................................................51 1.2. Avvertenze di sicurezza per avvitatori a impulsi...53 2. Materiale consegnato...............................................55 3. Spiegazione dei simboli utilizzati...........................55 4. Elementi di comando.................................................56 5.
AVVISO Leggere tutte le avvertenze di sicurezza e le istruzioni. La mancata osservanza delle avvertenze di sicurezza e delle istruzioni può causare scosse elettriche, incendi e/o lesioni gravi. Conservare tutte le avvertenze di sicurezza e le istruzioni per il futuro, consegnandole eventualmente ad altri utilizzatori o ai successivi proprietari. 1. Avvertenze di sicurezza 1.
e) f) Sicurezza delle persone a) b) c) d) e) f) g) Qualora si intenda operare con l’elettroutensile all’esterno, utilizzare una prolunga adeguata anche per l’uso esterno. L’utilizzo di una prolunga adeguata per l’esterno riduce il rischio di scosse elettriche. Se non è possibile evitare l’utilizzo di un elettroutensile in un luogo umido, utilizzare un interruttore differenziale. L’utilizzo di un interruttore differenziale riduce il rischio di scosse elettriche.
a) b) c) d) e) f) g) h) Non sovraccaricare l’apparecchio. Per il proprio lavoro utilizzare l’elettroutensile adeguato. Con l’elettroutensile adeguato, sarà possibile lavorare meglio e in modo più sicuro nei valori di carico indicati. Non utilizzare elettroutensili con interruttori difettosi. Un elettroutensile che non è più possibile accendere o spegnere è pericoloso e necessita di riparazione.
• Utilizzare dispositivi di sollevamento supplementare e dispositivi di supporto di sicurezza durante la sostituzione degli pneumatici del veicolo. • Quando si utilizza l’avvitatore a impulsi, non toccarlo con le mani.. Rischi residui Anche se si utilizza correttamente questo elettroutensile, sussistono comunque sempre rischi residui. Possono manifestarsi i seguenti rischi relativamente alla struttura e alla versione di questo elettroutensile: 1.
2. Materiale consegnato 1 avvitatore a impulsi con cavo 4 inserti chiave a tubo (17 mm, 19 mm, 21 mm, 22 mm) 1 custodia per il trasporto Questi simboli sono utilizzati sulle seguenti pagine: Avviso Nota Indumenti di protezione Maschera antipolvere Protezione per l’udito Protezione visiva Classe di protezione II Tutela ambientale 3. Spiegazione dei simboli utilizzati 55 10923_Schlagschrauber_BA_141205.indd 55 05.12.
4. Elementi di comando 1. 2. 3. 4. 5. 6. 7. Impugnatura Cavo di rete con spina di alimentazione Rotazione destrorsa interruttore a bilico (F) Rotazione sinistrorsa interruttore a bilico (R) Supporto della chiave a tubo Inserti chiave a tubo (accessori) Custodia per il trasporto (non raffigurata) 22 mm 21 mm 19 mm 17 mm 5. Uso 5.1 Uso conforme alle disposizioni Questo avvitatore a impulsi è adatto per avvitare e svitare bulloni, viti e dadi. Non utilizzarlo per fini diversi.
Tutte le applicazioni con l’apparecchio che non sono indicate nel capitolo "Uso conforme alle disposizioni" sono considerate come un utilizzo non conforme. L’apparecchio non deve essere utilizzato per le seguenti finalità: • per la miscelazione di vernici o materiali da costruzione, • per la lucidatura, la smerigliatura, l’affilatura con i corrispondenti margini di guardia • come motore per ulteriori apparecchi. 5.2 Uso non conforme alle disposizioni Esiste il pericolo di lesioni.
1 6.2 Accensione/ spegnimento Questo avvitatore a impulsi è dotato di un interruttore a bilico, con il quale è possibile passare da rotazione destrorsa a quella sinistrorsa. • Collegare la spina di alimentazione (2) con una presa di corrente adatta. • Selezionare una chiave a tubo adatta. Durante l’inserimento prestare attenzione che la chiave a tubo sia posizionata saldamente e in modo sicuro nel relativo supporto (5).
2 Rotazione sinistrorsa (R) Rotazione destrorsa (F) Indicazioni di funzionamento: • L’allentamento/serraggio di bulloni, viti o dadi può richiedere diversi colpi. • Più si stringe un bullone, una vite o un dado, più saldo sarà. Evitare un serraggio prolungato per evitare danni al materiale di fissaggio o alle opere di muratura. • Notare in particolare, che il materiale di montaggio più piccolo spesso richiede meno forza.
• Sollevare il veicolo con gli accessori e gli utensili originali del produttore di automobili. Rispettare rigorosamente le istruzioni per l’uso del produttore. • Selezionare una chiave a tubo adatta. Durante l’inserimento prestare attenzione che la chiave a tubo sia posizionata saldamente e in modo sicuro nel relativo supporto (5). • Posizionare l’utensile saldamente sul materiale di fissaggio da lavorare dello pneumatico.
Avviso! Prima della pulizia o della manutenzione scollegare sempre l’utensile dalla rete elettrica per ridurre il rischio di lesioni. Non tentare mai di riparare da soli l’utensile. 7. Pulizia e manutenzione Staccare la spina di alimentazione (2) dalla presa di corrente. Rimuovere la chiave a tubo (6) dal rispettivo supporto (5). Pulire le prese d’aria da polvere e sporcizia.
8. Tutela ambientale 9. Problem behebung Le apparecchiature elettriche vecchie sono materiali riciclabili e pertanto non devono essere smaltite nei rifiuti domestici. Invitiamo pertanto tutti a supportare con un contributo attivo la conservazione delle risorse e la tutela dell’ambiente, e a consegnare questo apparecchio presso i punti di raccolta autorizzati, ove presenti. Problema Causa Soluzione L’utensile non funziona.
Numero articolo: 10923 Tensione nominale: 230 V~, 50 Hz Potenza d’ingresso nominale: 710 W Inserto chiave a tubo – dimensioni quadrate: 12,7 mm, ½" Coppia massima: 300 Nm rotazione sinistrorsa (allentare) 100 Nm rotazione destrorsa (avvitare) Classe di protezione: Classe II Classe di protezione IP: IPXO Numero di giri al minimo n0: Dimensioni chiave a tubo: Peso (netto): 2200 min-1 SW17, SW19, SW21 und SW22 3,23 kg Soglia di rumorosità LPA: Livello di potenza acustica LWA: 96
10.3 Avvertenza di disturbo acustico 11. Dichiarazione di garanzia Non è possibile evitare una determinata quantità di rumore che proviene dall’utensile. Rimandare i lavori rumorosi nei momenti consentiti e determinati. Attenersi ai periodi di riposo e limitare al minimo necessario la durata del lavoro. Per la propria sicurezza personale e per la tutela delle persone che si trovano nelle vicinanze, è opportuno indossare una protezione per l’udito.
12. Dichiarazione di conformità CE 65 10923_Schlagschrauber_BA_141205.indd 65 05.12.
Oryginalna instrukcja obsługi Spis treści 1. Wskazówki dotyczące bezpieczeństwa............ 67 1.1. Ogólne wskazówki dotyczące bezpiecznego stosowania narzędzi elektrycznych.............. 67 1.2. Wskazówki dotyczące bezpiecznego stosowania wkrętarek udarowych............... 69 2. Zakres dostawy................................................... 71 3. Objaśnienie stosowanych symboli.................... 71 4. Elementy obsługowe.......................................... 72 5. Użycie.............
OSTRZEŻENIE Należy przeczytać wskazówki bezpieczeństwa oraz instrukcje! Zaniedbania w zakresie przestrzegania wskazówek bezpieczeństwa oraz instrukcji mogą spowodować porażenia przez prąd elektryczny, pożary i/lub ciężkie obrażenia ciała! Wszystkie wskazówki dotyczące bezpieczeństwa oraz instrukcje należy zachować na przyszłość i w razie potrzeby przekazać innym użytkownikom lub kolejnym właścicielom.
e) f) Bezpieczeństwo osób a) b) c) d) e) f) g) Gdy narzędzie elektryczne stosowane jest na zewnątrz, należy stosować wyłącznie przewody przedłużające, które nadają się także do użycia na zewnątrz. Stosowanie przewodu przedłużającego nadającego się do użycia na zewnątrz zmniejsza ryzyko porażenia przez prąd elektryczny. Jeżeli nie można uniknąć stosowania narzędzia elektrycznego w wilgotnym otoczeniu, należy używać wyłącznika ochronnego prądowego.
a) b) c) d) e) f) g) h) Nie wolno przeciążać urządzenia. Podczas prac należy używać przeznaczonego do danego zastosowania narzędzia elektrycznego. Używając odpowiedniego narzędzia, należy pracować w podanym zakresie mocy. Pozwoli to zapewnić wydajniejszą i bezpieczniejszą pracę. Nie wolno używać narzędzia elektrycznego, jeżeli jego włącznik jest uszkodzony. Narzędzie elektryczne, którego nie można włączyć ani wyłączyć, stanowi zagrożenie i wymaga naprawy.
• Podczas zmiany opon stosować dodatkowy podnośnik oraz zabezpieczające urządzenia podporowe. • Podczas używania wkrętarki udarowej nie dotykać rękami jej napędu. Ryzyka szczątkowe Nawet jeżeli narzędzie elektryczne używane jest zgodnie z przepisami, istnieją ryzyka szczątkowe. Potencjalne zagrożenia związane z budową oraz wersją tego narzędzia elektrycznego: 1. Uszkodzenia płuc w przypadku nienoszenia odpowiedniej maski przeciwpyłowej 2.
2. Zakres dostawy 1 wkrętarka udarowa z kablem sieciowym 4 nasadki kluczy nasadowych (17 mm, 19 mm, 21 mm, 22 mm) 1 walizka Na nast�pnych stronach stosowane s� poni�sze symbole: Ostrzeżenie Uwaga Odzież ochronna Maska przeciwpyłowa Ochrona słuchu Ochrona wzroku Klasa ochrony II Ochrona środowiska 3. Objaśnienie stosowanych symboli 71 10923_Schlagschrauber_BA_141205.indd 71 05.12.
4. Elementy obsługowe 1. 2. 3. 4. 5. 6. 7. Rękojeść Kabel sieciowy z wtyczką Przełącznik kołyskowy – bieg w prawo (F) Przełącznik kołyskowy – bieg w lewo (R) Uchwyt kluczy nasadowych Nasadki kluczy nasadowych (akcesoria) Walizka (nieprzedstawiona na ilustracji) 22 mm 21 mm 19 mm 17 mm 5. Użytkowanie 5.1 Użytkowanie zgodne z przeznaczeniem Opisana wkrętarka udarowa jest przeznaczona do wkręcania i wykręcania trzpieni, śrub i nakrętek. Nie należy jej używać do innych celów.
Wszystkie zastosowania urządzenia, które nie zostały wymienione w rozdziale „Użytkowanie zgodne z przeznaczeniem” uznawane są za niezgodne z przeznaczeniem. 5.2 Użytkowanie niezgodne z przeznaczeniem Nie wolno używać urządzenia do następujących celów: • do mieszania farb i materiałów, • polerowania, szlifowania, ostrzenia, grawerowania z odpowiednimi nasadkami, • napędzania innych urządzeń.. Istnieje niebezpieczeństwo odniesienia obrażeń ciała.
1 6.2 Włączanie/ wyłączanie Niniejsza wkrętarka udarowa wyposażona jest w przełącznik kołyskowy, za pomocą którego można przełączać pomiędzy biegiem w prawo i biegiem w lewo. • Należy podłączyć zasilacz (2) do odpowiedniego gniazda sieciowego. • Należy wybrać odpowiedni klucz nasadowy. Po włożeniu klucza nasadowego należy sprawdzić, czy jest prawidłowo i bezpiecznie zamocowany w uchwycie (5). • Należy mocno przyłożyć narzędzie do obrabianego elementu mocującego (trzpienia lub nakrętki) .
2 Bieg w lewo (R) Bieg w prawo (F) Wskazówki dotyczące użytkowania narzędzia: • Odkręcenie/ dokręcenie trzpieni, śrub lub nakrętek może wymagać kilkukrotnego przyłożenia narzędzia. • Im dłużej trzpienie, śruby lub nakrętki są wkręcane, tym są stabilniej zamocowane. Należy unikać zbyt mocnego dokręcania, aby nie uszkodzić elementów mocujących lub muru. • Należy w szczególności pamiętać, że w przypadku mniejszych elementów mocujących nie jest wymagana duża siła dokręcania.
7. Czyszczenie i pielęgnacja • Należy podnieść pojazd za pomocą oryginalnych narzędzi i akcesoriów producenta pojazdu. Należy ściśle przestrzegać instrukcji obsługi producenta. • Należy wybrać odpowiedni klucz nasadowy. Po włożeniu klucza nasadowego należy sprawdzić, czy jest prawidłowo i bezpiecznie zamocowany w uchwycie (5). • Należy mocno przyłożyć narzędzie do obrabianego elementu mocującego.
8. Umwelt schutz Ostrzeżenie! Przed rozpoczęciem prac związanych z czyszczeniem i pielęgnacją narzędzia należy odłączyć je od zasilania sieciowego, aby zmniejszyć ryzyko odniesienia obrażeń ciała. Nigdy nie wolno podejmować prób samodzielnej naprawy narzędzia. Należy wyciągnąć wtyczkę (2) z gniazda sieciowego. Należy wyjąć klucz nasadowy (6) z uchwytu (5). Należy usunąć pył i zabrudzenia ze szczelin wentylacyjnych.
8. Ochrona środowiska 9. Rozwiązywanie problemów Zużyte narzędzia elektryczne zaliczają się do surowców wtórnych i nie mogą być wyrzucane wraz z innymi odpadami z gospodarstwa domowego! Dlatego zwracamy się z prośbą o oddanie niniejszego urządzenia do odpowiedniego punktu zbiórki – jeżeli taki istnieje – i udzielenia nam tym samym wsparcia poprzez aktywny udział w działaniach mających na celu ochronę zasobów i środowiska. Problem Przyczyna Rozwiązanie Narzędzie nie działa.
Numer artykułu: Napięcie znamionowe: Znamionowy pobór mocy: Rozmiar nasadki czworokątnej do klucza nasadowego: Maksymalny moment obrotowy: Klasa ochrony: Stopień ochrony IP: 10923 230 V~, 50 Hz 710 W 10.
10.3 Wskazówki dotyczące obciążenia hałasem 11. Oświadczenie gwarancyjne Pewne obciążenie hałasem przy użytkowaniu tego narzędzia jest nieuniknione. Prace związane z dużym obciążeniem hałasem należy zaplanować na godziny, w których jest to dozwolone. Należy przestrzegać godzin ciszy nocnej itp. i możliwie maksymalnie ograniczyć czas pracy. Dla zapewnienia ochrony sobie oraz osobom przebywającym w pobliżu zaleca się stosowanie odpowiedniej ochrony słuchu.
12. Deklaracja zgodności WE 81 10923_Schlagschrauber_BA_141205.indd 81 05.12.