WS0100 WiFi Smart Weather Station User Manual Table of Contents Introduction ............................................................................................................................................... 3 1 2 Warnings ................................................................................................................................................... 4 3 Quick Start Guide ..........................................................................................................
1 Introduction Thank you for your purchase of the WS0100 WiFi Smart Weather Station. The following user guide provides step by step instructions for installation, operation and troubleshooting. To download the latest full sized manual and additional troubleshooting tips, please visit: The WS0100 is a WiFi connected device that receives sensor data from a variety of sensors, displays and configures this data, and sends it to your WiFi router and the Internet.
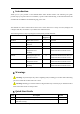
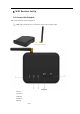
Install the sensors 6 6 Clear any total rain that may have accumulated during the set up. 7 Connect the receiver to WiFi 10 8 Register at AmbientWeather.net 11 9.10.4 4 Parts 4.1 WiFi Receiver (included) QTY Item Image 1 WS0100 Receiver with WiFi Frame Dimensions (LxHxW): 3 x 3 x 1 in 1 Antenna 1 Power Adapter 1 User Manual Figure 2 5 Weather Station Installation Guide and Limitations 7.
in a shaded area on the north side of a structure. 3. Avoid wind obstructions. The rule of thumb is to install the anemometer at least four times the distance of the height of the tallest obstruction. For example, if the building is 20' tall, and the mounting pole is 6' tall, install 4 x (20 – 6)' = 56' away. 4. Wireless Range.
6 WiFi Receiver Set Up 8.1 Connect the Antenna The console antenna is shown in Figure 49 Note: The external antenna can effectively advance the reception of RF.
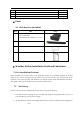
Indictor LED RF work green light-5 WiFi work white light-4 Net work red light-3 Status ON Description when the sensor search success. Flash when enter the sensor search mode. OFF when no receive any transmitter. ON When the Receive successfully connects to the Wi-Fi router. Flash when enter the WAP mode. OFF when the Receive is not connected to the Wi-Fi router. ON When the Receiver is not transfer data to the internet more than 30 minutes. Flash When the Receiver is transmitting data.
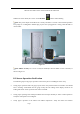
otherwise the outdoor sensor search mode will be terminated. While in the search mode, the receiver search RF LED will be remain flashing. Note: The power adapter is intended to be correctly oriented in a vertical or floor mounted position. The prongs are not designed to hold the plug in place if it is plugged into a ceiling, under-the-table or cabinet outlet. Figure 51 Note: Indoor use only. Use a screw or nail (not included) to affix the WIFI receiver to the wall, as shown in Figure 51. 8.
temperature match closely with the console and sensor array in the same location (about 10'apart). The worst case sensor accuracy should be within 4°F worst case (the accuracy is ±2°F). Allow about 30 minutes for both sensors to stabilize. • Verify proper operation of the indoor and outdoor humidity. Verify the indoor and outdoor humidity match closely with the console and sensor array in the same location (about 10'apart). The worst case sensor accuracy should be within 10% (the accuracy is ± 5%).
10.1 Connect your Device to the Receiver's WiFi Make sure your receiver is plugged into AC power. It will not connect to WiFi otherwise. When you first power up the console, or press and hold the WAP button for three seconds, the WiFi LED will flash to signify that it has entered wireless access point (WAP) mode, and is ready to connect to the console's WiFi. You can use your desktop, laptop, tablet, or smart phone to connect to the console's WiFi.
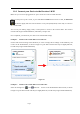
Figure 53 Example 3. Connect to the console WiFi server with an iPhone or iPad. Tap the Settings icon and Wi-Fi. Connect to the WeatherHome WiFi network, as shown in Figure 54 (your WiFi network name may be slightly different, but will always begin with WeatherHome).
Example 4. Connect to the console WiFi server with an Android. From the Apps icon, tap the Settings icon and Wi-Fi. Connect to the WeatherHome WiFi network, as shown in Figure 55 (your WiFi network name may be slightly different, but will always begin with WeatherHome). Figure 55 10.2 Accessing the Console's Web Interface Once connected to the console WiFi, open any web browser, and enter the following IP address into the address bar: http://192.168.5.1 to access the console's web interface.
Figure 44 Figure 56 Notes: • • Make a note of your Mac address. You will need this to register at AmbientWeather.net. If you have a hidden SSID, enter the SSID manually.
Time Zone Settings (default: 0h). based on the number of hours from Coordinated Universal Time, or Greenwich Mean Time (GMT). The following table provides times zones throughout the world. Locations in the eastern hemisphere are positive, and locations in the western hemisphere are negative.
Figure 57 If the connection is successful, the Wi-Fi console's WiFi LED will stop flashing and remain on. When the console successfully connects and uploads to AmbientWeather.net, the data signal LED will Light Off. If the data signal NET NET LED flash once per 60 seconds, the console is currently uploading to the server. If data signal NET LED will Light On, the console is not connected to the weather server for more than 30 minutes.
Figure 58 Page 15
Figure 59 If any of the sensor communication is lost, dashes (--.-) will be displayed on the screen. To reacquire the signal: 1. Tap the to enter the lost sensor search mode, Tap the to exit the search mode. 2. The search icon will be displayed for 3 minutes. Once the signal is reacquired, the remote search icon will change Page 16 , and the current values will be displayed..
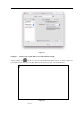
If new sensors are added, subtracted, or multiple sensor channels are lost, in search mode to select ALL’s .Or press and hold for three seconds button on receiver. B: Console's Units Select the view icon and tap . Figure 60 Choose your want Units into the web interface (Figure 60), and tap Save. C: Adjustment or Calibrate Select the view icon and tap Page 17 .
Note: The calibrated value can only be adjusted on the console. The remote sensor(s) always displays the un-calibrated or measured value. Note: The measured humidity range is between 10 and 99%. Humidity cannot be accurately measured outside of this range. Thus, the humidity cannot be calibrated below 10% or above 99%. The purpose of calibration is to fine tune or correct for any sensor error associated with the devices margin of error.
C1:Temperature or Humidity Calibration Select you want to type of calibration value and tap , then enter temperature offset rang:-9.0F to 9.0F,default 0F. Select you want to type of calibration value and tap , then enter humidity offset rang:-9% to 9%,default 0%. Note: Humidity is a difficult parameter to measure accurately and drifts over time. The calibration feature allows you to zero out this error.
To determine the relative pressure for your location, locate an official reporting station near you (the internet is the best source for real time barometer conditions, such as Weather.com or Wunderground.com), and set your weather station to match the official reporting station. C3: Wind Gain Calibration Select calibration value and tap , then enter wind speed calibration factor from: 75% to 125% The default is 100%.
to calibration. C5: Updating Firmware Select the view icon and tap To find firmware updates, please visit: Note that you must download the firmware update file to your PC or Mac. You cannot download a file to your tablet or mobile phone. to access the console's upgrade web interface. Tap Select File and browse to the binary (bin) file you downloaded to your PC or Mac. Figure 60 Once complete, your computer will automatically reconnect to your default WiFi connection. 13.6.
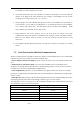
Hours from GMT Time Zone Cities -12 IDLW: International Date Line West --- -11 NT: Nome Nome, AK -10 AHST: Alaska-Hawaii Standard CAT: Central Alaska HST: Hawaii Standard Honolulu, HI -9 YST: Yukon Standard Yukon Territory -8 PST: Pacific Standard Los Angeles, CA, USA -7 MST: Mountain Standard Denver, CO, USA -6 CST: Central Standard Chicago, IL, USA -5 EST: Eastern Standard New York, NY, USA -4 AST: Atlantic Standard Caracas -3 --- São Paulo, Brazil -2 AT: Azores Azores, Cape Verde
Hours from GMT Time Zone Cities 9 JST: Japan Standard Tokyo 10 GST: Guam Standard Sydney 11 --- Magadan 12 IDLE: International Date Line East NZST: New Zealand Standard Wellington, New Zealand 13.7. If all of the information you entered is correct press save to confirm(Figure 45). If it does not, check your web interface information again. Figure 45 13.8. Once the setup is completed, disconnect your device from the console WiFi. Otherwise,the console will automatically exit WAP mode.
Figure 46 If the connection is successful, the Wi-Fi console’s status Wi-Fi icon remain on. will stop flashing and NOTE: When the console successfully connects to your any website of weather servers, the data signal icon will appear on the LCD display(In front of the Indoor Temperature). If the data signal icon flashing, the console is currently uploading to the server. If the icon is disappears, the console is not connected to the weather server for more than 30 minutes. 13.
14.1. When you first power up(AC) the console, or press and hold the MIN/MAX/-(WiFi) button for three seconds in normal mode, the console icon(behind the In/Outdoor humidity)) will flash to signify that it has entered WAP (wireless access point) mode, and is ready to enter for WIFI settings. `14.2. Use your smart phone, tablet, or computer to connect to the console through WiFi(reference: Example 1-4 of WiFi Setting ). 14.3.Once connected, enter http://192.168.5.1/upgrade.
Figure 50 14.6. If update successfully when press Upgrade key. Then you will see the following. Figure 51 NOTE: In this upgrade only Wifi firmware is updated. The console does not reset. 14.7.Once the upgrade is completed, the console will automatically exit WAP mode.
1 Glossary of Terms Term Definition Accuracy Accuracy is defined as the ability of a measurement to match the actual value of the quantity being measured. Hygrometer A hygrometer is a device that measures relative humidity. Relative humidity is a term used to describe the amount or percentage of water vapor that exists in air. Range Range is defined as the amount or extent a value can be measured.
• • Wind sensor: 4 x AAA alkaline batteries or Lithium batteries (not included) Battery life: Minimum 12 months for base station with excellent reception. Intermittent reception and multiple sensors may reduce the battery life. Minimum 12 months for sensors (use lithium batteries in cold weather climates less than -4 °F) 16.4 WiFi Specifications • • • WIFI Standard: 802.11 b/g/n WiFi Console WiFi Frequency: 2.
21 Liability Disclaimer Please help in the preservation of the environment and return used batteries to an authorized depot. The electrical and electronic wastes contain hazardous substances. Disposal of electronic waste in wild country and/or in unauthorized grounds strongly damages the environment. Reading the “User manual” is highly recommended.
• Increase the separation between the equipment and receiver. • Connect the equipment into an outlet on a circuit different from that to which the receiver is connected. • Consult the dealer or an experienced radio/TV technician for help. The distance between user and device should be no less than 20cm.