
Install Manual


Standoffs & Flashings
Installation Manual
R
A H I L T I G R O U P C O M PA N Y
Remove a tile over a rafter. Install the base of a two-piece standoff, ensuring that both lag bolts are screwed into the rafter. Install soft
aluminum flashing over the base, inserting it under the tile above and forming it to the shape of the tile. Insert standoff shaft through the
opening in the flashing, screwing it down firmly in place onto the base. Seal with roofing cement or other appropriate compound.
Attach L-feet to standoffs. Slide L-foot mounting bolts along slot on SunFrame (or SolarMount) rail. Insert footing bolts through L-feet and
fasten with flange nuts.
SunFrame
rail
L-foot
Mold
ashing
to tile
Tile
Rafter
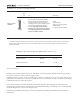
Example 2
2-piece, aluminum, flat top standoff
No-Calk™ flashing
Shingled roof
SunFrame (shown) or SolarMount rail
Rafter
L-foot
SunFrame
rail
Shingle
No-Calk collar
Cut an opening in the roofing material over a rafter to accommodate the flashing riser. Install the standoff, ensuring that both lag bolts are
screwed into the rafter. Insert the flashing under the shingle above and over the shaft of the standoff. No-Calk collar does not require sealing
of the flashing and standoff shaft.
Attach L–feet to standoffs. Slide L-foot mounting bolts along slot on SunFrame (or SolarMount) rail. Insert footing bolts through L-feet and
fasten with flange nuts.
Planning and installation
There are many possible configurations of standoffs and flashing. The two
examples here illustrate major product varieties and installation settings.
Example 1
2-piece, aluminum, flat top standoff
Soft aluminum flashing
Tile roof
SunFrame (shown) or SolarMount rail