
Installation Guide


UNIQUE!24CT/30CT/36CT !
20
7. Replace the cap back on the regulator.
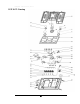
8. Next you will remove the grates, burners and burner caps from the cooktop to
access the orifices.
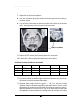
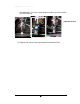
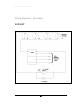
9. You will need a 7mm wrench to remove the orifices. Each orifice can be accessed
easily - the larger burner orifice is located on the burner wall.
10. Remove all LPG orifices: place in the bag and store in a safe place.
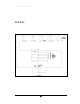
11. Take the NG orifices provided and install them as shown below.
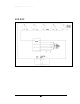
See below for rating of orifice for each model
NG
LF
LR
Middle/Center
RF
RR
24”
1.65 mm
1.17 mm
N/A
2.40mm
0.90mm
30”
1.50 mm
1.12 mm
2.10 mm
1.50 mm
0.80 mm
36”
1.50 mm
1.12 mm
2.11 mm
1.52 mm
0.86 mm
12. Once all the orifices are installed, replace all burners and burner caps, then fire up
the burners to check the minimum flame height.
13. Minimum flame height should be approx. ¼” tall. You will want a small
minimum flame for simmering (especially on the small burners). There is a small
adjustment screw located on the valve itself, the lid must be removed in order to
make the adjustment. Once the lid is off, pop off the black square cap and make
the adjustment (counter clockwise for a smaller flame and clockwise for a larger
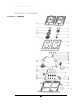
Orifice Locations