
Owner`s manual


UNIQUE UGP 6C/8C/10C DV
11
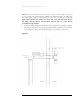
In order to determine what lengths you need to cut off measure from the
inside wall to the back of your fridge. We suggest allowing 1” for clearance
between the back of the fridge and the interior wall, therefore cut the fresh air
and the flue exhaust vent with suggested tools allowing for a 1” to 2”
protrusion or more through the interior wall into the room and a minimum 1”
space from the exterior wall to the flange connection.
Note: You will find that on the flue exhaust tube there is a slight protrusion of the aluminum
interior vent tube; this allows you the ability to connect it to the fridges chimney, ensure you
maintain this protrusion when cutting your flue exhaust tube.
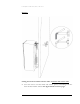
CONNECTING VENTING TO FRIDGE
After cutting your tubes to the required length for your application, push your
fridge up to the fresh air and flue exhaust tube, they will fit into the venting
connections on the fridge. Take the high temp silicone and apply a ¼” bead
around both the outside of the fresh air and the flue exhaust vents or the
inside of the venting that’s attached to the fridge, either way you want to
ensure an air tight fit once they are joined together. See Figure C on next
page.
For the flue exhaust once you have joined the connection you can pull the
black insulation from the chimney bend over the connection to cover it, this
will ensure it’s well insulated.
Please be aware the venting does not have to be cut down, it will operate with
the supplied vent lengths. Only cut down the lengths if the venting will protrude
too far out from the exterior wall and will be in the way of a walkway, etc where
someone may bump into them. In high wind situations the shorter you make the
vents, the increased chance the fridge will shut down.