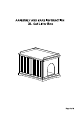
\ /N\ warnings A 1. PLEASE READ ALL INSTRUCTIONS CAREFULLY BEFORE STARTING ASSEMBLY. 2. DO NOT LET ANY SHARP OBJECTS TOUCH OR RUB THE SURFACE OF THE PRODUCT. 3. WHEN ASSEMBLING, DO NOT LET CHILDREN PLAY AROUND THE WORKING AREA. 4. PLEASE CONFIRM ALL PARTS ARE CORRECT BEFORE STARTING THE ASSEMBLY PROCESS. 5. DO NOT TIGHTEN ALL BOLTS AND SCREWS COMPLETELY UNTIL THE ENTIRE UNIT HAS BEEN ASSEMBLED AND SET ADVISE ~ 1. DO NOT SIT OR STAND ON THIS PRODUCT. IT IS INTENDED FOR PETS ONLY. 2.
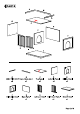
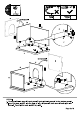
HARDWARE] x14 pes x 14 pcs x14 pes apexes x 6 pcs X 4 pcs X 24 pcs @ ASSEMBLY INSTRUCTIONS pcs x6 pes Xx 4 pcs x12 pecs STEP 1: 1. Install hinge #6 onto left and right door H,| by screw #7. 2. Insert wood dowel #1 into the upper side aprons A and upper back apron B. 3. Connect upper side aprons A and upper back apron B with top panel C. 4. Tighten them with screw #5.
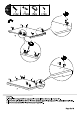
pes x14pes| apexes x4 pes STEP 2: 1. Install the magnet #4 to top panel C and tighten them with screw #7. 2. Insert the pin #2 into the hole of the bottom panel J & top panel C, and tighten pin #2. 3. Insert wood dowel #1 into the bottom panel J.
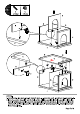
STEP 3: 1. Connect left side panel D, back panel G and right side panel F to the bottom panel J. 2. Insert the cam lock #3 into the hole of left side panel D, back panel G and right side panel F. Then tighten cam lock #3 to pin #2.
STEP 4: 1. Connect divider panel E with bottom panel J, insert the cam lock #3 on divider panel E. 2. Insert wooden dowel #1 on the hole of the divider panel E, left side panel D, right side panel F and back panel G, put the top panel C onto the product, insert the cam lock #3 on the hole of left side panel D, right side panel F and back panel G. Then tighten cam lock # 3 to pin #2.