WARNING!! Furniture Tipping Risk. Serious risk of severe or fatal crush injuries can occur from furniture tipping over if not secured. Children like to climb on furniture and Unsecured furniture can pose a serious danger. Please follow all instructions and install the tip-over restraints provided. In addition to installing the restraints, to help prevent tip-over: 1. Place heaviest items in the lowest drawers; 2.
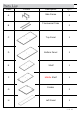
Label A B Picture Description Side Frame Transversal Tube QTY 2 2 C Top Panel 1 D Bottom Panel 1 E Shelf 1 F Middle Shelf 1 G H Divider Left Panel 2 1 2 OF 18
I Right Panel 1 J Middle Divider 1 K Left Door 1 L Right Door 1 M Shelf under Door 1 N Shelf above Drawer 1 O Front Panel of Drawer 1 P Left Panel of Drawer 1 3 OF 18
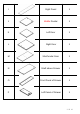
Q Right Panel of Drawer 1 R Back Panel of Drawer 1 S Bottom of Drawer 1 T Shelf under Drawer 1 U Back Wall at Top and Bottom 2 V Back Wall at Middle 3 Description QTY ① Cam Lock 23 ② Cam Bolt 23 ③ Wooden Dowel 27 Label Picture 4 OF 18
④ Bolt (M6*30mm) 9 ⑤ Bolt (M4*20mm) 7 ⑥ Screw (M4*40mm) 15 ⑦ Door Hinge 5 ⑧ Magnet 2 ⑨ Screw (M3*16mm) 5 ⑩ Screw (M3*12mm) 5 ⑪ Screw (M3.
Cabinet Restraint Device Hardware ⑱ L-shape Metal Brackets 2 ⑲ Screws (M4*35mm) 3 ⑳ Screws (M4*15mm) 3 ㉑ Plastic Dowel 3 ㉒ Screwdriver (Not provided) 1 ㉓ Power Drill (Not provided) 1 ㉔ Hammer (Not provided) 1 6 OF 18
Before Beginning Assembly: *23 *5 *23 *5 *27 *9 *9 *1 *7 *39 *15 *3 *5 *23 U C G V E I V F J V H M L K *2 *2 N T U *2 G Q R A D S P B O B A *2 *3 *3 *3 7 OF 18
Overview Top Panel(C) Divider(G) Shelf(E) Right Panel(I) Middle Shelf(F) Left Panel(H) Right Door(L) Shelf under Door(M) Left Door(K) Shelf above Drawer(N) Shelf under Drawer(T) Front Panel of Drawer(O) Divider(G) Bottom Panel(D) Side Frame(A) Transversal Tube(B) This Bookcase has multiple parts and may require up to 30 minutes to assemble. To give you an overview of the Bookcase parts, the above picture is to help you put the various parts into perspective.
Step 1 a b Open the carton and place all parts onto a clean, non-marring surface. Split up the Drawer Slides(⑯) into a and b.
2.1) Attach part a of Drawer Slides (⑯) to Left panel(H) and Right panel(I) using screw(⑪)with Screwdriver(㉒) 2.2) Attach part b of Drawer Slides(⑯) to Left Panel of Drawer(P) and Right Panel of Drawer(Q) using screw(⑪) with Screwdriver(㉒) Step 3 ㉒ ② H C F I T O Insert Cam Bolt(②) into the mounting positions of H,I,C,F,O,T,as shown, lock by turning Cam Bolt(②) with Screwdriver(㉒) Step 4 J E F H T I M N G G Insert Wooden Dowel(③) into mounting positions on E,F,G,H,I,J,M,N,T as shown.
Step 5 K L K F F 5.1) Attach Magnet(⑧) to Middle Panel(F) using Srew(⑨) with Screwdriver(㉒) . 5.2) Attach Magnet(⑰) to Left Door(K) and Right Door(L) using Srew(⑩) with Screwdriver(㉒). Step 6 F T J G 6.1) Insert Wooden Dowel on Divider(J) into the mounting positions on Middle Shelf(F), and Insert Cam Bolt on Middle Shelf(F) into the mounting positions on Divider(J), then Insert Cam Lock(①) into the mounting positions of Middle Divider(J). Lock by turning Cam Lock(①) with Screwdriver(㉒).
Step 7 J F K L 7.1) Attach Door Hinge(⑦) to the two sides of Left door(K) and Right door(L) as shown. 7.2) Insert one side of Door Hinge on Left door(K) and Right door(L) into the mounting position on Middle Shelf(F). Step 8 F J L K M G E 8.1) Insert the other side of Door Hinge on Left door(K) and Right door(L) into the mounting position on Shelf under Door(M).And insert the Wooden dowel on Shelf under Door(M) into Middle Divider(J) at the same time.
Step 9 G E F J M N H T G I 9.1) Insert Wooden Dowel on Shelf(E),Middle Shelf(F),Shelf under Door(M),Shelf above Drawer(N),Shelf under Drawer(T) into the mounting positions on Left Panel(H) and Right Panel(I),and insert Cam Bolt on Left panel(H) and Right panel(I) into the mounting positions on Middle Shelf(F), Shelf above Drawer(N). Insert Cam Lock(①) into the mounting positions on Middle Shelf(F), Shelf above Drawer(N), lock by turning Cam Lock(①) with Screwdriver(㉒) as shown. 9.
Step 11 U V V V U D Attach Back Wall at Top and Bottom(U) and Back Wall at Middle to the frame of bookcase using Screw(⑬) with Screwdriver(㉒). Step 12 A B A B A B A B 12.1) Attach Side Frame(A) to Transversal Tube(B) using Bolt(④) with Hex Key(⑫). 12.2) Attach Transversal Tube(B) to Bottom Panel(D) using Bolt(④) with Hex Key(⑫) as shown.
Step 13 R Q S R P Q P Q R S P O 13.1) Attach Left Panel of Drawer(P) and Right Panel of Drawer(Q) to Back Panel of Drawer(R) using Screw(⑥) with Screwdriver(㉒). 13.2) Insert Bottom of Drawer(S) into the grooves between Left Panel of Drawer(P) and Right Panel of Drawer(Q). 13.3) Insert Cam Bolt on Front Panel of Drawer(O) into the mounting positions on Left Panel of Drawer(P) and Right Panel of Drawer(Q).
! WARNING Serious or fatal crushing injuries can occur from tipping furniture. To help prevent tip-over: ALWAYS secure this furniture to the wall using Cabinet Restraint Device. See product instructions for more ways to help prevent furniture tipover.
15.1)Use Power Drill(㉓) Drill two mounting positions on wall at same height, insert Plastic Dowel(㉑) into the mounting position with a Hammer(㉔)(Not priovided). 13.2)Attach L-shape Metal Sheet(⑱) to plastic Dowel(㉑)using Screw(⑲) with Screwdriver(㉒ ). Note: The Metal sheet need to be secured to solid, load bearing surface. Please use a Stud Finder(not supplied) if needed to locate the Wall Frame. 13.3)Attach L-shape Metal Sheet(⑱) to Top Panel(A)using Screw(⑳) with Screwdriver(㉒).
OF 18