
Installation & Assembly


Step 1
Place the mantel along the wall where you want it mounted. Place a mark at the
top of the mantel. Place the mantel aside for now. Measure 3/4” down from that
first mark and place second mark. The Second mark is where the ledger will go. If
you haven’t done so cut the 2x4 or 2x6 (mantel with 7” height) down 2-3 inches
shorter than mantel length size. This will give you wiggle room to adjust side to
side. Make sure the ledger is level when mounting. Use the proper screws and or
anchors depending on what type of wall you’re mounting to. It is very important
that the ledger is mounted securely to the wall since the mantel will be supported
by it.
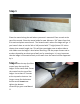
Step 2Place the top lip of the
mantel over the top of the
ledger. Drill a starter hole. Screw
the mantel into the top of the
ledger. Use at least 2-3 screws
at the top and or bottom. Use
longer screws for the bottom
but be careful to not over
tighten the bottom
screws!!Enjoy your new Mantel