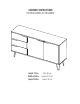
ASSEMBLY INSTRUCTIONS INSTRUCCIONES DE ENSAMBLE Height: 31,5 in Width: 57,95 in Depth: 15,35 in Alto: 80 cm Ancho: 147,2 cm Fondo: 39 cm
! IMPORTANT RECOMMENDATIONS / RECOMENDACIONES IMPORTANTES -The cabinet MUST be used exclusively indoors, do not expose to direct sun. / El mueble debe ser usado únicamente en interiores, no exponer al sol directo. -Do NOT overload the cabinet (see suggested loads), Do not hit or hammer the cabinet (just when indicated). / NO sobrecargar el mueble (ver las cargas sugeridas). No golpear ni martillar el mueble (solo cuando se indique). -Do not drag, lift and move between two people.
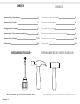
INDEX ÍNDICE Assembly Hardware 4 Herrajes para Armado 4 Assembly Parts 5 Piezas de Armado 5 Suggested Loads 6 Cargas Sugeridas 6 Assembly Recommendations 6 Recomendaciones de Ensamble 6 Assembly Steps 26 Warranty REQUIRED TOOLS* *Not included, and not shown actual size. Page 3 7-25 Pasos de Armado 7-25 Garantía 26 HERRAMIENTAS NECESARIAS* *No incluidas y no se muestran en tamaño real.
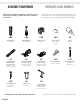
ASSEMBLY HARDWARE HERRAJES PARA ARMADO Please check that the hardware content is correct. If any item is missing, please call to our customer service line. Compruebe que el contenido de los herrajes sea el correcto. En caso de que falte alguna pieza, por favor llame a nuestra línea de atención al cliente.
ASSEMBLY PARTS PIEZAS DE ARMADO M K Q F L P M K Q O K R G L B D M Q R R R E H G L R G R H N C G A I J A - x1 B - x1 C - x1 D - x1 E - x1 Page 5 F - x1 G - x4 H - x2 I - x1 J - x1 K - x3 L - x3 M - x3 N - x1 O - x1 P - x1 Q - x3 R - x6
MAX SUGGESTED LOADS CARGAS MÁXIMAS SUGERIDAS 33 lbs. 15 Kg. 22 lbs. 10 Kg. 22 lbs. 22 lbs. 22 lbs. 22 lbs. 10 Kg. 10 Kg. 10 Kg. 10 Kg. 10 Kg. 22 lbs. 22 lbs. ASSEMBLY RECOMMENDATIONS 10 Kg. RECOMENDACIONES DE ENSAMBLE Two people are recommended to assemble the product. Ensamble el mueble entre dos personas. Assemble the cabinet on a flat, smooth surface, preferably on a carpeted floor or the carton box of the product.
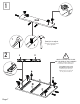
1 Gx4 1 2 2 2 11 Gently hit to adjust. Golpee suavemente para ajustar. ! WHEN PLACING THE SLIDE ON THE SIDE OF THE CABINET: PARA PONER RIEL EN LATERAL DEL MUEBLE: The plastic stop must be placed on the rear. Revisar que el tope plástico del riel quede en la parte trasera.
3 1 2 Gently hit the pieces with a rubber hammer to adjust the joint. Golpee suavemente la pieza con un martillo de goma para ajustar el ensamble. G G B / Rotate 180° 2 1 Page 8 Turn minifix cams to the right to tighten. Gire las cajas minifix hacia la derecha para apretar las piezas.
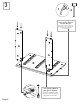
4 C Inset Hinge Bisagra Interior 5 H X2 1 2 Page 9
6 H G G C 1 2 Rotate to tighten. Gire para apretar.
7 E 8 Rotate Voltear E 1 2 Page 11
9 1 E H G G C Rotate to tighten. Gire para apretar.
10 ! WHEN PLACING THE SLIDEON THE SIDE OF THE CABINET: PARA PONER RIEL EN LATERAL DEL MUEBLE: The plastic stop must be placed on the rear. Revisar que el tope plástico del riel quede en la parte trasera.
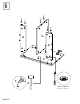
12 H D 13 1 Rotate to tighten. Gire para apretar.
14 F 15 1 F G Rotate to tighten. Gire para apretar.
G F G R R G R G R R R B Slide the back panels inside the cabinet Deslice los fondos dentro del mueble 17 A A Rotate Voltear Page 16
18 Rotate to tighten. Gire para apretar.
19 K X3 8 20 Fron t/ Fr ente L X3 Page 18 2
21 x3 2" M L K 22 x3 L M Q Slide the back panels inside the drawer Deslice los fondos dentro del cajón Page 19 K
23 x3 Q L K 1" 24 N Page 20
25 M K Q L N Rotate to tighten. Gire para apretar.
27 M K Q L O Rotate to tighten. Gire para apretar.
29 M K L Q P Rotate to tighten. Gire para apretar.
31 Door Installation Instalación de las Puertas F P O N H E H I C A J 1 Hinge adjustment Ajuste de las bisagras 2 Depht adjustment Ajuste de profundidad Page 24 3 4 Side adjustment Ajuste lateral 5 Height adjustment Ajuste de altura
32 ! For the user safety, it is recommended to anchor the cabinet to the wall. Por la seguridad del usuario se recomienda anclar el mueble a la pared. -WARNING! TIPPING HAZARD – Unanchored furniture can tip over -WARNING: CHECK FOR HIDDEN PIPES AND CABLES BEFORE DRILLING. -IMPORTANT: IF YOUR WALLS ARE NOT SOLID LIKE BRICK OR STONE, YOU WILL REQUIRE SPECIALIST FITTINGS (NOT SUPPLIED) -Pre-drill small pilot hole on the back edge of the furniture top using a 2mm drill bit.
WARRANTY POLICY PÓLIZA DE GARANTÍA We are committed to your satisfaction by offering you a competitive warranty to ensure all our products are free from defects, in material and workmanship, to the original purchaser for a period of one year from the date of your purchase. How It Works We are happy to furnish a replacement at no cost to you in the case we determine a component to be defective.