
Installation & Assembly
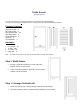

Step 3. Attach Horizontal Slats
• Set 11 horizontal slats (C) across vertical lath.
• Use spacer blocks to attain a uniform distance between horizontal slats.
• Apply a dab of wood glue to strengthen each join – do not nail into place
until all 11 slats have been positioned.
• Once you are satisfied with the arrangement, use ¾ inch nails or staple
gun to tack lattice together. (use 2 nails per join)
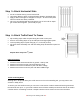
Step 4. Attach Trellis Panel To Frame
• Slip 2 nailing strips under the panel along the inside of each post.
• Place 2 more nailing strips on top of trellis panel and tight against posts.
• Tack top nailing strips to posts using (8) 1-½ inch nails per strip
• Flip entire frame assembly over and tack nailing strips to backside of panel as
above.
Repeat above steps for 2
nd
panel.
Hinge Placement
• Set Both Trellis Screen Panels flat on ground – side by side.
• Measure 10 inches from top of post and attach a hinge.
• Measure 10 inches from bottom of post and attach a hinge.
• Measure 40 inches from end of post and attach middle hinge.
♥Thank you for ordering from us ♥
Trellis Anchoring Hints
Although the L-Shape will allow your Trellis Screen to sit as a free standing unit, you may want to use
anchors in windy areas.
To anchor your new Trellis Screen you can use a 2 foot section of rebar hammered into the ground and
then wired to each post – or your local hardware store will have suitable post anchors that can be used in
a similar fashion. If attaching to a deck a simple L-Bracket can be used to secure to the deck floor.