
User manual


TD 92929EN
20 December 2013 / Ver. B
User Manual
WL3 and WL3 Plus WLAN Handset
12
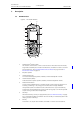
3. Description
Keypad
While not in use, the keypad should be locked to
prevent accidentally pressing a key.
Loudspeaker
The handset has a separate loudspeaker for the loud
speaking function. It is placed on the
back side of the handset.
Microphone
The microphone is placed on the front bottom side of
the handset.
Clip
There are two different belt clip options for the handset
; a hinge-type clip (standard), and a
swivel-type clip. See 15. Troubleshooting on page 73 or 14.3 Attach the Swivel-type Clip on
page 72. Use the clip to attach the handset to a pocket, belt, or similar. It is also possible to
use the handset without any clip on, see 14.4 Attach Cover for No Clip on page 72.
Battery
The battery is a rechargeable Li-Ion b
a
ttery, placed under a battery cover. See 14.1.4
Replace the Battery on page 70.
The battery is fully charged within 2.5 hours. See 14.1.2 Charge the Battery on page 70.
The battery can be charged separately with a special battery rack charger. See 14.1.3
Charge Spare Batteries on page 70.
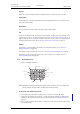
3.1.1 Alphanumeric Keys
Figure 2.
. , ? ! - ‘ ” 1
a b c à â æ ç 2
d e f é è ê ë 3
j k l 5
m n o ñ ô ö œ 6
t u v û 8
#
g h i î ï 4
p q r s 7
w x y z 9
Space + * 0
Available characters.
NOTE: Depending on the selected menu language, other characte
rs are also available. This
means that the character order can differ from the figure above.
In idle mode, and number input mode
• A short press on a key enters the di
gi
ts “0”–“9” and the characters and #.
• A long press on 0 enters the character + (used, for example, to
enter an international
number), if the hot key function on key 0 is deactivated, see 9.6.2 Define Hot Keys on
page 53.
• Enter a pause in number input mode by a long press
on the *-key. A pause is indicated by
a “P” in the display.