OpenStage M3/M3 Plus OpenStage M3 Ex/M3 Ex Plus on HiPath Cordless Office HiPath 3000 Operating Instructions A31003-M2000-U102-2-7619
Our Quality and Environmental Management Systems are implemented according to the requirements of the ISO9001 and ISO14001 standards and are certified by an external certification company. Copyright © Unify GmbH & Co. KG <06/2014> Hofmannstr. 51, 81379 Munich/Germany All rights reserved. Reference No.
2 Safety notes Safety notes Using the OpenStage M3 Ex and OpenStage M3 Ex Plus handsets in potentially explosive working environments This handset fulfils the requirements of the ATEX Directive and meets the required EN and IEC standards (see the appendix in the operating manual). See also the notes in the declaration of conformity. OpenStage M3 Ex and OpenStage M3 Ex Plus were designed for use in potentially explosive working environments (Ex zones) and in compliance with fire prevention regulations.
Safety notes 3 Headset: • A corded headset may not be used in the Ex zone. Only Ex authorised Bluetooth headsets may be used. For more information, consult your system administrator. USB cable connection: • Data may not be transferred via USB cable in the Ex zone.
4 Safety notes Compliance with BGR 139 (personal alarm functionality) Only for OpenStage M3 Plus and OpenStage M3 Ex Plus! Notes: • For BGR-compliant operation as a personal alarm signal device with a voice communication capability (PNG-S), the handset must operate in conjunction with an alarm server. Handset operation without an alarm server is not BGR-compliant. • The alarm functionality cannot be deactivated by the user. Deactivation is only possible via a control call from the alarm server.
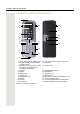
Controls, parts of the device 5 Controls, parts of the device 1 2 3 17 22 4 21 5 20 6 19 7 8 9 16 15 18 14 10 11 13 12 1 Alarm and emergency call key (red) 2 LED for indicating mode activation and alarm status 3 Example of a 2.
6 Contents Contents Safety notes . . . . . . . . . . . . . . . . . . . . . . . . . . . . . . . . . . . . . . . . 2 Using the OpenStage M3 Ex and OpenStage M3 Ex Plus handsets in potentially explosive working environments. . . . . . . . . . . . . . . . . . . . . . . . . . . . . . . . . . . . . . . . . . . . . . . . . . . . . . . . . . . . . 2 Using OpenStage M3, OpenStage M3 Plus, OpenStage M3 Ex and OpenStage M3 Ex Plus. . 3 Using the battery pack for OpenStage M3 and OpenStage M3 Plus . . . . . . . . . .
Contents 7 Conducting calls – enhanced functions . . . . . . . . . . . . . . . . . . 31 Speakerphone mode. . . . . . . . . . . . . . . . . . . . . . . . . . . . . . . . . . . . . . . . . . . . . . . . . . . . . . . . . 31 Conducting calls with the headset. . . . . . . . . . . . . . . . . . . . . . . . . . . . . . . . . . . . . . . . . . . . . . . . 32 Corded headset . . . . . . . . . . . . . . . . . . . . . . . . . . . . . . . . . . . . . . . . . . . . . . . . . . . . . . . . . . . 32 Cordless headset . .
8 Contents UCD (Universal Call Distribution) . . . . . . . . . . . . . . . . . . . . . . . . . . . . . . . . . . . . . . . . . . . . . . . . 69 Mulap group (Multiple Line Application) . . . . . . . . . . . . . . . . . . . . . . . . . . . . . . . . . . . . . . . . . . . 72 Message functions . . . . . . . . . . . . . . . . . . . . . . . . . . . . . . . . . . 74 Leaving a message/advisory message . . . . . . . . . . . . . . . . . . . . . . . . . . . . . . . . . . . . . . . . . . . .
Contents 9 Calling functions via codes . . . . . . . . . . . . . . . . . . . . . . . . . . . . . . . . . . . . . . . . . . . . . . . . . . . 107 Functions and codes . . . . . . . . . . . . . . . . . . . . . . . . . . . . . . . . . . . . . . . . . . . . . . . . . . . . . . . . . 108 Personal alarm functionality. . . . . . . . . . . . . . . . . . . . . . . . . . 110 Alarm statuses . . . . . . . . . . . . . . . . . . . . . . . . . . . . . . . . . . . . . . . . . . . . . . . . . . . . . . . . . . . .
10 Operating instructions Operating instructions These operating instructions describe your handset and its functions on your communications system. All functions that can be performed via your handset are described here. If some of the required functions are not available on your handset, it may be due to one of the following: • The function is not configured for you or your handset - please contact your system administrator.
Putting the handset into service 11 Putting the handset into service Checking the package contents • Handset • Battery pack • Accessory pack containing the following: – Battery cover – Screw for battery cover – Allen key – Attachment clip – Holder for attachment clip – Dummy plug (OpenStage M3 and OpenStage M3 Ex only) – Connector with cord for man down alarm (OpenStage M3 Plus and OpenStage M3 Ex Plus only) • Document "Information on Handset" • Document "Safety Notes" Removing the protective cover Remov
12 Putting the handset into service 2 1 To disconnect the flat plug from the charger, press the release button and disconnect the flat plug. Fitting the attachment clip 1. Press the attachment clip pin on the back of the handset until the tabs on the sides engage audibly in the recesses on the phone. 2. Slide the attachment clip onto the pin as it clicks audibly into place. 3. Secure the handset with the attachment clip to the belt.
Putting the handset into service 13 To remove the handset, press the opener on the attachment clip and slide the handset from the pin. While you are wearing the handset on the belt you will be able to read the display without having to remove the handset, see Page 100. Inserting the battery The handset is supplied with an approved battery. The battery is not charged when supplied. It is first charged in the handset. • • • • • Do not remove the battery in Ex zones.
14 Putting the handset into service 1 2 3 Inserting the battery Insert the battery pack (at an angle, nose first and the contacts facing down). Then press it down into the compartment until the battery pack's positioning clip firmly snaps into place. Closing the battery compartment 1. Replace the battery cover at the bottom of the housing into the recesses. 2. Then press down the battery cover until it rests firmly on the seal. 3. Insert and tighten the Allen screw.
Putting the handset into service 15 Charging and using the battery To charge the battery, insert the handset into the charging shell with the keypad facing forwards. Important: Only place the handset in the designated charger. (For order numbers see Page 122). The charging status is indicated by the charge status LED.
16 Putting the handset into service Connecting a corded headset Not for OpenStage M3 Ex and OpenStage M3 Ex Plus! You can connect a headset with a 2.5 mm jack plug to the left side of your handset. 1. To do this, open the rubber cover using your finger nail and bend it outward. 2. Insert the jack plug into the socket. 1 2 The headset volume corresponds to the setting for the earpiece volume Page 91. Use a Bluetooth headset for Ex-proof equipment, Page 86.
Putting the handset into service 17 Setting the handset display language If your preferred language for handset display texts is not set as the default, you can set this yourself. v Opening the main menu Open the handset's main menu. Opening the first submenu uvÏ st Settings Language [ Select the menu icon and confirm. Opening the second submenu [ Select the menu item and confirm.
18 Putting the handset into service Setting the system display language If you wish to change the language of the display texts, then you must also change the system language on the handset. A different language can be set for every handset on the system. c or d Menu Press and hold the Talk or Speakerphone key. Open the system menu. >< Service? [ Select the menu item and confirm. >< More features? [ Select the menu item and confirm.
Description of controls 19 Description of controls Function keys The following function keys are available: Key a c Name Usage On-hook and on/ • End a call off key • Cancel functions • Go back to the next menu level up • Activate or deactivate the handset Talk key • • • • Speakerphone key • Answer a call • Dial a phone number • Toggle between handset and speakerphone mode • Access telephone system functions Message list • Access message lists * Star key # • When entering the phone number: –
20 Description of controls Control key The control key is assigned different functions depending on the operating situation: t s u v In idle status Call volume Open the handset's phonebook - Open the handset's main menu During a call Call volume Open the handset's phonebook - Select "Loudspeaker Vol", "GAP DTMF", "Base Settings" In the main menu Select a menu icon Select a menu icon Select a menu icon Select a menu icon In lists and menus Next-higher item in the list Next-lower item i
Description of controls 21 Menu icons in the main menu v or w uvts The handset's main menu can be opened by right-clicking or pressing the centre key of the control key. The menu icons are selected by pressing the left/right and top/bottom of the control key. Alternatively, you can also press one of the numerical keys, e. g. 4 for "Alarm Clock" or O for "Settings". Menu options that are only available in expert mode are marked with the • icon.
22 Description of controls Icon Ï Name Usage Settings Configure handset: • Date/Time • Audio Settings – Handset Volume – Advisory Tones – Vibration – Ringtones (Handset) • Display + Keypad – Screensaver – Large Font – Colour Schemes – Display Backlight – Keypad Illumination – Auto Keylock • Language • Registration – Register Handset – Select Base (only if registered on several systems) • Telephony – Auto Answer – Aera Codes • System – Handset PIN – Handset Reset – Base Reset • Menu View – Simplified –
Conducting calls – the basic functions 23 Conducting calls – the basic functions You can use your handset to make both internal and external calls. Internal calls are calls that • you make within the range of a communications system, for example, within your company, • you make between networked communications systems, for example, to different company locations. External calls are calls that you conduct with users of the public telephone network.
24 Conducting calls – the basic functions Language If your preferred language for the display texts is not set, you can set this yourself Page 17. First seize the line, then dial c or d o When the handset is in idle status: Press and hold the Talk or Speakerphone key. Enter the number you wish to dial. The user is called. Typing errors cannot be corrected. In case of typing errors: Press the On-hook key. Either: p The user answers. You are conducting the call. Or: Busy Please replace handset.
Conducting calls – the basic functions 25 Manual redial c st if nec. Show The last 20 phone numbers dialled are saved in the redial list. A phone number that was dialled several times is only saved once. When the handset is in idle status: Press the Talk or Speakerphone key briefly. The redial list is displayed. Select the required telephone number. If you want to see details of the selected phone number: Press the display key. Either: c or d Press the Talk or Speakerphone key briefly.
26 Conducting calls – the basic functions Callback This function enables you to call a user who does not answer or whose line is busy. The Callback function enables you to contact him as soon as he hangs up or re-uses his telephone. Please note that a line is signalled as busy when it is being called by another user. You can continue to use your handset without restriction when a callback has been booked. You can also send a callback request as a message Page 75.
Conducting calls – the basic functions 27 Consultation You interrupt your call to consult with a user (including external users) and then resume the original call. p You are conducting a call. Activating and conducting an enquiry/consultation call Activate enquiry. The current call is placed "on hold", so that the first user waits. Enquiry o p Enter the phone number for the consultation call. The number is dialled. The user answers. The consultation starts.
28 Conducting calls – the basic functions Answering or rejecting a call Accepting a call Your handset rings Page 97. The caller information appears on the display. The name and/or telephone number of the caller can be displayed. You have the following options for answering a call: k c or d The handset is in the charging shell: Remove the handset from the charging shell (only works if "Auto Answer" is active) Page 97. The handset is not in the charging shell. Press the Talk key or Speakerphone key.
Conducting calls – the basic functions 29 Forwarding calls This function is for when you leave your desk for a while and want certain calls to be forwarded to your new location. The forwarding destination for internal calls can be any internal or external phone number. The destination number is usually an external phone number because you can be reached internally anytime by means of your handset. Activating call forwarding c or d Open the system menu.
30 Conducting calls – the basic functions Activating or deactivating the keypad lock # This feature protects against accidentally pressing buttons when the handset is in a pocket, for example. The keypad lock turns off automatically when a call comes in and turns back on when the call has ended. Press the hash key until the activation or deactivation is confirmed by a signal. A key icon on the display indicates that the keypad lock is active.
Conducting calls – enhanced functions 31 Conducting calls – enhanced functions Speakerphone mode Features Speakerphone mode offers you the following advantages: • Other persons can listen to and participate in the call. • Your hands are free. • When dialling, you can hear the ring tone, for example, without having to lift the handset to your ear. Speakerphone mode can be used effectively up to a background noise level of 50 dB (A).
32 Conducting calls – enhanced functions Conducting calls with the headset The handset can be used with a corded and cordless headset. Corded headset Not for OpenStage M3 Ex and OpenStage M3 Ex Plus! You can connect a corded headset via the jack on the side of the handset, see Page 16. The headset must have a (2.5 mm) jack plug. The earpiece and microphone functions are activated on the headset once it is connected. Cordless headset You can use a cordless Bluetooth headset with your handset.
Conducting calls – enhanced functions st [ agreed PIN: Activation ³ 33 If necessary, enter and confirm the Bluetooth PIN for your headset (see the user manual supplied with your headset). The device is saved in the list of known devices. The Bluetooth interface is automatically activated on your handset. The active Bluetooth function is ticked.
34 Conducting calls – enhanced functions Number redial The last 20 phone numbers dialled are saved in the redial list. A phone number that was dialled several times is only saved once. If you tried to call a party from the handset's telephone directory, the name of the party is displayed in case of number redial. For information on manual number redial, see Page 25. Automatic redial c st Options st Automatic Redial [ The phone number is automatically redialled ten times at 20-second intervals.
Conducting calls – enhanced functions 35 Adding a telephone number to the redial list c st Options st st During dial preparation, you can add a number from your handset's redial list to your phonebook. Press the Talk key briefly. The redial list is displayed. Select the required telephone number. Press the display key. Copy to Directory [ Select the menu item and confirm. The phonebook is displayed. [ Select the menu item and confirm.
36 Conducting calls – enhanced functions System speed dialling Your system administrator can save up to 1000 external phone numbers as system speed dialling destinations in your communications system. You can dial these speed dialling destinations with a three-digit code (000 - 999). c or d Menu Dialling a system speed dialling destination Press and hold the Talk or Speakerphone key. Open the system menu. >< Service? [ Select the menu item and confirm.
Conducting calls – enhanced functions c or d Menu Setting up an individual speed dialling destination Press and hold the Talk or Speakerphone key. Open the system menu. >< Service? [ Select the menu item and confirm. >< * 92=Change Speed Dial? [ Select the menu item and confirm. Abb. dial no: > Call the first destination. > Mnu >< Change entry? Call the next destination. Open the additional menu. [ Select the menu item and confirm.
38 Conducting calls – enhanced functions Finding an entry o >< Enter the first letters of the name you are looking for (see Page 39). The name is searched for. The search result becomes more precise as each letter is entered, i.e. the number of names found is reduced. Select the user you want. Dial entry [ Confirm your selection. The selected number is called. Quitting the phonebook Press the display key. Phone numbers dialled from the system phonebook are not stored in the redial list.
Conducting calls – enhanced functions 39 Entering a name and finding an entry You can now enter the name via the handset's keypad. Each key is assigned several letters and each letter is selected by pressing the key an appropriate number of times. For example, you have to press the "7" key three times to enter an "r". o Enter the name you want to find (maximum 16 characters). Partial entries are accepted, for example "mei" for Meier. The more characters entered, the more precise the search result.
40 Conducting calls – enhanced functions The handset's phonebook You can save contact information for frequent call partners in the phonebook. Once a phone number has been saved in this way you no longer have to enter it in full when you want to call someone. All you have to do is select the required phonebook entry. You can save a total of 500 entries at most in the phonebook. Gigaset QuickSync Page 85 is a software application for transferring data between your cordless OpenStage phone and your PC.
Conducting calls – enhanced functions 41 Saving an entry st s [ New Entry o st ... Open the phonebook. Select the menu item and confirm. The input mask is displayed. Enter the relevant information, see above. Jump to the next line. etc. Functions for text input: # X * Save a Switches mode from abc to Abc, from Abc to 123 and from 123 to abc If predictive text is off: press the key briefly. If predictive text is on: press and hold down the key. Deletes the letter to the left of the cursor.
42 Conducting calls – enhanced functions Dialling an entry with the speed dialling digit You can call up and dial the phone number associated with an entry to which you assigned a speed dialling digit by simply pressing this speed dialling digit Page 84. o Press and hold down the required speed dialling digit. The assigned phone number is dialled. Viewing an entry s s t or o Open the phonebook. You can scroll to the required entry or enter the first letter of the relevant entry.
Conducting calls – enhanced functions 43 Marking a VIP (Very Important Person) entry s st st Options VIP Entry [ VIP: u On v s Melodies: u Circles v a An incoming call for a VIP-marked entry is signalled with a VIP ringtone. When the handset is idle: Open the phonebook. Select the entry you want. Open the menu. Select the menu item and confirm. The input mask for marking a VIP entry is displayed. Activate the VIP marking. Move the cursor down one line. Select a melody, for example "Circles".
44 Conducting calls – enhanced functions Sending an entry or phonebook to the handset or system You can send individual entries or the entire phonebook to other handsets or to the communications system. For phonebook transfer in vCard format via Bluetooth see Page 86. If your handset and the recipient's handset have phone numbers between 1 and 99, you can send or receive a list or entry directly from one handset to the other.
Conducting calls – enhanced functions 45 Loading a list or entry from the communications system c or d Menu Prerequisite: You sent an entry or list to the communications system by dialling the phone number 00 or 99. Press and hold the Talk or Speakerphone key. Open the system menu. >< Service? [ Select the menu item and confirm. >< Load list buffer? [ Select the menu item and confirm. a Press the On-hook key once.
46 Conducting calls – enhanced functions Making calls using identification codes In the case of calls you make to external partners, you can enter and charge the call costs on the basis of individuals, customers, accounts and private calls, for example, by means of account codes. The account code (ACCT) can contain up to 11 characters and is included in the data printout. The ACCT is only transferred after a call has been completed. The ACCT can be entered before and during the external call.
Conducting calls – enhanced functions 47 Using the handset as a second line You can use your mobile phone for an outgoing call as if it were another line (temporary phone). c or d Menu This function can also be called by entering the code Page 107. Press and hold the Talk or Speakerphone key. Open the system menu. >< Service? [ Select the menu item and confirm. >< * 508=Temporary Phone? [ Select the menu item and confirm. Home Extn.
48 Conducting calls – enhanced functions Deactivating the phone number display Your service engineer can deactivate the display of your phone number and name on the called party’s display for external outgoing calls. You can also activate and deactivate the phone number display on your own handset yourself.
Conducting calls – enhanced functions 49 Directed call transfer You can transfer calls to other telephones to your handset. This is also possible when you are conducting a call. This function can also be called by entering the code Page 107. c or d Menu Another telephone rings. Press and hold the Talk or Speakerphone key. Open the system menu. >< Service? [ Select the menu item and confirm. >< * 59=Pickup directed? [ Select the menu item and confirm. The called user is displayed.
50 Conducting calls – enhanced functions Call charge display After a call has ended, the display shows the connection charges for the current call as standard. If the costs are to be displayed continuously during an outgoing call, this function must be requested from the carrier. If a call is transferred, the costs are assigned to the telephone to which the call was transferred from this point onwards.
Conducting calls – enhanced functions 51 Entrance telephone If the service engineer has set up an entrance telephone, you can speak to the door intercom and activate the door opener from your handset. Some of the functions described below can also be called directly by entering the relevant code Page 107. Talking to a visitor by means of the door opener equipment Your handset rings. Either: c o Press the Talk key within 30 seconds. You are connected to the entrance telephone immediately.
52 Conducting calls – enhanced functions Activating the door release c or d Menu This function only works if it has been configured by the service engineer. Press and hold the Talk or Speakerphone key. Open the system menu. >< Service? [ Select the menu item and confirm. >< * 89=Door release ON? [ Select the menu item and confirm. o Follow the user guidance system from this point onwards.
Conducting calls – enhanced functions 53 Activating control relays The service engineer can set up a maximum of 4 control relays that enable various equipment (for example, door opener) to be activated and deactivated. It is possible to access a specific control relay. Depending on the configuration, the control relays can be • activated and deactivated automatically, or • activated and deactivated automatically on the basis of a timer. Prerequisite: The service engineer has set up at least one switch.
54 Conducting calls – enhanced functions Sending a signal to the network To enable ISDN-type services/features to be started via analogue lines (for example, call waiting when a line is busy, three-way conference calls, etc.), you must send a signal to the network before dialling the service code and/or phone number. This function can also be called by entering the code Page 107. p Menu You have an external connection. Open the system menu. >< Service? [ Select the menu item and confirm.
Conducting calls – enhanced functions c or d Menu 55 Deactivating call forwarding to a "trunk" Press and hold the Talk or Speakerphone key. Open the system menu. >< Service? [ Select the menu item and confirm. >< Forward by Network OFF? [ Select the menu item and confirm. o Follow the user guidance system from this point onwards (enter a multiple subscriber number or DID and forwarding type). [ Confirm your entries. a Press the On-hook key to end the operation.
56 Conducting calls – enhanced functions Using dual-tone multifrequency signalling Your handset operates on the basis of digital information transmission. However, certain applications, for example answering machines, can only be operated using analogue technology. For this you have to send signals using the dual-tone multifrequency signalling (DTMF) process.
Conducting calls – enhanced functions 57 Parking/activating calls You can park up to ten calls (i.e. place them on hold) to conduct another call in the interim or to continue them on other telephone in your communications system. Parking a call p Menu >< Service? >< * 56=Park a call? You are on a call you wish to park. Open the system menu. [ Select the menu item and confirm. [ Select the menu item and confirm. o Enter the parking position number (0... 9) and note it down.
58 Conducting calls – with multiple users Conducting calls – with multiple users Call waiting You need to speak to a user in your communications system urgently, even though his line is busy. You can send a call waiting signal during his call to let him know you want to talk to him. The user either answers immediately or you will be automatically connected to him when he has finished his call. This function is only available if it has been configured by the service engineer. The user is busy.
Conducting calls – with multiple users 59 Ending the second call Either: Menu >< Quit and return? [ Open the system menu. Select the menu item and confirm. Or: a c Press the On-hook key. The following message appears on the display: "Recalling". Your telephone rings. Press the Talk key to talk to the first caller again. Ending the first call a c Press the On-hook key. The first call is ended. Your telephone rings. Press the Talk key and answer the second call.
60 Conducting calls – with multiple users Disabling/enabling automatic call waiting You can disable/ enable automatic call waiting signalling for a second call during a telephone conversation. Disabling the call waiting tone c or d Menu Press and hold the Talk key or press and hold the Speakerphone key. Open the system menu. >< Service? [ Select the menu item and confirm. >< Call wait.term.off? [ Select the menu item and confirm. a Press the On-hook key to end the operation.
Conducting calls – with multiple users 61 Busy override You need to speak to an internal user urgently, even though his line is busy. The "Override" function allows you to interrupt the ongoing call to pass on a message. This function is only available when the code has been input and if it has been configured by the service engineer. p *L2 Override o The user is busy. Call the function. Enter the phone number of the busy user. The override is established.
62 Conducting calls – with multiple users Transferring (with announcement of call transfer) p Open the system menu. Menu >< [ Start transfer? You can use this function to forward a call you answered to another user. Select the menu item and confirm. The current call is placed "on hold", so that the first user waits. o p Enter the phone number of the user to whom the call is to be transferred. The number is dialled. The user answers. You announce the call presently on hold.
Conducting calls – with multiple users 63 Conducting a conference You can connect up to 5 internal or external partners with each other in a telephone conference. You can include up to 4 external users in the conference. For information purposes, you will hear an alerting tone every 30 seconds during a conference call (can be disabled - ask your service engineer). Setting up a conference You decide to set up a conference while talking to a user. p Open the system menu.
64 Conducting calls – with multiple users Open the system menu. Menu >< End conference? [ Select the menu item and confirm. The conference is ended. Leaving a conference a Press the On-hook key. You exit the conference. When one user leaves the conference, the other two users remain connected. Viewing the names of conference parties As the convener of the conference, you can view the names of all conference parties. p You are connected with two or more partners in a conference call.
Conducting calls – with multiple users 65 Connecting parties As the conference convener, you can leave the conference and thereby connect the other parties with each other. If you were previously connected with two or more parties, the other parties remain in a conference. Otherwise, the remaining two users conduct a one-to-one call. p Menu >< Withdraw? [ a You are connected with two or more partners in a conference call. Open the system menu. Select the menu item and confirm.
66 Group functions Group functions Activating/deactivating group calls If this has been configured by the service engineer, you belong to one or more groups of internal users that can be reached at a hunt group or group call phone number. Calls are signalled on all telephones in the group either in succession (=hunt group) or simultaneously (=group call), until a member of the group answers the call. Every user in the group can also remain available under his own phone number.
Group functions 67 You belong to multiple groups Leaving and re-joining individual groups c or d Menu Press and hold the Talk key or press and hold the Speakerphone key. Open the system menu. Either: Leave hunt group? [ Select the menu item and confirm. Or: >< Join hunt group? [ Select the menu item and confirm. then: > Group 1 Group 2 Mnu Select the required group and call the additional menu. Either: >< Leave hunt group? [ Select the menu item and confirm.
68 Group functions Ringing group on You can have calls to your handset signalled acoustically on up to five other telephones. The call is received by the person who answers the call first. Adding users to a group First user c or d Menu Press and hold the Talk key or press and hold the Speakerphone key. Open the system menu. >< Service? [ Select the menu item and confirm. >< * 81= [ Select the menu item and confirm. Ringing group on? Mnu Add ext to group? Open the additional menu.
Group functions 69 UCD (Universal Call Distribution) This function enables calls to be distributed in a team. An incoming call is always delivered to the team member who has been idle longest. Team members can also work in separate rooms, for example, on the company's premises and at a teleworking station. The teams (call distribution groups) and team members are set up by the service engineer. Logging on/off You must log on and off at the system when you start/finish work.
70 Group functions c or d Menu Press and hold the Talk key or press and hold the Speakerphone key. Open the system menu. >< Service? [ Select the menu item and confirm. >< UCD Menu? [ Select the menu item and confirm. >< #402=Not available? [ Select the menu item and confirm. a Press the On-hook key to end the operation. Wrap-up time If you need more time than the actual call lasts, you can request/activate a wrapup time for the last call.
Group functions 71 UCD night service UCD night service is a separate night service for call distribution. It is not affected by the system night service. All incoming calls are forwarded to a special call distribution destination. Night destination on c or d Menu Press and hold the Talk key or press and hold the Speakerphone key. Open the system menu. >< Service? [ Select the menu item and confirm. >< UCD Menu? [ Select the menu item and confirm.
72 Group functions Mulap group (Multiple Line Application) If your handset's line belongs to a Mulap group (Multiple Line Application), then you can • answer calls for the group (press the Talk key in group calls) • make external telephone calls under the group phone number (the group phone number is stored in the called party's caller list, for example) • activate and deactivate the group call function for your handset's line • forward the lines of the Mulap group to internal or external destinations Ac
Group functions 73 Forwarding on c or d Menu Press and hold down the Talk key or press and hold the Speakerphone key. Open the system menu. >< Service? [ Select the menu item and confirm. >< More features: [ Select the menu item and confirm. >< * 501=Forward [ Select the menu item and confirm. Line: On? o Enter a line number. Either: >< [ 1=all calls? Select the menu item and confirm. Or: >< [ 2=external calls only? Select the menu item and confirm.
74 Message functions Message functions The message functions enable you to react to voicemail/callback services of the communication system or of other users or to initiate information features yourself. Leaving a message/advisory message A number of advisory messages are stored in your communication system that can be automatically sent to the caller when an internal call is not answered (in the case of handsets and telephones with display).
Message functions 75 Deactivating an advisory message c or d Menu >< Absence Text OFF? [ a Press and hold the Talk key or press and hold the Speakerphone key. Open the system menu. Select the menu item and confirm. Press the On-hook key to end the operation. Sending/calling text messages You can send short messages to individual internal users or to groups of internal users. These must have a handset or telephone with display.
76 Message functions a Press the On-hook key to end the operation. Answering a message or voicemail message An advisory message appears and the message key flashes when one or more information messages or voicemails have been received for you. Viewing a new message Either: f Press the message key. Or: c or d Menu >< Display Messages? [ >[ Press and hold the Talk key or press and hold the Speakerphone key. Open the system menu. Select the menu item and confirm.
Message functions 77 Checking for an old text message c or d Menu >< > >< >< Display Messages? Msg. from: ... Text? Mnu Time/date sent? >< at: ... [ Old messages that have not been deleted cannot be displayed using the message key f. To view these messages, proceed as follows: Press and hold the Talk key or press and hold the Speakerphone key. Open the system menu. Select the menu item and confirm. Select the required message and call the additional menu.
78 Message functions Calling back a caller > Mnu >< Call? [ Select the party Open the additional menu. Select the menu item and confirm. The connection is set up. The caller is automatically deleted from the caller list when a connection is finally set up. Call requests for groups (hunt group/group call) are also deleted if a member of the group has set up the connection.
Additional functions 79 Additional functions Handset alarm clock function When the alarm clock is activated, it rings every day or every day from Monday to Friday at the set time. The alarm clock is deactivated during automatic number redial. The alarm will only sound with the set melody if the handset is in idle status. During a call, the alarm is only signalled by a short tone. Prerequisite: The date and time must be set. Setting the alarm clock uvì v Alarm Clock [ The handset is in idle status.
80 Additional functions Press the display key or any key. The alarm deactivates and is repeated after five minutes. The alarm is repeated twice and then permanently deactivated. Snooze Handset appointment reminder function You can use your handset to remind yourself of up to 30 appointments. The handset must be in idle status at the time of the appointment reminder. The appointment reminder function is deactivated during automatic number redial. The date and time must be set.
Additional functions 81 Deactivating an appointment reminder uvá st v Organizer Calendar Select the menu icon and confirm. [ Select the menu item and confirm. The calendar for the current month is displayed. [ Deactivate Select and confirm the required day with at least one available appointment. The list of appointments is displayed. Select the appointment reminder that you want to deactivate. 09:15 Meeting 18:00 Date Options st Open the handset's main menu.
82 Additional functions System appointment function You can use your handset to enter a single appointment for the next 24 hours or an appointment that recurs on a daily basis. When the appointment is due, your handset rings for approx. 20 seconds to remind you of your appointment. The entered appointment appears on the display. This appointment call is deleted when you confirm it. Alternatively it is deleted automatically after it has been repeated 5 times at one-minute intervals.
Additional functions 83 Confirming an appointment c a The handset rings and the appointment is displayed. Press the Talk key. Press the On-hook key. The appointment is confirmed. Selecting a base If your handset is registered at multiple bases (cordless systems), then you can set a specific base or the base with the best reception as the base to be used. The handset then switches automatically to this base. uvÏ v Settings You can change the base name that is displayed on the handset at any time.
84 Additional functions Setting the base Cannot be set on HiPath 3000. uvÏ v Settings You can configure individual settings on your system with your handset depending on how your system is configured. Open the handset's main menu. [ Select the menu icon and confirm. st System [ Select the menu item and confirm. st Base Reset [ Select the menu item and confirm. ><[ Select the required menu item and confirm. Speed dialling You can program the number keys Q and 2 to O with a phone number.
Additional functions 85 Changing display key assignments You can assign functions to display keys and/or change the current assignment. The function is then started by pressing the key. Changing the assignment ? Press and hold the required display key. A list of the functions that can be programmed on the key is displayed.
86 Additional functions Bluetooth interface Before you can use your Bluetooth device, activate Bluetooth, ensure the devices are visible and then register the handset. You can register one Bluetooth headset at the handset. You can also register up to five data devices (PCs, PDAs and handsets) to send and receive address book entries as vCards or exchange data with the computer ( Page 90). To use the phone numbers, dialling codes (country and area code) must be stored in the directory ( Page 101).
Additional functions 87 Registering Bluetooth devices The distance between the handset in Bluetooth mode and the activated Bluetooth device (headset or data device) should be no more than 10 m. To connect a Bluetooth headset, see Page 32. If the Bluetooth connection is not yet established between the handsets, perform the following steps: Searching on your handset uvò st v Bluetooth Search Data Device Open the handset's main menu. [ Select the menu icon and confirm.
88 Additional functions Confirming the connection on the other device st st agreed PIN: [ Enter and confirm identical Bluetooth PINs within a few seconds (default: 0000). If you were not fast enough, repeat the previous steps. Add to Known Device List [ Confirm the prompt. The Bluetooth connection is established. The two devices can now exchange data in vCard format. Editing the list of known (trusted) devices Opening the list uvò st v Open the handset's main menu.
Additional functions 89 Rejecting/accepting an unregistered Bluetooth device If a Bluetooth device that is not registered in the list of known devices tries to connect with the handset, you will be prompted on the display to enter the PIN for the Bluetooth device (bonding). a Rejecting Press the On-hook key briefly. Accepting o[ Enter the PIN for the Bluetooth device you want to accept and confirm. If you have accepted the device, you can use it temporarily (i.e.
90 Additional functions Phonebook transfer To transfer the phonebook data between handsets or with the system without using Bluetooth, see Page 44. s st Options Prerequisite: The Bluetooth connection between the devices is established Page 87. Open the phonebook. Select the entry. Press the display key. st Copy Entry [ st Copy All [ Select the menu item and confirm. st vCard via Bluetooth: [ Select the menu item and confirm. Trusted Devices ...
Setting the handset 91 Setting the handset You can change the standard settings of the handset if you are not happy with them. Setting the speaker volume During a call You can adjust the speaker volume during a call via the earpiece or speakerphone using a menu function. The relevant volumes are adjustable depending on whether you are conducting the call via the earpiece or speakerphone. p t r You are conducting a call. Press the control key to open the Handset Volume menu.
92 Setting the handset Setting advisory tones Can only be set if this menu item is visible. To set, see Page 101. The advisory tones have the following meaning: uvÏ v Advisory Explanation Key Tones Every key press is confirmed. Confirmation • Confirmation tone when saving inputs/settings and when placing the handset in the charging shell • Error beep (decrescendo tone sequence) to signal incorrect inputs • End-of-menu beep at the menu end Battery The batteries must be charged.
Setting the handset 93 Setting the ringer uvÏ v Tones and melodies are saved on your handset. If you select the menu items Volume and Melodies, the ringtone sounds at the current setting. Open the handset's main menu. Settings [ Select the menu icon and confirm. st Audio Settings [ Select the menu item and confirm. st Ringtones (Handset) [ Select the menu item and confirm. [ Select the required menu item and confirm. st Volume Melodies Time Control Anon. Calls Silent The "Anon.
94 Setting the handset st Time Control [ uv st Select the menu item and confirm. Specify On or Off. If active: Suspend ring from Suspend ring until o Select the required menu item. Enter the time. Save the settings. Save Setting ringing tones and pictures with resource directory Your handset's resource directory is used to manage sounds that you can use as ringing tones and pictures that you can use as screensavers.
Setting the handset 95 Screensavers/caller pictures Show st a Press the display key. Toggle between the pictures. If you have saved a picture in an invalid file format, you will see an error message after selecting the entry. Press to exit the menu level. Sounds st The selected sound is played immediately. Toggle between the sounds. You can set the volume during playback. st Options Loudspeaker Vol [ Press the display key. Select the menu item and confirm. uv Adjust the volume.
96 Setting the handset Checking the available memory You can show how much memory is left. uv· st v Open the handset's main menu. Media-Pool [ Select the menu icon and confirm. Available Memory [ Select the menu item and confirm. Activating or deactivating the ringer Deactivating the ringer * Hold down the key until a confirmation tone is emitted. The ó icon appears on the display. Activating the ringer * Hold down the key until a confirmation tone is emitted.
Setting the handset 97 Activating/deactivating automatic call answering Can only be set if this menu item is visible. To set, see Page 101. uvÏ st v Settings Telephony st This function allows you to accept calls by removing the handset from the charging shell. Open the handset's main menu. [ Select the menu icon and confirm. [ Select the menu item and confirm. Select the menu item. Auto Answer Press the display key.
98 Setting the handset Setting the display A number of options are available for setting the display. You can set the screensaver (screen picture), the colour scheme, the font size and the display lighting. Screensaver/slide show A picture or slide show (all the pictures are displayed one after the other) from the resource directory Page 94 or the time can be displayed as a screensaver when the handset is idle. This will replace the idle status display.
Setting the handset 99 Colour scheme uvÏ st st v Settings Display + Keypad Colour Schemes [ [ [ st Selection Five colour schemes are saved on your handset. By selecting a colour scheme you define the colours to be used for the font, menu items and background. If you change to a different colour scheme during a setting, it is immediately previewed to show how it will appear later for all menus. Open the handset's main menu. Select the menu icon and confirm. Select the menu item and confirm.
100 Setting the handset Rotating the display automatically Only OpenStage M3 Plus and OpenStage M3 Ex Plus! You can activate and deactivate the automatic position-dependent rotation of the information on the display. When activated, the display is rotated by 180° (upside down) in non movement and call statuses when you move the handset from a vertical to a horizontal position.
Setting the handset 101 Setting the conversion list for vCard transfer Can only be set if this menu item is visible. To set, see Page 101. See also Gigaset QuickSync Page 85, Phone numbers are usually specified as follows in e-mail programs, such as Microsoft Outlook for example: +49 (30) 11111111. The handset is unable to use this format, however, to dial the phone number. If the phone number above is a local fixed network number, it is converted to 011111111, for instance, when dialled.
102 Setting the handset Resetting the defaults Can only be set if this menu item is visible. To set, see Page 101. This function allows you to reset your mobile phone to the defaults, for example, if you want to pass it on to someone else or reset it.
Setting the handset 103 Default settings Setting Tones and signals Explanation/notes Ringer volume Levels Default state 5 5 Ringer melody, external Ringer melody, internal Alerting tone Earpiece volume Volume in speakerphone mode Timed reminder Melody Volume Key tones, audible each time a key is pressed Warning tone, audible approximately five minutes before the battery expires Confirmation tone, indicates whether actions were successful or unsuccessful Auto.
104 Telephone blocking Telephone blocking Handset telephone lock Can only be set if this menu item is visible. To set, see Page 101. You can protect your handset against theft by entering a 4-digit numerical code (PIN) to lock it. The PIN is preset to "0000" (default). The handset does not prompt for a PIN in this setting. As soon as you have changed the PIN you will need to enter it when you turn on the handset. You can protect your handset from unauthorised access with the telephone lock Page 105.
Telephone blocking 105 Telephone lock code programming c or d Menu > < Service? You can protect your handset against unauthorised access (thereby safeguarding personal data) by entering a 5-position code to lock and unlock it. To change a code, first enter the old code and then key in the new code twice. Press and hold the Talk key or press and hold the Speakerphone key. Open the system menu. [ Select the menu item and confirm. > < * 93=Change PIN? [ Select the menu item and confirm.
106 Telephone blocking Central telephone lock / Locking/unlocking other handsets If you have the appropriate authorisation, you can lock and unlock other handsets to prevent unauthorised use. c or d Menu If the user has locked his handset and has forgotten the individual password he has set, you can unlock the phone again using this function. Press and hold the Talk key or press and hold the Speakerphone key. Open the system menu. > < Service? [ Select the menu item and confirm.
System functions 107 System functions The system functions can be called up via the menu or directly by entering codes. Calling functions via the menu c or d Menu Press and hold the Talk key or press and hold the Speakerphone key. Open the system menu. Either: >< [ Suppress call ID? Select and confirm the function. Or: >< >< Service? [ Select the menu item and confirm. * 41=Temporary MSN? [ Select and confirm the function. Or: >< Service? [ Select the menu item and confirm.
108 System functions Functions and codes Your service personnel may have assigned different codes to the following functions or some functions may not be available in your configuration. Functions Automatic call wait.term.on Automatic call wait.trm.off Call waiting tone off Call waiting tone on Accept call waiting Caller list - Call - Saving a number Advisory msg. on Advisory msg.
System functions 109 Functions Codes Callback View callbacks Suppress phone number Restore phone number Temporary phone number (MSN) Ringing group on Ringing group off Hunt group/join hunt group Hunt group/leave hunt group Control Relay On Control Relay Off Change PIN Trunk flash) Language selection Locking the phone Unlocking the phone Directory (system, LDAP) Tel.
110 Personal alarm functionality Personal alarm functionality The OpenStage M3 Plus and OpenStage M3 Ex Plus handsets are equipped with a sensor that allows them to be operated as a PNG-S. These handsets are referred to below as personal alarm devices with voice communication capability, or by the abbreviation PNG-S. Alarm statuses Integrated sensors detect alarm statuses such as: • Non movement • Position detection (deviation from the upright position, e.g.
Personal alarm functionality 111 Alarm sensors The alarm sensors detect operating states from which alarm situations can develop. The handset can detect and signal automatic alarms. These include non movement, man down, time, escape and pull cord alarms. In addition to automatic alarms, there are also manual alarms, which are triggered by means of an alarm key. Alarm key The alarm key initiates a manual alarm. The alarm destination (default: phone number 112) can be configured.
112 Personal alarm functionality Alarming signal If an alarming signal is triggered, the handset automatically generates alarm calls to the configured alarm destination. The alerted party recognises the alerting party from the caller's phone number for example. The alarm subscriber's phone number has to be transmitted for this purpose. The communications system used must support the caller ID function.
Personal alarm functionality 113 Monitoring LED The monitoring LED visually indicates the following PNG operating states: Monitoring Off: Monitoring On: Prealarm Active: Alarm: Technical Warning: Automatic Alarm Off: continuously off flashing, 50 ms on/1000 ms off flashing, 500 ms on/500 ms off continuously on continuously on flashing, 500 ms on/2000 ms off Language support in Additional Features menu The Additional Features menu is only available in German and English.
114 Personal alarm functionality Activating monitoring Note: The alarm functionality must be configured prior to initial use. 3x w Press the centre key three times. or uvÉ st v Extras [Mode] Activation Open the handset's main menu. [ Select the menu icon and confirm. [ Select the menu item and confirm. The procedure for activating the alarm functionality is started. The handset immediately activates monitoring mode. Shown on the display when the handset is in monitoring mode.
Personal alarm functionality Either: [ Or: 115 Press any display key Immediately press any display key or the volume key (+/-) in order to confirm the prealarm. The prealarm is reset and the pending alarm is prevented. This avoids a false alarm being issued. Confirm triggering event The prealarm can also be confirmed by resolving the triggering event, i.e.
116 Personal alarm functionality Sending an emergency alarm signal/calling for assistance In monitoring mode The handset is in monitoring mode. Automatic alarming signal The alarm sensors in the handset recognise operating statuses that trigger an alarming signal. Certain alarm types initially generate a prealarm (configurable). If you do not acknowledge this alarm, the handset sends emergency alarm signals to the configured alarm destination.
Personal alarm functionality 117 Deactivating monitoring 3x w Press the centre key three times. or uvÉ st v Extras [Mode] Activation Open the handset's main menu. [ Select the menu icon and confirm. [ Select the menu item and confirm. The procedure for disabling the alarm functionality is started. The handset disables the alarm functionality automatically. The handset is now no longer in monitoring mode.
118 Personal alarm functionality Function test when activating Alarm Mode and PNG Mode A function test has to be performed before the Alarm Mode or PNG Mode is used. This test is performed automatically by the handset. Please follow the instructions on the display. 1. Test: Charge status of battery pack If the battery pack is adequately charged, no reference is made to the battery test.
Appendix 119 Appendix Troubleshooting Some malfunctions can be resolved without outside intervention. The following table provides a list of such malfunctions. All other malfunctions should be reported to the relevant service personnel. Error No display. You cannot dial an external number. No reaction to keystroke. Possible cause Remedy The handset is not switched on. Press the On-hook key until confirmation is received. Batteries are empty. Charge or replace the batteries. The handset is locked.
120 Appendix Error The following appears: Not possible or: Incorrect entry. or: Key not programmed. The following appears: no access Possible cause Speed-dial number not available, appointment entered incorrectly, entry blocked or not allowed, prerequisite not fulfilled (for example if there is no second partner for toggling), number dialled was incomplete. Remedy Correct your input, select a permitted option, enter the phone number in full. Blocked function was called.
Appendix 121 General specifications Handset Maximum sound pressure level according to less than 118 dB (A) TBR10, Annex D Weight incl. battery approx. 100 g Dimensions (W x H X D) approx. 48 x 127 x 19 mm DECT DECT standard Supported GAP standard Supported No.
122 Appendix Handset operating times/charging times The operating time of your handset depends on the capacity and age of the battery and the way it is used. (All times are maximum possible times).
Appendix 123 Accessories Use only original accessories. This will avoid possible health risks and personal injury and also ensure that all the relevant regulations are complied with. Source For information on accessories (such as headsets, protective pouches), contact Unify at the following address: http://wiki.unify.
124 Appendix Writing names • Enter the individual letters/characters by pressing the corresponding key. The characters assigned to the key are shown in a selection line at the bottom left of the screen. The selected character is highlighted. • Briefly press the key several times in succession to select the required letter/character. Standard characters 1x 2 3 4 5 L M N O a b Q Space Line feed 1 a d g j m p t w a 2x 3x 4x 5x 6x 7x 8x 9x 10x b e h k n q u x .
Appendix 125 Declaration of conformity Your handset is supplied for use within a specific country, which is displayed on the underside of the device. Country-specific requirements have been taken into consideration. The device complies with the basic requirements of the R&TTE Directive and therefore displays the CE symbol.
Index Index Numerics 2.5 mm jack ................................................................ 5 A Accessories ............................................................ 123 Account code ........................................................... 46 Activating .................................................................. 23 Advisory message .................................................... 74 Advisory tones .......................................................... 92 Alarm clock ............
127 Confirmation tone Function .............................................................. 103 Setting ................................................................... 92 Connecting parties ................................................... 65 Connection quality .................................................... 23 Consultation (second connection) ............................ 27 Control key ............................................................5, 20 Control relays ............................
Index 128 K N Key tone Function .............................................................. 103 Setting ................................................................... 92 Keypad lock .............................................................. 30 Keys Control key ............................................................ 20 Display keys .......................................................... 20 Function keys ........................................................ 19 Night answer ........
129 Index R T Radio range .............................................................. 23 Range problems ....................................................... 23 Recall ..................................................................57, 61 Redial Automatic .............................................................. 34 Registering devices (Bluetooth) ............................... 87 Rejecting a call ......................................................... 28 Resetting ........................