
User guide


Camera Menu
5-11
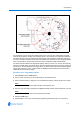
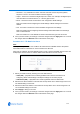
Figure 5-5 An example of areas
The ending point of one area is the starting point for the next area. The ending point of the last
area cannot go past the starting point of the first area. In this example, the area that includes the
vending machines cannot extend past the starting point of the area that includes the emergency
exit. If your controller supports areas, these are separate from the areas you can program with the
dome. You should not use both the controller and the configuration utility to define areas.
The zoom level also affects how large areas appear. When you zoom in to an area, the area may
appear to be small. When you pan the dome, area boundaries may appear to be close. However, if
you zoom out, the area appears to be larger. When you pan the dome, the area boundaries appear
further apart. With this in mind, it will be easier to establish area boundaries if the zoom level is
small than if the zoom level is large.
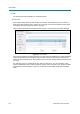
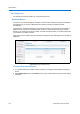
Procedure 5-13 Programming Areas
1 Select Areas from the Camera menu.
2 Enter a name of the area you are programming in the Name text box.
3 Enter the left boundary, in degrees, in the Left Boundary text box. Values range from 0 to 359.
Note
This must not be less than the right boundary of the previous area.
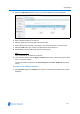
4 Enter the right boundary in degrees in the Right Boundary text box.Values range from 0 to 359.
Note
This must not be greater than the next area’s left boundary.
5 Select the Add button.
6 Repeat steps 2–5 until you have finished programming boundaries (up to 16 can be set).