
User guide


Camera Menu
5-3
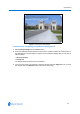
35X Camera Dome
The IP Dome 35X camera dome includes a 35X optical zoom camera with 12X digital zoom
capability. The maximum possible zoom is 420X.
The following example explains how 35X camera zoom stop settings work.
The default camera settings are 52X for the first zoom stop setting and 140X for the maximum
zoom setting. If the current zoom level is less than 52X, pressing Zoom In continuously causes the
zoom to stop at 52X. If the zoom level is 52X or greater, pressing Zoom In continuously causes the
zoom to stop at the maximum zoom setting of 140X. The second zoom stop remains in effect until
the zoom function is reduced to less than the first zoom stop setting (52X) and the zoom button is
released for one second or longer. To achieve higher zoom levels, change the maximum zoom
setting.
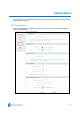
Procedure 5-3 Configuring the 35X Camera Zoom Stop settings
1 Select PTZ Configuration from the Camera menu.
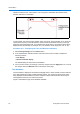
2 In the Zoom Stops section use the slider to change the First Zoom Stop setting. The slider bar
can be moved left or right using the mouse or for fine adjustments using the left and right arrow
keys on the PC keyboard. The default first stop zoom setting is 52X.
• Select 35 to set the first zoom stop to 35X magnification.
• Select 52 to set the first zoom stop to 52X magnification.
3 Use the slider to change the Max Total Zoom X setting. The Max Zoom setting should always
be higher than the First Zoom setting. The default maximum zoom setting is 140X.
4 Once you have chosen your settings, to save the changes select the Apply button or to cancel
the changes select the Refresh button at the bottom of the page.
Freeze Frame
If you need to maintain a static image when calling automatic functions, such as presets or
patterns, use the Freeze Frame setting. This prevents the dome movement and lens adjustments
being displayed on-screen while the preset or pattern is being found.
When the Freeze Frame setting is enabled, the scene currently displayed on the monitor will be
preserved (frozen) on-screen until the pattern or preset is ready for display. The image then
switches smoothly to the new scene. You may want to use this setting if using a digital video
recorder.
The Freeze Frame feature allows the current image to be maintained on-screen when switching to
a preset or pattern. If presets or patterns are included as part of a sequence or tour, the total
movement and lens adjustment time should be included as part of the dwell time to ensure that the
scene will be displayed before moving to the next scene.
Procedure 5-4 Configuring the Freeze Frame function
This prevents the display of the dome movement and lens adjustments from being displayed on-
screen while the preset or pattern is being found.
1 Select PTZ Configuration from the Camera menu.
2 In the Freeze Frame section select the check box to enable or disable the function. The default
setting is disabled.
3 Once you have chosen your settings, to save the changes select the Apply button or to cancel
the changes select the Refresh button at the bottom of the page.