
User guide


Web Configuration
3-11
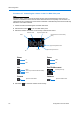
4 Select a pattern slot number from the drop-down menu, the new pattern will be saved to this
slot number. Select Define Pattern
the pattern definition menu will be displayed:
Note
If the selected pattern slot number has been assigned to a pattern it will be replaced without
warning. This also applies to any pattern that is associated with a Home Position, Alarm Action
or Scheduled task. The original pattern will be replaced by the new pattern.
Note
The apple peel pattern as a default will be saved to pattern slot numbers 1 and 16. If these
pattern slot numbers are selected when defining a pattern the apple peel pattern will be
replaced by the new pattern. To restore the apple peel pattern you must follow
Procedure 6-49
Restore Factory Defaults.
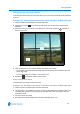
5 Select Start to begin programming the pattern. Use the camera control overlay to define
the pattern’s behavior.
Note
A pattern can contain a maximum of 97 steps with an unlimited duration.
Note
A diagonal pan or tilt move will use 4 steps.
6 The white progress bar provides a visual representation of the number of steps remaining in
the pattern. As steps are added to the pattern this progress bar will decrease.
When the progress bar reaches the left side, no more steps will be saved for the pattern.
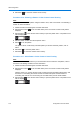
7 Select Stop . to end the pattern recording. The Replace Pattern dialog will appear prompting
you to confirm that the pattern should be saved. Select Yes to save or No to cancel.
The camera settings you have configured will be used for the pattern. Refresh the page.
8 Select Exit to close the pattern’s definition menu.
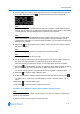
9 To test the new pattern, select the pattern number from the drop-down menu and select .
The pattern will run continuously until interrupted by a camera command, pattern, scan or
alarm.
10 Select Exit to close the Pattern menu.
11 Select Exit to close the Primary Camera Control menu.
Procedure 3-12 Selecting a Preset via the Camera Control Overlay
Note
It is also possible to select a preset using the Preset menu, refer to Procedure 4-16 Selecting a
Preset for more information.
1 Follow Procedure 3-5 Starting the Live Web Video feed.