
User guide


Networking Menu
6-4 Configuration and User Guide
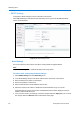
TCP/IP
Configure the DHCP, the IP address and the DNS in this section.
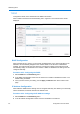
When TCP/IP is selected from the Networking menu. Figure 6-17 the TCP/IP screen will be
displayed.
Figure 6-17 TCP/IP screen
DHCP Configuration
When a DHCP server is running on the network enabling DHCP on the camera will allow an IP
address to be automatically assigned to the camera. DHCP on the IP Dome is defaulted to
enabled. This ensures that when the camera is connected to a DHCP network the server will
automatically assign an IP address for the camera. If DHCP is disabled the IP settings must be
configured manually.
Procedure 6-33 Configuring the DHCP
1 Select TCP/IP from the Networking menu.
2 In the DHCP Configuration section use the check box to enable or disable this function. The
default setting is enabled.
3 Once you have chosen your setting, use the Apply or Refresh button at the bottom of the
page.
IP Address Configuration
When DHCP is disabled the IP settings can be configured manually. This allows you to manually
set the IP address, the subnet mask and the default router.
Procedure 6-34 Configuring the IP Address settings
1 Select TCP/IP from the Networking menu.
2 In the IP Address Configuration section enter the IP address in the text box.