
User guide


Networking Menu
6-2 Configuration and User Guide
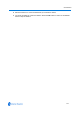
4 Once you have chosen your settings, to save the changes select the Apply button or to cancel
the changes select the Refresh button at the bottom of the page.
Note
If either Synchronize with computer or Synchronize with NTP Server have been selected in the
Setting camera time section it will be necessary to confirm the change settings and reboot the
camera. You will have to log back in to the IP Dome when it restarts, Follow
Procedure 3-4
Logging in to the IP Dome.
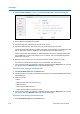
Procedure 6-30 Configuring the Date Time Format
1 Select Date Time from the Networking menu.
2 In the Date Time Format section, check the Camera Time. If it is incorrect it can be altered
using
Procedure 6-32 Setting the Camera Time.
3 To change the format use the Date Display Format drop-down menu:
• DD/MM/YYYY
• MM/DD/YYYY
• YYYY/MM/DD
The default setting is DD/MM/YYYY.
4 Once you have chosen your settings, to save the changes select the Apply button or to cancel
the changes select the Refresh button at the bottom of the page.
Note
If either Synchronize with computer or Synchronize with NTP Server have been selected in the
Setting camera time section it will be necessary to confirm the change settings and reboot the
camera. You will have to log back in to the IP Dome when it restarts, Follow
Procedure 3-4
Logging in to the IP Dome.
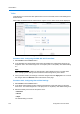
Procedure 6-31 Configuring the Time Zone and Daylight Savings
1 Select Date Time from the Networking menu.
2 In the Time Zone section use the check box to enable or disable Automatic Daylight Savings.
The default setting is disabled.
3 Select the Time Zone from the drop-down menu. The default is ‘(GMT) Greenwich Mean Time’.
4 Once you have chosen your settings, to save the changes select the Apply button or to cancel
the changes select the Refresh button at the bottom of the page.
5 When Apply is selected you will be prompted to confirm the change settings and reboot the
camera. Select the OK button to confirm or the Cancel button to stop the change and reboot.
If OK was selected you will have to log back in to the IP Dome when it restarts, Follow
Procedure 3-4 Logging in to the IP Dome.
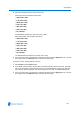
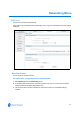
Setting Camera Time
Use this section to set the time on the camera.
Procedure 6-32 Setting the Camera Time
1 Select Date Time from the Networking menu.
2 In the Setting Camera Time section select your method of setting the time by checking one of
the radio buttons: