
Installation Instructions
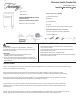

Vanity Top x1
Vanity Base x1
OVERALL DIMENSIONS of Cabinet
with Vanity Top:
33-1/2”H x 18-1/4”W x13-5/8''D
Faucet and drain not included.
Florence Vanity Combo Set
SKU 6050055, 56, 57
Installa on Instruc ons
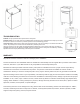
Tools required for assembly:
(A) Philips Screwdriver
(B) Silicone
(C) Tape Measure
(D) Level
(E) Electric drill with #2 drill bit and Phillips drive bit
Estimated installation time: 2-1/2 hours
(including removal of old vanity if applicable)
Included accessories:
WARNINGS & CAUTIONS
CARE & MAINTENANCE
WARNING: • To maintain the beauty of the furniture finish, avoid placing the
Two people are required for safe installation. Take extra
precautionary measures to ensu
re a secure grip on the vanity
base and top when lifting.
CAUTION:
• The bathroom floor and wall must be finished prior to
installation of the vanity base and top.
• Do not use water that exceeds temperatures of140°F/46°C.
• Do not place any sharp or abrasive objects on the bare surface
of the vanity top.
vanity in direct sunlight.
• Av
oid exposing the vanity to extreme temperatures by installing
away from heat and air vents.
• Dust frequently with a clean, soft and dry cloth.
• Wipe away a
ny water or liquid spills on the vanity base immediately
with a clean, soft and dry cloth.
INSTALLATION
Step 1: Fix the legs(FFx4) on the bottom of the vanity with the screws(DDx16). Then place the vanity in the desired position taking
into account the location of your plumbing.
Step 2: Adjust the screws of the legs to level your cabinet from front to back and side to side. Use level for accurate
reading as improper shimming may cause your vanity to wobble and become misaligne
d resulting in twisting of the cabinet.
Step 3: Remove door handle (EEx1) that are pre-installed on the back side of the drawers and re-install them on the front
of the drawers with their original matching screws(AAx2) using a Phillips screwdriver.
Step 4: Measure two correct hole positions on the wall according to the two holes on the back of the cabinet. Drill holes,
place the cabinet to the wall according to the two holes, then put wall anchors(CCx2) in and drill screws (BBx2) into wall
anchors(CCx2).
Step 5: Place the vanity top centered on the cabinet. For additional stability, use clear silicone to secure the vanity top onto the
cabinet. Apply silicone sealant around the top of cabinet. Place and position vanity top on cabinet and let it cure.
Philips
Screwdriver
Silicone
Sealant
Tape
Measure
Level Electric Drill
AA x 2 BB x 2 CC x 2 DD x 16 EE x 1 FF x 4