
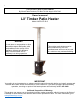
Instructions / Assembly

4
Never use petroleum based flammable vapors or liquids in or near this heater.
Warning:
When the heater is to be operated in the presence of other people, the owner/purchaser is required to
inform people unfamiliar with the operation of the patio heater of the instructions, and of the hazards
involved of operation. If this heater is used in a commercial or rental installation, it is the responsibility
of the purchaser to check with the local codes for properly acquainting users with the safety
precautions and instructions.
Failure to comply with the precautions and instructions provided with this heater can result in death,
serious bodily injury and property loss or damage from hazards of fire, explosion, burn, asphyxiation,
or carbon monoxide poisoning. Be sure you understand all operation instructions before attempting to
operate or service this heater.
Fuel Considerations:
Your pellet stove is designed and tested with premium grade pellets that comply with Pellet Fuels
Institute standards. You can only burn premium grade pellets in this heater (minimum 40 lbs density
per cubic feet, 1/4” to 5/16” diameter, with a length no greater than 1.5”, not less than 8,200 BTU/lb,
moisture under 8% by weight, ash under 1% by weight, and salt under 300 parts per million).
Pellets that are soft, contain excessive amounts of loose sawdust, have been, or are wet, will result in
reduced performance and may cause damage to your heater. Store your pellets in a dry place. DO
NOT over-fire or use volatile fuels or combustibles to increase heat output, doing so may cause
personal and property damage hazards.
For help with assembly, visit our YouTube channel: Wood Pellet Products and find our timber
heater assembly - Big Timber & Lil Timber Models. You will also find a maintenance video we
recommend you watch as well.
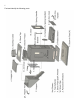
1. Assembly
Note: Partial assembly has been done for you. Use this assembly guide as an example for the
remaining parts. The assembly of this heater requires basic mechanical skills. Proper assembly is the
responsibility of the purchaser. All service and repairs should be done by a qualified person.
Tools required for assembly are:
Phillips Screwdriver / Drill with Philips bit.
Crescent Wrench
1.1 Unpacking
Carefully remove all parts from the box. The paint on the heater is not fully cured until after you fire
the unit on its initial firing, so use care when handling painted parts.