
Installation Guide
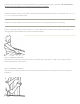

Add new pieces of wainscot by pushing the grooved edge onto the tongue of piece already applied. (See Figure 2.)
Make sure first piece is plumb. Secure first piece by nailing close to the grooved edge with 1” finishing nails. (See
Figure 4.) Also, nail first piece at an angle on lap of plank so nails will not show. Contractor’s glue can also be used.
Continue to nail additional pieces through the lip. Leave approximately 1/32” between pieces to allow for
expansion/contraction. As you are working, check frequently for plumb with level or tape measure.
When you come to a corner, rip the piece to the proper width. Secure with 1” finishing nails. For a stronger bond, use
combination of nails and glue.
STEP 3: WAINSCOT CHAIR RAIL
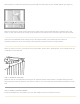
Wainscot chair rail is installed after securing the 32” wainscot and the wainscot base. It is applied with grooved lip
facing down above the 32” wainscot. (See Figure 3.) Nail on 16” centers. Nail into studs whenever possible for secure
hold.
STEP 4: INSIDE & OUTSIDE CORNERS
Finish the installation by using inside corner trim and outside corner trim to finish all corners.