
Installation Guide

Expansion and contraction are inherent characteristics of solid wood products due to humidity. The manufacturer
cannot be held held liable for contraction and expansion of planks.
If walls are cracked, uneven or extremely rough, planks should be glued and/or nailed to a framework of 2” x 4”, 1” x
3” or 1” x 4” strips of kiln-dried wood.
If walls are in good condition, glue and nail wainscot directly on existing drywall, plywood or paneling.
Note: In rooms with extremely high moisture (e.g. saunas, bathrooms or laundry areas), apply a vapor barrier, ex. 4
mil polyethylene placed between the studs and wainscot/planking.
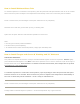
STEP 1: WAINSCOT BASE TRIM
Nail base trim to wall with grooved side up using 1” finishing nails. (See Figure 1.) Nail on 16” centers to studs
wherever possible for a secure hold.
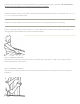
STEP 2: WAINSCOT/ PLANKING
Start with grooved edge toward corner. Leave about 1/8” space between your first piece and corner, allowing for
expansion.