
Installation Instructions
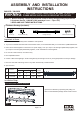
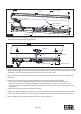
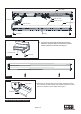
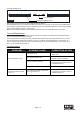

Fig.2
Fig.3
Aluminium Plate
LED Strip
Female Connector
Male Connector
Female Connector
Male Connector
Wire Nut
Wire Nut
Fixture Plate
Fixture Plate
Set Screw
Ceiling
Outlet Box
Anchor (A)
Dry Wall Screw (B)Key hole slot
2. Unscrew two set screws and then remove the aluminium plate. Unplug the connectors to separate the terminal
wires and grounding wire inside the light fixture.
Page 2 / 6
3. Attach the fixture plate to the location where you want to install, mark the target where is for two anchors to secure
fixture plate to the ceiling. Remove the fixture plate and drill two holes on the target, hammer the anchors to target
holes tightly, then secure the dry wall screws to anchors in part way. (See Fig.3)
4. Remove three wire nuts from three wires, then thread these three wires through the center hole of fixture plate.
(See Fig.3)
5.
Pull out the source wires from the outlet box. Make wire connections using wire nuts as follows:
---Connect the hot wire (usually black insulation) from the fixture to the black wire from the power source.
---Connect the neutral wire (usually white insulation) from the fixture to the white wire from the power source.
---Connect the fixture grounding wire (usually green insulation or bare wire) to the house grounding wire from the
power source.
Carefully put the wires back into the outlet box.
(See Fig.3)
6. Attach fixture plate to ceiling by inserting two dry wall screw heads into key hole slots, then slide the fixture plate
to left or right until the heads of the dry wall screw are located into narrow ends of the key hole slot. (See Fig.3)
7. Use a screwdriver (not included) to tighten the dry wall screws. (See Fig.3)