
Instructions / Assembly

ASSEMBLY INSTRUCTIONS
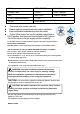
Preparation:
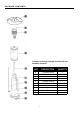
Before beginning assembly of product, make sure all parts are present. Compare parts with
package contents list and hardware contents above. If any part is missing or damaged, donot
attempt to assemble the product. Contact our customer service for replacement parts.
Estimated Assembly Time: 60 minutes
Tools Required for Assembly (not included):
Phillips screwdriver w/ medium blade. Leak Detection Solution.
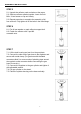
STEP 1
1-1. Place the three pcs post brackets on each position
on the base as shown in the picture.
1-2. Connect the post brackets to base with three M8 x
15MM screws.
STEP 2
2-1. Put the seamless tube on the top of three pcs post
brackets.
2-2. Connect the seamless tube to the post brackets using
six M6 x 35 MM screws and nuts ¢6. Tighten the screws
and nuts.
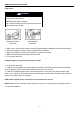
STEP 3
Place the cylinder housing on the base vertically.
STEP 4
4.1. Secure the 3 pcs pins (reflector support bolts)
on the cap of flame screen.
4-2. Fix the completed burner unit to the post by 4 pcs M6
x10 mm bolts.
6