
Installation Guide

SUPERIOR
Ridge Vent Systems
Handmade in the U.S.A.
SUPER RIDGE Series
©
Installation instructions
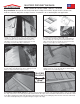
1. Make sure ridge line has a 3" slot, 1 1/2" each side of ridge
centerline. For ridge lines not prepared for Superior Ridge
vents cut slot with a circular saw and clean out debris. Set
saw depth to not cut the roof rafters. Stop the slot 12" short
of any ridge end, intersecting ridge or obstruction.
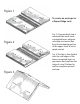
To create an end cap for a Super Ridge vent:
Fig. 1. A strip is removed from each lower corrugated layers
to create a flap. Fig. 2. The flap is then folded over the side
edges of the lower layers to provide an end cap. Center first
vent piece on the ridge, 1/2" from end of roof.
3. Continue applying Super Ridge Series vents, working from
the ends. Align center with previous pieces, making sure vent
matches roof pitch until entire ridge is covered.
4. Center shingle cap on vent and nail. Nail line for cap
shingles is to be 2" – 2 1/2" up from edge. Continue nailing
until all vent is covered with ridge cap.
FIG. 1
FIG. 2
Easy Installation: One person can easily install the 4 ft. ridge vent sections. All you need is a circular saw,
chalk line, hammer, utility knife and tape measure. Installation is for a standard gable roof application:
To install the optional wind deflectors, slide the deflector between the ridge vent and shingle until the ends are flush with
the edge of the vent. A 1 in. wide gap should remain between the edge of the vent and the wind deflector to allow air to flow
freely. Drive galvanized roofing nails through the wind deflector and roof sheathing at points 2 inches from each end and at
12” centers. Butt adjacent pieces together along the length of the ridge.
Super
Shield
Wind
Deflectors
©