
Use and Care Manual


4
SETTING UP THE CIGAR COOLER
1. When choosing a location to store the cigar cooler, be aware of the following:
a. Be sure that it is placed on a sturdy, level surface that is strong enough to support it when full.
b. Ensure there is at least 6-inches of space behind the cooler and 10-inces of space on either side. This will
ensure proper air ventilation.
c. It is not recommended to place the cooler on a carpet or rug.
2. Make sure the unit is level by rotating each of the bottom feet until it appears perfectly level and stable. You
may want to use a carpenter’s level to do this.
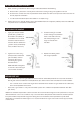
ATTACHING THE HANDLE
BEFORE FIRST USE
• When you first turn on the cigar cooler, or restart it after an extended period of non-use, there could be a
few degrees variance between the temperatures you select and the one indicated on the LCD readout.
- This is normal and it is due to the length of the activation time. Leave the cigar cooler on for a few hours,
and normal operation will resume.
• Place the cigar cooler in a dry, well-ventilated space with ambient temperature between 50°–80°F
(10°–26°C).
NOTE: If the ambient temperature is above or below the recommended range, the unit's performance may be
affected. Extreme cold or hot conditions may cause the interior temperature to uctuate. This will then prevent
the optimal interior temperature range from being reached. In addition, the temperature may uctuate
depending on whether the interior light is on or off, and whether the cigars are located on the upper, middle,
or lower racks.
1. Lightly pull away the door
gasket, being careful not
to remove it completely. It
is located on the inner left
side of the door where the
handle is to be installed. The
gasket is easily removed by
hand, no tools necessary.
2. Guide the two (2) included
screws through the pre-drilled
holes in the door until they
are entirely through. Then
align the handle with
the door.
3. Tighten the screws using
a Philips-head screwdriver
(not included) until the
handle sits flush and is
secured tightly against
the door frame.
NOTE: DO NOT over-tighten,
as this will cause damage t
o the handle assembly.
4. Replace the door gasket
to its original position.