
Installation Guide


For Additional Information – http://www.dingewood.com/
For Assistance Email: Sales.DingeWood@gmail.com
need predrilling. They should not be visible once inserted into the wood. Points should be diamond or
blunt.
HORIZONTAL APPLICATION
In horizontal application, start at the bottom and work up, with the groove edges facing downwards.
Leave a gap .5” at each wall to allow for expansion and contraction.
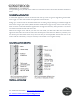
Siding up to 6 inches wide can be blind nailed with one siding nail per bearing toe-nailed through the
base of each tongue. (See Chart 3) Nails should be installed at an angle so they cannot work their way
back out of the wood. Nails should be applied with enough force that they must penetrate 1-1/4 inches
into solid wood and are flush with the wood.
Measure the length of the wall for your first row and install your first board. Butt the second board
against the first and work across the wall, until the final piece of the first row. Make any necessary cuts
for the last piece and install. Check every few rows that you are still parallel with the first row or the
wall. To fill the wall exactly, it may be necessary to fit a board or two together loosely.
NAIL INSTALLATION (CHART 3)
VERTICAL APPLICATION