
Installation Guide


Page | 9
Electrical Connections
Note: All electrical connections must be performed by a fully qualified electrician and in
accordance with each country's NEC (National Electrical Code).
Note: Make sure that all conductor sizes are at least 14AWG.
IMPORTANT! Tightly screw all connections to ensure good electrical contacts.
1. Install the electrical junction box or boxes, above floor level according to the local safety and
building regulations and codes. Place the following label or similar in the electrical cabinet
(service entrance panel) indicating that an under floor heating system is installed in the room.
2. Install the control thermostat as far as possible from any heat sources or heat sinks such as
fireplaces, chimneys, direct sunlight, windows, doors, or anything that could possibly affect
proper temperature readings. The suggested height for placement is 1.5m (5 feet) above floor
level.
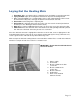
3. Install an electric conduit to the thermostat box as
shown on the diagram.
1. Thermostat
2. Junction box is not necessary in North America.
IMPORTANT! Make sure that the sensor does
Not touch any of the heating ribbons.
4. Measure the resistance of the heating mat / system
and record the value (See page 13). Make sure the
measured values are adequate for the resistance values
that are printed on the specific mat nameplate.
5. To ensure there are no grounding issues that will trip the
GFCI we recommend the use of a Megger tester. If you
do not have a Megger tester, then check the ohm readings of the each cold lead with the
ground wire. If it reads zero (0) there is no ground and you may proceed with the installation.
If there is an ohm reading in this case, the mat is damaged and must not be installed. You
will have to replace it.