
Installation Guide


Page | 10
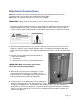
6. Feed the cold leads of each mat into the thermostat box. We suggest you mark each cold lead
with a number that corresponds to its mat. That way if there is ever a problem, you can easily
identify which mat it is. Make sure that you can see your label. Do not remove any labels that
maybe on the cold leads.
-Connect all leads of the same color.
-Connect the ground wire from the mat to the ground lead wire (green) of the house
via a UL approved conduit. Install and verify the following:
Black wire from the thermostat
Red wire (white wire for a 120V system) from the thermostat
Floor sensor wire from the thermostat
Black cold leads from the heating mats
Red cold leads (white cold leads for 12V) from the heating mats
Green wire for grounding
7. You should record and we suggest making a floor plan diagram that includes all the installed
heating mats, their specific location in the room and the numbers of the related cold leads.
8. Connect the wires to the control thermostat according to the wiring diagram on page 11.
9. Switch ON the heating system (see the directions in your thermostat manual) for half an hour
to ensure that the system is working properly. It is important to check each circuit system to
ensure that each mat is heating.
10. Switch OFF the heating system (see the directions in your thermostat manual).
11. When the mats are cool, you may begin to install your floor covering. We suggest you cover
the mats with a 3/8 inch thick self-levelling cement. Consult your local floor dealer or
manufacturer regarding the right self-levelling material for your type of floor
IMPORTANT!
If you are installing a glued type of floor covering, or using thin-set or grout or tile adhesive, do
not switch on the heating system again until the glue, thin-set, or grout or tile adhesive is
completely dry. Consult the material's manufacturer for the exact required drying time.