
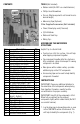
Instructions / Assembly


1. Use a garden hose to fill one or both basins
with water. Only fill the basins halfway with water.
2. Fill a second basin, if desired, with clean,
filtered play sand (NOT INCLUDED). Only fill
halfway with sand .
3. Add bubbles to the Bubble Maker. Press and
release the top button to turn On/Off.
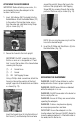
4. Secure the garden hose to the waterpark as
shown (Fig. 16).
5. Gradually opening the valve to the full
position. Allow water to flow through the
entire waterpark until it pours out of the spout,
into the Dump Bucket.
NOTE: The Dump Bucket may continuously
spin when the hose valve is fully open. This
step is just to fill the entire waterpark.
6. Gradually turn the valve counterclockwise to
release less water until a slow, steady stream
of water pours into the bucket.
NOTE: A good flow of water allows the bucket
to dump once every 25 - 35 seconds.
NOTE: Monitor the area around the waterpark
for puddles and move the waterpark
accordingly.
STORING THE WATERPARK
WARNING: Do NOT leave water in the bucket or
basins; empty after use.
IMPORTANT: Do NOT use or leave water in the
waterpark if temperatures fall below 32°F.
IMPORTANT: Do NOT attempt to move the
waterpark when it is filled with water or has
water/sand in the basins.
1. Turn the water supply to the OFF position.
2. Release the hose from the waterpark
connector (water will flow from the pipe).
3. Remove both basins and empty any water
basin.
NOTE: If sand is used in the second basin, the
first basin can be used as a cover to keep
sand clean.
4. Empty any water left in the Dump Bucket.
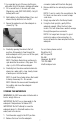
5. Using the front uprights, gently tilt the
waterpark upward, lifting the front a few
inches. This will allow excess water to escape
through the open hose connector.
NOTE: For longer term storage it is good
practice to release a few connections to
ensure all water has been emptied from the
waterpark.
For assistance please contact:
SmartPool LLC
687 Prospect St
Ste 460
Lakewood, NJ 08701
732-730-9880
info@smartpool.com
7
Fig. 16