
Instructions / Assembly


ATTACHING THE ACCESSORIES
IMPORTANT: Before attaching accessories, it is
recommended to place the waterpark in the
location it will be used.
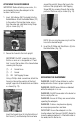
1. Insert AA batteries (NOT included) into the
Bubble Maker. Attach the Bubble Maker (CC)
to the center of the top lateral pipe, across
from the water and sand tables using Straps
(AA) as shown (Fig. 12)
2. Secure the Funnel to the front upright.
IMPORTANT: Do NOT screw into any pipe
that has a union or is designated as a "feed
line". Look at the location of the funnel before
screwing into the pipe.
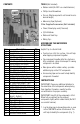
(1) A Funnel Hose
(1) C Funnel
(2) BB Self Tapping Screws
Using a Phillips head screw driver, attach the
funnel just above the coupling of the front
upright, opposite of the water and sand tables
as shown (Fig. 13).
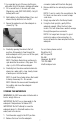
Insert the Funnel Hose (A) into the bottom of
the Funnel (C) and then wrap the hose twice
around the upright. Secure the hose to the
bottom of the upright with a Self Tapping
Screw (BB) by screwing through the inside
portion of the hose only as shown (Fig. 14).
NOTE: Scissors may be necessary to cut the
hose to the desired length.
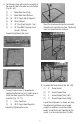
3. Insert the (2) Water and Sand Basins (E) into
the table frames (Fig. 15)
OPERATING THE WATERPARK
WARNING: Do NOT allow children to use the
waterpark unless there is proper supervision.
WARNING: NEVER leave children unattended
while the waterpark is in use.
WARNING: Do NOT leave water in the bucket or
basins; empty after use.
WARNING: Ensure all fittings are secure before
operating the waterpark.
WARNING Surfaces may become slippery,
ensure proper precautions are taken
IMPORTANT: Ensure the waterpark is in the
location where it will be used. Do NOT attempt to
move the waterpark when it is filled with water or
has water/sand in the basins.
6
Fig. 12
Fig. 13
Fig. 14
Fig. 15