
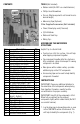
Instructions / Assembly


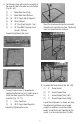


Insert Support Rod (D) into the Right Support
Arm (G) as shown (Fig. 8B).
Slide Dump Bucket (B) onto Support Rod (D)
as shown (Fig. 8C).
Slide Left Support Arm (F) onto Support Rod
(D) as shown (Fig. 8D).
9. Attach the Dump Bucket Assembly to the
waterpark structure as shown (Fig. 9).
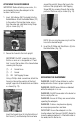
NOTE: The Dump Bucket should tilt slightly
toward the center of the waterpark. If it is tilting
away from the center, the bucket may be installed
backwards - please check the location of the
counter weight.
10. Connect the Bucket Feed Line
(Fig 10A and 10B).
(1) H Bucket Feed Line
Tighten the union from the Cross Feed Line
and secure the front end with the yellow
elbows from the Bucket Support Arms as
shown (Fig. 10)
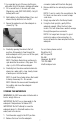
11. Connect the Bucket Spout (Z) to the Bucket
Feed Line (H) as shown (Fig 11A and 11B).
IMPORTANT: Turn from the bottom of the
spout, and do NOT over tighten. A snug fit is
all that is needed.
Ensure that the spout is in line with the Bucket
Feed Line and the center of the Dump Bucket
(Fig. 11B).
12. Using a rubber mallet (Do NOT use a metal
hammer), lightly tap all the non-glued
components together to ensure they are
secure and square. The assistance of a
second person to hold the opposing side
when tapping connections together will make
this step easier.
5
Fig. 8A
Fig. 8B
Fig. 8C
Fig. 8D
Fig. 9
Fig. 10
Fig. 11A
Fig. 11B