
Instructions / Assembly

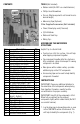


CONTENTS TOOLS (Not Included)
• Rubber mallet (Do NOT use a metal hammer)
• Phillips Head Screwdriver
• Scissor (May be required to cut Funnel Hose to
desired length)
• Measuring Tape (Optional)
Other Supplies/Accessories (Not Included)
• Clean, filtered play sand (if desired)
• (3) AA Batteries
• Water and Sand Toys
• Riding Toys
ASSEMBLING THE WATERPARK
STRUCTURE
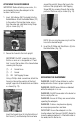
Helpful Tips to a Quick Build:
• Construct on a flat, firm surface - this will help
when tapping components together
• Tap components together after the structure is
fully assembled - easier to take apart if a wrong
component is installed
• Wear gloves with a rubber coating - provides
additional grip on the PVC components
• A measuring tape can be used to help identify
components if needed
INSTRUCTIONS
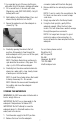
IMPORTANT: Please pay additional attention to
the orientation of the components when placing
them together. Connectors need to face the
correct direction for proper assembly.
IMPORTANT: Hand fit all the components at first.
When fully assembled, tap the unglued
components lightly with a rubber mallet (Do NOT
use a metal hammer).
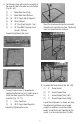
1. Lay the blue pipe in descending order, as seen
in the CONTENTS section of the manual. This
will help to identify the components (Fig. 1).
2
Item Description Qty
A Funnel Hose 1
B Dump Bucket 1
C Funnel 1
D Bucket Support Rod 1
E Water And Sand Basins 2
F Bucket Support Arm (Left) 1
G Bucket Support Arm (Right) 1
H Bucket Feed Line 1
I Table Upright With 4 Way 1
J Main Water Feed (Top) 1
K Main Water Feed (Bottom) 1
L Cross Feed Line 1
M 36" Pipe (Bottom/Table Support) 1
N 33.5" Pipe (Lateral Supports) 3
O 30.5" Pipe (Table Upright - Top) 1
P 24" Pipe (Front Upright - Top) 1
Q 17.25" Pipe (Table Support) 4
R 16" Pipe (Table Upright - Bottom) 2
S 12" Pipe (Table Support) 3
T Table Legs 2
U
24" Pipe With Coupling (Front
Upright - Bottom)
1
V 3 Way Tee (Purple) 2
W Elbow (Yellow) 3
X 3 Way Elbow (Red) 2
Y 4 Way Elbow (Green) 1
Z Bucket Spout 1
AA Bubble Maker Straps 2
BB Self Taping Screws 2
CC Automatic Bubble Maker 1