
User Manual

Installing LED strips:
1. Clean, degrease and dry the surface where the LED strip will be mounted.
2. Remove the protective paper and apply the strip. Gently press the strip to the mounting surface
until tightly glued (do not press LEDs, resistors, and controls). The surface where the strip is glued
must be solid and without breaks to avoid damages to the strip.
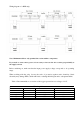
3. Connect the LED strip with wire supply every 5 meters (wiring diagrams of LED strips are
shown above).
4. The tape can be cut into 3 pieces with a minimum number of LEDs. Each cutting line is marked
by a black stripe and has two pairs of pads on both sides for further connection.
5. Soldering strip segments can be performed only at designated areas (they are marked as “+/-” or
“+ / RGB”). Soldering time should not exceed 10 seconds at a temperature less than 260 °C.
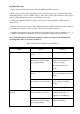
Note: Troubleshooting of problematic situations you may encounter when installing and
operating LED strips are described in Table 2.
Table 2. Fault List and Troubleshooting Methods
Major Faults and Troubleshooting Methods
Fault
Cause
Solution
The LED strip does not work
1. Power supply does not
work.
Replace power supply.
2. Short circuiting or
automatic protection against
power supply failure.
Cut out voltage from power
supply and cut out the strip
from power supply.
Find and clear the short
circuit.
3. Power supply fuse has
blown.
Replace the blown fuse with a
new one and replace the power
supply.
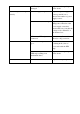
4. When connecting the stripe,
the polarity was not respected.
Connect the LED strip to the
power supply according to
polarity.
5. Power cable breakdown.
Restore the damaged contact.
A part of the LED strip does
not work
1. Parts of the LED strip are
not connected to each other.
Check and restore the
soldering at the joints of
segments of the LED strip.
2. Short circuiting or
automatic protection against
power supply failure.
Replace LEDs and a strip
segment with LEDs.