
Installation Guide

INSTALLATION INSTRUCTIONS
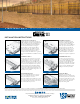
Prepare the Base Leveling Pad.
Excavate the base trench to the designed
width and depth. Start the leveling pad at the
lowest elevation along the wall alignment.
Step up in 8" (200mm) increments with the
base as required at elevation change in
the foundation. Level the prepared base
with maximum lifts of 6" (150mm) of well-
compacted granular fill (gravel, road base,
or ½" to ¾" [10 - 20mm] crushed stone).
Compact to 95% Standard Proctor or greater.
Do not use PEA GRAVEL or SAND for leveling
pad.
Install Fill & Compaction.
Provide ½"-¾" (10 - 20mm) clean
crushed stone drainage fill behind
the units to a minimum distance
behind the tail of one foot (300mm).
Fill all open spaces between units
and open cavities/cores with the
same drainage material. Proceed
to place backfill in maximum 6-8"
(150 - 200mm) layers and compact
to 95% Standard Proctor with the
appropriate compaction equipment.
Install the Base Course.
Place the first course of Keystone units end
to end (with face of wall corners touching) on
the prepared base. The receiving pin holes
should face upward, as shown. Make sure each
unit is level. Leveling the first course is critical
for accurate and acceptable results. Keystone
recommends minimum embedment depth
for below grade placement of Keystone units
on a ratio of 1" (25mm) below grade for each
8" (200mm) of wall height above grade or one
unit, whichever is greater.
Install Additional Courses.
Place the next course of Keystone
units over the fiberglass pins, fitting
the pins into the triangular shaped
receiving hole in the units above.
Push the units toward the face of the
wall until they make full contact with
the pins. Continue backfilling and
building to desired top elevation.
Insert the Fiberglass Pins.
Place the straight fiberglass pins into the
holes of each Keystone unit as required.
Once placed, the pins create an
automatic setback for the additional courses.
Place pins in the front holes for near vertical
(
1
⁄8" or [3mm]) setback and the rear holes for
1
1
⁄8" (29mm) setback per course.
Capping the Wall.
Complete your wall with the
appropriate Keystone capping units.
With units dry and clean, use exterior
construction grade adhesive on the
top surface of the last course before
applying cap units. Backfill and
compact to finish grade.
STEP 1
STEP 2
STEP 3
STEP 4
STEP 5
STEP 6
III
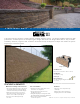
STRUCTURAL WALL | KEYSTONE COMPAC
®
III STRAIGHT SPLIT
©2017 Keystone Retaining Wall Systems LLC
Keystone Retaining Wall Systems LLC • A Contech Company
4444 West 78th Street • Minneapolis, MN 55435
(952) 897-1040 • www.keystonewalls.com
Note: If drain tile is required for your project, consult an engineer or visit www.keystonewalls.com/resources for more information.