SM1050 Walk-behind Sweeper USER MANUAL www.sanitmax.
CONTENT 1. Security ·································································································1 2. Machine structure instruction······································································3-5 3. Technical parameter ···············································································6 4. Battery safety requirement ·········································································7 5.
Security: The following symbols indicate potential hazardous conditions. It is particularly important to read the instructions with regard to necessary measures of precaution and protection. The essence of the manual is to prevent the danger of accidents, and most of accidents are occurred during to carelessness about safety operation rules. The best guarantee of getting away from accidents is that the users are careful and cautious, which is better than other prevention.
5. the reason why it is strictly prohibited to cleaning the wire rope, belts, high temperature sundry, water, flammable or poisonous and harmful material is to avoid the winding, burning the main brush and the side brush, to make it can't work normally. 6. It is prohibited driving in more than a steep slope or high-speed road meanwhile be careful with sharp corners. 7.
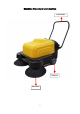
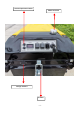
Machine Structure Introduction Push Handle Solid Tire Side Brush -3-
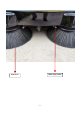
Overload protection switch Water Tank Inlet Charge interface Dustbin -4-
Sweeping Sweeping Water spray nozzle Side brush -5-
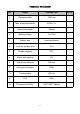
Technical Parameter No NAME PARAMETER 1 Sweeping width 1050 mm 2 Max. area performance 4200㎡ /h 3 Main brush length 445mm 4 Battery voltage 12v/73Ah 5 Battery kind Lead-acid battery 6 Continue working time 3-4 h 7 Dustbin capacity 35 L 8 Water tank capacity 15 L 9 Side brush diameter 420 mm 10 Driving motor power 550w 11 Turning radius 500 mm 12 N.
Battery safety requirement 1. The battery is not allowed to work in a low voltage state, charge the battery immediately once the low voltage alarms. 2. Free maintenance battery and no need of adding electrolyte. 3. To avoid leakage, please keep the battery dry; clean, especially to avoid erosion of pollutants like metal powder. 4. The metal part such as the tool is banned to place on the battery so as to prevent burning out the short-circuited battery. 5.
Stop Operation 1. Turn off the key button. Empty the dustbin 1. Stop and clean filter . 2. unlock hook of dustbin 3. Pull the dustbin downward, then drag out to empty. 4. Put the dustbin back inside the machine and fasten the locking buckle of dustbin. 5. Finish routine examination for the next work. 6. Push or drag machine After operation Please perform the operation before leaving the machine when finish working. 1. Use adjuster to raise the side brushes. 2. Use red button to clean dust in filter. 3.
Maintenance schedule Maintenance operation Before first using Every 10 10 Every50 10 Every100 10 Every200 hours hours hours hours 10 Every400 10 hours Check the height of side brushes and main brushes by adjusting Whether main brushes and side brushes are winded by the cable or wire material Check whether the garbage filtering is cleaned completely Trial operation and check isolate leather Oil lubrication point Check the vibration filter The drive belt of main brushes Check screws or Screws cap bei
Be careful! The normal operation of the machine will be affected if the trace of the brush is more than 5cm, and spare parts will be hot, therefore shorten service life of the machine. Replace the main brush Be careful! Please wear gloves to prevent being scratched when replacing main brushes. 1. Park machine on flat ground 2. Stop sweeping function. 3. Turn off the key 4. Open left side door (Picture 9) 5. Screw off B 6. Screw off 1、2 nut。 7. Screw off 3、4、5、6 nut. 8. Pull out broom A. 9.
11. Install new main brush like picture 10. 12. Install round plate and nuts 13. Close left side door. 14. Check and adjust the height of main brush . Picture 10 Picture 9 Notice: Check and adjust the height of side brushes 1.Check side brush height by follow procedure: A. Operate the machine on the flat road. B. Keep the machine stop and run side brush for a few second. C. Rise side brush, move the machine and then stop the machine D.
2. Press brake pedal 3. Turn off key 4. Open left side door 5. Adjust bolt A to make B fall to suitable position (Picture 12) 6. Lock bolt B 7. Check brush side again 8. If the brush is abrasion, need to change . Picture 12 Replace side brush Be careful! Please wear gloves to prevent being scratched when replacing side brushes. 1. Park machine on flat ground 2. Turn off key 3. Screw off nut A (Picture 13), and press brush to remove it 4. Change new one and tight nut A 5.
Machine fault and troubleshooting Problem Possible Reason Solution The key on “on” position, but the machine doesn’t move Battery wire broken Connect wire again Handbrake is working Loosen handbrake Travel switch broken Change travel switch Contactor is not connected Reset contactor Main brush doesn’t get down Bring down main brush Contactor is not connected Reset contactor Battery no power Charge battery .