
Instructions / Assembly

STEP 3: BOTTOM RING ASSEMBLY continued
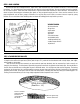
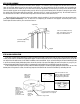
D. Check the roundness of your circle by measuring diameter across in several locations. Since the rails do not automatically form a
true circle, DO NOT SKIP THIS STEP! Otherwise, you might end up with a slightly oval shape, which can cause problems later on.
Once you have formed a true circle, stake the bottom rails at every other rail with a screwdriver, being careful not to scratch the rails.
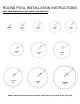
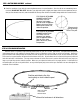
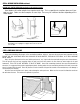
FOR POOLS WITH ODD
NUMBER of BOTTOM
PLATES or CUFFS:
Measure from bottom
plate to center of opposite
bottom rail at every other
bottom plate. When true,
stake into position.
FOR POOLS WITH EVEN
NUMBER of BOTTOM
PLATES or CUFFS:
Measure from bottom
plate to opposite bottom
plate at every other
plate. When true, stake
into position.
Measurements
must go through
center of the pool.
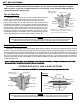
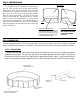
STEP 4: PATIO BLOCK INSTALLATION
Once the frame is in position, begin centering bottom plates or cuffs on 2”x8”x16” patio blocks. Sink patio block into ground
under bottom plate or cuff, making sure that the block is level in all directions (side to side as well as front to back). Repeat this
step around the frame making the tops of all blocks level with the ground. Do not install blocks or rails on loose sifted soil or sand.
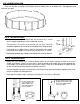
There must be no space between the ground and the bottom of the rails. All patio blocks must be flush with the ground, solid and
level with each other in all directions. You may remove a bottom rail at this time to cart in sand or sifted soil for the cove (step 9) as
long as your pool ring remains staked in position. Make sure you replace the bottom rail in its proper position. A chalk outline of
the bottom plates or cuffs on the patio block is an easy and temporary way to ensure that your track does not move throughout the
remainder of the installation.
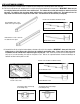
Position patio blocks like this,
leaving only an inch inside the pool.
Make sure pool
is level from
block to block.
1"
6"
Check for levelness in all directions.