
Instructions / Assembly
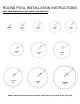

STEP 3: BOTTOM RING ASSEMBLY
A. Use your pool parts breakdown sheet to separate all pool components, becoming familiar with each part.
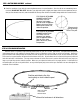
B. Take the curved bottom rails and place them in a circle along the circumference of the pool area. IMPORTANT: Make sure you
are using the bottom rails and not the inner stabilizer bars. The bottom rails on some pool models are made of resin and
not metal. The stabilizer bars are always metal and they have a male end and a female end. The bottom rails are the
larger width rails that have the straight cuts on both ends. The bottom rails do not interlock (see diagram.)
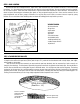
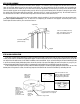
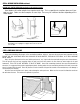
Please note the different bottom tracks.
Bottom Rail 1” x 5/8”. Used on
the bottom of the pool.
Resin Bottom Track
Metal Bottom Track
Inner Stabilizer 5/8” x 5/8”.
Used on the top of the pool.
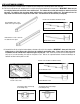
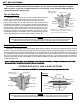
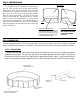
C. Assemble the rails by using the bottom plates or bottom cuffs to join them together. IMPORTANT: Some pools have resin
bottom plates or resin bottom cuffs rather than the traditional metal bottom plate. Please refer to your pool parts
breakdown sheet to confirm which component applies to your pool. Rails should be inserted into the bottom plates or
cuffs up to, but not exceeding, the stops on the plate or cuff. Rail can be squeezed between thumb and forefinger to
facilitate insertion into the plates or cuffs.
Please note the different bottom tracks.
Resin Bottom Track
Metal Bottom Track
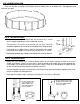
* Adjust rails in or out as necessary
to form a true circle.
The bottom rail is inserted up The bottom rail is inserted up
to the dimple only. to the dimple only.