
Instructions / Assembly

STEP 10: LINER INSTALLATION
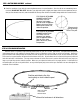
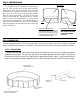
If you opted to use the stabilizers to help hold the
wall up, then you will need to take them off while
installing the liner. Do not place the liner wall seam
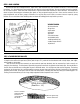
directly over the skimmer or skimmer return cutouts.
Place the liner at the center of the pool with the flap
from the seams facing down. (For print liners, leave
the print side facing up.) Spread the liner so that the
bottom seam of the circumference is resting on the
cove evenly around the pool. The seam should not be
upon the wall or shifted to one side. These conditions
will cause tightness or stretching of the liner when the
pool is being filled.
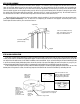
POOL WALL
COVE
COVE
CORRECT LINER SEAM
INCORRECT LINER SEAM
Resting evenly on or near the cove
Shifted up wall.
of the pool. Seam may not always
This should not be done.
lie on the cove as pictured, so your
Correct this situation
focus should be to keep the seam
if it occurs.
consistent around the pool.
STEP 11: HANGING LINER
There are a few different types of liners on the market today. The three most common liners are the Overlap, the Snap Bead,
and the V-Bead liners (Also referred to as J-Bead liners). Please be sure which one you have and follow the appropriate step below:
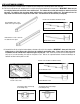
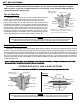
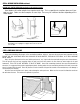
TYPE #1 – OVERLAP LINER:
Starting at the liner wall seam, hang the liner over the wall making sure that the seam is straight up and down,
perpendicular to the floor. This will assure you that the liner begins going over the wall straight. As you put the
liner over the wall you can secure it by using the plastic coping strips to keep it in place. If you end up with excess
material, continue around the pool, pulling excess liner evenly, and distribute over the wall until the excess is gone.
Liner wall seam
straight up and down
Liner overlapping
pool wall
Plastic coping installed at this
time to hold liner in place
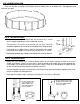
Outside
pool wall
Liner overlap
Plastic coping