
Instructions / Assembly

7(8/%HZ%9% (* /%-*Y8)%&'7(1001 (&* ' .
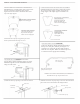
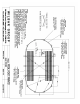
TWO PIECE RESIN TOP COVER WITH ATTACHMENTS ON
THE SIDES There is a straight support with a square cutout:
to fit the oval upright, instead of an angle support
supplied for the curved ends. It attaches the exact same
way as the angle support.
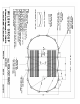
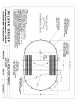
LARGE TWO PIECE RESIN TOP COVER WITH ATTACHMENT
IN FRONT: (DOES NOT INCLUDE 6”TOP RAIL POOLS)
The curved end angle support is slightly larger than the
straight support. The straight support is not filled in the
back.
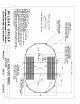
CURVED SIDE ANGLE SUPPORT:
Use on curved end upright.
TOP VIEW OF CURVED SIDE
ANGLE SUPPORT:
Larger than straight side
support. Has back wall.
Use on curved end uprights.
Back wall
STRAIGHT SIDE SUPPORT
Used on the straight side of
the pool-notice the square
cutout. Use on oval uprights.
Fasten bottom half of top cap to upright using #10 screws.
Secure top half to bottom half using #12 screws.
TOP VIEW OF STRAIGHT
SIDE SUPPORT:
Smaller piece that is
open in back. Use on
oval uprights.
No back wall
#12
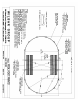
installation
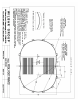
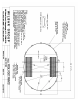
requires no hardware. Simply hook the back end of
the top cover into place, and use your fingers or a
screwdriver to gently flex the front tabs enough to
hook the cover in place. Make sure that the top cover
is centered over the upright when installing.
ONE PIECE RESIN CLIP-ON COVER: This
#10
small half over hole in
the top plate as shown and attach with a #12 screw.
Slide the large half over the small half and secure
using two #10 screws.
#12
#2
2 PC RESIN TOP COVER:Center
Side view of top
cover and top rail
Swing this end around and
gently flex tab into place.
Hook this
end first.
Bullnose rail is used for the illustration, but installation is
the same for all 1 pc. clip-on resin covers.
#10
1) Attach the inner top cap using a #12 Screw into hole #2.
#12 screw
Small Half
Inner Cap
2) Attach the resin outer Top Cap using a #12 screw into hole. Put the
grill over the screw when finished. See Diagram below.
#12 x 3/4” screw
Top Cap Grill
Curved and Top Cap