
Instructions / Assembly

7(8/%6]%9% /) 8/1)&':%(;8% -* Y8.
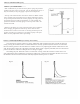
Using neutral alkalinity sifted earth or fine sand without pebbles, build a 3" base over the entire pool area to
protect the liner. Make sure that the straps and the pressure plates are covered entirely. If the base does not fully
cover the metal components, they will show through and will damage the liner. If using vermiculite or foam base,
you must have at least two inches of soil or sand on top of the straps and pressure plates. Vermiculite alone will
not properly cover these metal components, possibly allowing damage to the liner. Do not use any substance with
high alkaline or acid content, such as peat moss. It will cause the pool to corrode.
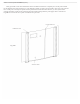
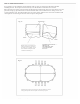
Next, using sifted earth or fine sand, build a 6" to 8" pool cove inside
the metal wall along the entire circumference. The cove will prevent the
liner from creeping under the wall and will also protect the liner from
any metal corners of the pool framework. THIS STEP IS NOT
OPTIONAL – IT MUST BE DONE! **IMPORTANT: If using foam cove,
install it on top of the 3” sand base. Since earth containing chemicals
can cause discoloration or corrosion, it is suggested that you place
polyethylene plastic sheeting under the cove around the perimeter of the
wall, so no earth comes in contact with the metal. Since the presence of
such chemicals is beyond the control of the manufacturer, such damage
is not covered by the warranty. The plastic sheeting will not prevent a
washout in the event that your liner is damaged. The plastic is only to
protect the metal framework of the pool from corrosion.
After the cove and base are in place, rake and tamp the entire pool area.
Make sure that no sand remains on the wall above the cove. This could
cause pinholes in your liner.
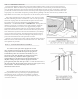
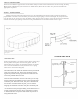
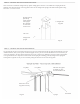
7(8/%6Q%9% -, )Y8+% 8' +%,/)&:;(%1778TB0G.
It is easiest to line up all of the uprights next to each
other. It helps to lean them up aga inst a fence or some othe r
sturdy object. On m ost models the top of the up rights can
be identified by either an extra hole in the middle, or b y an
extra hole on each side (depending on which pool you have )
for the decorator caps. Place the metal top plate on the
upright making sure the holes line up and the hooked part o f
the plate is facing the open end of the upright (the side that
goes against the pool wall). Now put a #10 x ½” screw in Put front screw of
the center hole only. Do not install screws in the two side top plate in loosely
holes until later. T his will make things easier a nd more
efficient later down the line.
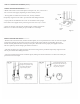
Top Plate
2”
8”
2345%]V
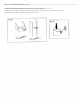
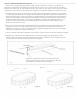
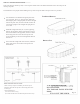
Now install the fence post holders onto the uprights,if you
have purchased a fence to go around your pool j#CC%#CL= <=$C
3@#$<"I$3? @ #a. If not, or when that is completed, you should
line the uprights around the pool at every bottom plate for your
convenience later on.
Upright