
Instructions / Assembly
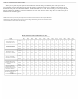

7(8/%6[.%h100%m*&'(%1778TB0G
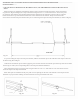
*** hC%!=@"S=I$"<C%$P?%>3SSC<C@$%M3@>#%?S%P=AA%e?3@$%=##C!OA3C#5%*@C%K=#%=%#3!4AC%<? P %?S%O?A$#%P3$K%P=AA
%%%%O=<#N%=@>%$KC%?$KC<%3#%=%#$= 44C<C>%>?"OAC%<?P%L=$$C<@%P3$K%P=AA%O=<#5%/AC=#C%IKCIM%PK3IK%>C#34@%J?"<
%%%%L??A%K=#%=@>%S?AA?P%$KC%=LL<?L<3=$C%3@#$<"I$3? @# % OCA?P5
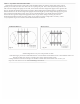
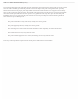
Type #1 Single Row
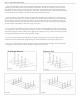
the sidewall, make sure that the strips do not touch each other. One
bar must be inside the pool (the bolts will touch this bar) and one bar
must be outside the pool (the nuts will touch this bar). Insert the bolts
with the bolt head to the inside and the nuts to the outside of the pool.
Do not tighten until all bolts have been inserted. If your screwdriver
slips and scratches the head of the bolt, file the scratch smooth so that
it cannot puncture the liner. It is recommended that you cover the
heads of the bolts, on the inside of the wall, with three layers of duct
tape. If the insertion of the wall in the bottom rail is tight at the point
where the wall is joined together, insert a screwdriver and twist to
make enough room, again being sure not to ratch the wall or the
bottom rail.
IMPORTANT-This operation must be done carefully! When joining
Wall Bar
2345%[_
REMEMBER:
ALL NUTS SHOULD BE AS TIGHT AS POSSIBLE USING HAND TOOLS. BARS MUST NOT TOUCH EACH OTHER. EVERY HOLE FROM TOP TO BOTTOM OF THE
WALL/WALL BAR SYSTEM MUST HAVE A SECURELY TIGHTENED NUT AND BOLT. IF THIS IS DONE INCORRECTLY YOUR POOL WILL BREAK!
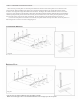
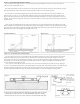
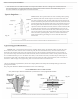
Type #2 Staggered Bolt Pattern
IMPORTANT - This operation must be done carefully! When joining the sidewall, make sure that the strips
do not touch each other. One bar must be inside the pool (the nuts will touch this bar). Insert the bolts with the
bolt head to the inside and the nuts to the outside of the pool. Do not tighten until all bolts have been inserted. If
your screwdriver slips and scratches the head of the bolt, file the scratch smooth so that it cannot puncture the liner.
It is recommended that you cover the heads of the bolts, on the inside of the wall, with three layers of duct tape. If
the insertion of the wall in the bottom rail is tight at the point where the wall is joined together, insert a screwdriver
and twist to make enough room, again being sure not to ratch the wall or the bottom rail.
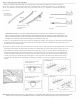
n%&S%J?"%=<C%!3##3@4%=@J%K=<>P=<CN%>?%@?$%AC=DC%C!L$J%K?AC#%3@%$KC%P=AA%e?3@$%=##C!OAJ5%+?3@4%#?%P3AA%I="#C
J?"<%L??A%$?%O<C=Md
7CC%J?"<%L??A%>C=AC<%S?<%=>>3$3?@=A%K=<>P=<C%3@%$KC%I=#C%?S%#K?<$=4C5
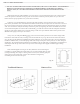
STAGGERED BOLT WALL BAR SYSTEM
* Every hole from top to bottom of wall/Wall bar system must have a securely tightened nut and bolt. *
2345%[`
REMEMBER:
ALL NUTS SHOULD BE AS TIGHT AS POSSIBLE USING HAND TOOLS. BARS MUST NOT TOUCH EACH OTHER. EVERY HOLE FROM TOP TO BOTTOM
OF THE WALL/WALL BAR SYSTEM MUST HAVE A SECURELY TIGHTENED NUT AND BOLT. IF THIS IS DONE INCORRECTLY YOUR POOL WILL BREAK!