
User Manual

-10-
INSPECTION, MAINTENANCE AND CLEANING
1. WARNING!! Make sure the Air Brush is disconnected from its air supply before perfo-
rming any inspection, maintenance or cleaning procedures.
2. BEFORE EACH USE, inspect the general condition of the Air Brush. Check for loose
connections and condition that may affect its operation. Do not use damaged equipment.
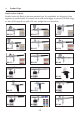
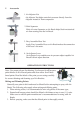
3. Cleansing after short term use: after using the Air Brush, always spray thinner or water
(depending upon the type of paint used) through the Air Brush until it is completely cl-
ean. Make sure the Air Brush Cup and Jar are thoroughly cleaned (see fig 1).
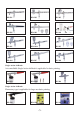
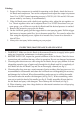
4. Cleansing after long term use: certain amount of paint residues after long term use, it is
recommended to disassemble and clean the Air Brush to avoid degrading the accuracy
and damage the Air Brush. When disassembling, make sure not to collide the needle.
Use brush washes the needle with detergent (see fig 2 & 3). When assembling, make
sure not to touch the head of the needle (see fig 4). Finally assemble all parts back to
the Air Brush and spray with detergent. Then clean up the Air Brush (see fig 5).
4). When cleaning, spray into a large bucket or other metal container to avoid spraying
into the environment.
FIG 1 FIG 2 FIG 3 FIG 4 FIG 5
Painting:
1. Proper oil free compressor is needed for operating an Air Brush. Attach the hose to
Air Brush and compressor. Turn on the compressor and adjust the output air pressure
from 15 to 50 PSI. Normal operating pressure is 20 PSI. (AS-18A and AS-186 com-
pressor made by our factory is recommended.)
2. If the Air Brush comes with a built-in air regulator valve, adjust the air regulator va-
lve. The air regulator valve can be adjusted from 15 to 50 PSI. Since there is no pre-
ssure gauge, you will have to test the Air Brush until the desired pressure is reached.
3. Remove the protective cap on the Air Brush.
4. On the Air Brush, gently pull the trigger back to start spraying paint. Pull the trigger
back more to increase paint flow, less to decrease paint flow. You can also adjust the
flow using the adjusting screw, tighten it to increase flow, loosen it to decrease or
shut off flow.
5. Always do a test spray before starting on your project.