
Operation Manual


7
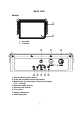
Basic operation
1. IMPORTANT: When connecting the camera to the Monitor the power
must be off .
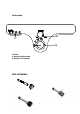
2. Screw the camera to the reel cable connect the reel to the Monitor (See
Figure 1-B).make sure the camera lens is clean.
3. Press the switch on the monitor and DVR will work after five seconds.
Gently insert the camera into a pipe duct, etc and reel out the cable until it is at
the desired depth.
IMPORTANT: Avoid kinking the fiberglass cable as this will cause irreversible
damage. Do not bend under sharp angles and do not twist the cable.
NEVER use the camera and/or cable as an unclogging tool.
4. adjust the led bright knob to suitable position 。
Press the MENU button to enter the setup of the monitor. Move through the
setup page using the select button and adjust the values with the UP and
DOWN buttons. Press and hold the UP and DOWN buttons to increase
setting speed. Following values can be set between 0 and 100:
bright-contrast- color –languge-6:9 - 4:3-sleep)
5. To view the images on another screen (not incl.) connect that screen
with a video cable (not incl.) to the VIDEO OUTPUT on the control box.
6. After use, switch the power off, carefully retract the camera from the
inspection area. Clean the cable and wind it back on the reel. Disconnect
all cables and place the protective caps back on the connectors. Make
sure the camera and cables are clean and dry before storing them back
in the case. Use a clean, soft and dry cloth to clean it .
7. Storage and cleaning
• Always return the equipment back to its protective case when not in use.
• Do not close the case with wet equipment inside as this will increase the risk of
mould.
• Clean the rest of the equipment with a clean dry cloth. Never use solvents or
abrasive solutions.
Fuse
1. The fuse and fuse cap on battery box are not assembled during
shipping, please relocate the fuse with cap to the fuse holder first before
use.
2. If the status LEDS on the control box don’t light up after switching on the
battery box, check the fuse.